IIS 7.5 and IIS 8.0 European Hosting

BLOG about IIS 7.5 Hosting, IIS 8.0 Hosting and Its Technology - Dedicated to European Windows Hosting Customer

IIS Hosting Europe - HostForLIFE :: Internet & Web IP Address and Domain Restrictions in IIS 8

clock September 24, 2021 08:03 by author Peter

This article covers how to configure Dynamic IP Restrictions.

Introduction
IP Address and Domain Restrictions is one of the great built-in features of IIS 8. Configuring this feature allows a website administrator to selectively permit or deny access to the web server, websites, folders or files that makes your server more secure. One can configure and set the limits based on specific IP address(es) or frequency of requests from a specific IP over a period of time. By default all the clients requesting the website are permitted all access unless specifically rejected.

Background
This feature was available in previous versions of IIS where you can block one IP or range of IP addresses. The disadvantage in this was first you need to know the person doing suspicious activity on your website based on the tools like Log Parser for checking the site logs then you can just block that IP or range of IP addresses using Deny Rules. Most of professional attackers (hackers) will use a variety of IPs from proxy servers so by the time you've blocked a handful a new range could be starting up.

Installing IP Address and Domain Restrictions in IIS 8
This feature is not installed by default. One must install the feature from the Turn Windows features On and Off window.

For that use the following procedure:

Open the Control Panel.

Click on the Programs feature.

In that Click on Turn Windows features on or off under Programs and Features.

Install the required features.

Configuring IP address and Domain Restrictions in IIS Manager
Open the IIS Manager. (Click WIN+R, enter inetmgr in the dialog and click OK. Alternatively, search for IIS Manger in the Start window).

Click on the IP Address and Domain Restrictions feature in the feature pane under the IIS section.

Once you opened this feature, you will see a window as in the following image.

The Action Pane elements are the elements used for defining the rules for allowing or denying the specific IP address(es). Let's have a deeper look into each of these elements.

Edit Feature Settings

  • This action is used for specifying the default access to all unspecified clients in Add and Deny rules.
  • On clicking this action, it will open up a window as in the following image.


  • Select Allow in the Access for unspecified clients dropdown if you are to allow all clients by default else select Deny.
  • If you want to configure rules based on the client's DNS name then check the Enable Domain Name Restrictions checkbox. If you click on OK to save the settings when this checkbox was checked then it will show a warning (as in the following image) that states that doing DNS lookups is a potentially expensive operation. Click on Yes to enable DNS lookup restrictions.

  • If you want to enable the requests that come through a proxy server then check Enable Proxy Mode checkbox.
  • Choose the Default Deny Action Type for sending the response to clients when you are denied a request. It can be either Unauthorized (401), Forbidden (403), Not Found (404) or Abort the request.
  • Once you have selected your options click on OK to save the settings.

Add Allow/ Deny Entry

  • These two action types are used for defining the rule for allowing or blocking the specific IP address or range of IP addresses.
  • On clicking the action, it will open one window as provided in the following image.

  • To create a rule for a specific IP Address, select Specific IP Address and enter the client IP address in the provided TextBox.
  • To create a rule for a range of IP addresses, select IP address range and enter the subnet and subnet mask in the provided textboxes. For example, to permit access to all IP addresses in the range from 192.168.8.0 to 192.168.8.8 then enter the subnet as 192.168.8.0 and subnet mask as the 255.0.0.0.
  • If you have enabled Domain Name Restrictions in the feature settings, then you will be able to set restrictions based on DNS names else this option will not be available. To create a rule for a client domain name, then select Domain name and enter the DNS name.
  • After entering the details click on OK to add the rule.

Edit Dynamic Restriction Settings

  • This is the new feature that came with IIS 8.
  • On configuring this feature one can secure their web applications from automated attacks like Dictionary attacks.
  • This action allows to dynamically determine whether to block certain clients, based on number of concurrent requests at a time or number of requests over a period of time.
  • On clicking this action, it will open a window as provided in the following image.

  • If you want to restrict the client based on a number of concurrent requests, then check the Deny IP Address based on number of concurrent requests check boxand enter Maximum number of concurrent requests count in the provided TextBox.
  • If you want to restrict the client based on number of requests over a period of time, then check the provided checkbox and enter the details in the provided textboxes.
  • Check the Enable the Logging Only Mode checkbox if you want IIS to log requests that would be rejected.

View Ordered List

  • This action is used for changing the rule priority.
  • On clicking this action, you will be able to see the screen that is showing rules places in the order and with multiple action elements as provided in the following image.

  • Rules located at the top of the list have higher priority.
  • Use Move Up and Move Down actions to change the priority of the rules.
  • Once you are done with changing the order of the rules then click on View Unordered List to return to the screen that allows you to add and remove rules.

Remove

  • This action is used to remove the rules that are not required.
  • To view this action click on any of the rules in the feature pane and then click on Remove to remove the rule.
  • On clicking Remove, you will get a warning as in the following image. Click on Yes to remove the rule.

Feature pane elements that give the information about the rules are applicable to the current web site or virtual application.

Mode

  • This displays the type of rule. It contains the values, either Allow or Deny, that indicates whether the created rule is to allow or deny access to content.

Requester

  • This displays the specific IP address or range of IP addresses or domain name defined in the Add Allow/Deny Restriction Rule.

Entry Type

  • This displays whether the item is local or inherited. Local items are added in the current application level and inherited items are added from a parent application level.


IIS 8 Hosting Germany - HostForLIFE.eu :: WordPress on Windows Server 2012 with IIS 8 and SQL Server 2012

clock October 18, 2019 11:09 by author Peter

Yesterday I decided to install WordPress for my new blog, both because it seemed like good product for the job and also to get some experience in running it (and thus also PHP) on Windows Server 2012 with IIS 8 Hosting. There are some good resources scattered around the web, but none seemed up to date, so I decided to share my notes from the install on here. I’m assuming you already have Windows Server 2012 and SQL Server 2012 installed.

IIS 8 CONFIGURATION
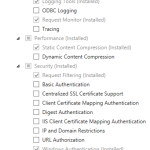
The configuration of IIS 8 is quite easy: you just enable the Web Server role through Server Manager. Just to be complete, the screenshot below shows the options I currently have installed, but keep in mind that I’m also running ASP.NET on my server.
Yesterday I decided to install WordPress for my new blog, both because it seemed like good product for the job and also to get some experience in running it (and thus also PHP) on Windows Server 2012 with IIS 8. There are some good resources scattered around the web, but none seemed up to date, so I decided to share my notes from the install on here. I’m assuming you already have Windows Server 2012 and SQL Server 2012 installed.

IIS 8 CONFIGURATION
The configuration of IIS 8 is quite easy: you just enable the Web Server role through Server Manager. Just to be complete, the screenshot below shows the options I currently have installed, but keep in mind that I’m also running ASP.NET on my server.I also highly recommend you install PHP Manager (http://phpmanager.codeplex.com/) as it will help us in enabling/disabling PHP extensions from within IIS Manager later on and provides an easy way to access php.ini as well.

PREREQUISITE INSTALLATION
To make things easy, you can install and configure PHP quite easily using the Microsoft Web Platform Installer. When you run the Web Platform Installer (Web PI), you can do a quick search for “sql php” and it comes up a few results. When you select “Microsoft Drivers 3.0 for PHP v5.4 for SQL Server in IIS”, which is what we need, all other prerequisites will be automatically installed as well as dependencies (PHP and URL Rewrite for IIS).

After Web PI finishes, you will have PHP installed and configured for use in IIS. Time to do a little test to see if everything is running smoothly. Create a new file under C:\inetpub\wwwroot\ (or wherever your Default Web Site is pointing to) named test.php with the following content:
<?php echo phpinfo(); ?>

This will output information about your PHP configuration.

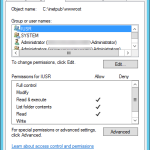
Time to try it out: navigate to the page (likely http://localhost/test.php). If you are greeted with a screen with purple blocks of information about your PHP configuration, you’re all set and you can skip ahead to the WORDPRESS INSTALLATION section. Chances are you’re going to be greeted with an IIS 403.1 error screen, however, which is due to the fact that the user account that IIS is currently using for the anonymous access to your site doesn’t have the proper privileges to access your wwwroot (or equivalent) folder on disk. This is solved quite easily by granting this user (called IUSR by default) access to the wwwroot folder through Windows Explorer or your other favorite method.
Retry and bask in the glory of the phpinfo() output.

WORDPRESS INSTALLATION

Now we can start downloading the actual WordPress files and start the installation. First off, grab the latest version (or the version of your choice) of WordPress. We will also need the WP Db Abstraction plugin. After downloading, unblock and unZIP both files in a folder under wwwroot (or your Web Site’s location). Installation of the WP Db Abstraction plugin is quite easy, just follow the steps outlined in the readme.txt:Upload wp-db-abstraction.php and the wp-db-abstraction directory to wp-content/mu-plugins. This should be parallel to your regular plugins directory. If the mu-plugins directory does not exist, you must create it.

Put the db.php file from inside the wp-db-abstraction.php directory to wp-content/db.php
Visit $your_wordpress_url/wp-content/mu-plugins/wp-db-abstraction/setup-config.php to generate your wp-config.php file

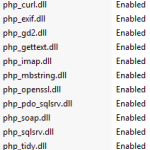
Before you perform the last step, though, go to IIS Manager and enter PHP Manager (it’s located on the Features page of your server under IIS). Scroll down and click the “Enable or disable an extension” link. You need to make sure that php_pdo_sqlsrv.dll and php_sqlsrv.dll are both enabled. You can also go ahead and disable the *mysql*.dll extensions. Here’s my list of enabled extensions:

Now we can visit the setup-config.php page as outlined above. The steps here are quite straightforward, so I’m not going to walk you through them. You will need to create a user on your SQL Server 2012 installation with SQL Server authentication that has access to a database that you also need to create to use for your WordPress installation.
One note about this process: I had some issues when choosing the default selected “SQL Server using MS PHP driver” and went with the “PDO SqlSrv” option the second time to eliminate these issues.

If the wizard has trouble automatically creating the wp-config.php file, you can either choose to give IUSR write permissions on the folder you created to hold all your WordPress files or you can manually create the file under that folder and paste the output you see on screen in there (I chose the latter). After the wp-config.php file is created, you can start the installation of WordPress by clicking the link on the bottom of the page you’re on.

WORDPRESS CONFIGURATION

After the install, which should only take a minute tops, you are now ready to log in to your WordPress admin dashboard and start configuring it how you’d like. As you can see, there’s a sample post and comment already waiting for you. If your experience is anything like mine, you will notice that when you navigate to the Posts -> All Posts option on the top left of your dashboard you won’t actually see these posts in the list. It took some hunting around the web to figure this out, but apparently there’s a line in the translations.php file of the WP Db Abstraction plugin that’s causing this (thanks to tm3ister on http://sourceforge.net/projects/wp-sqlsrv/forums/forum/1124403/topic/5004241 for figuring this out!). The solution is to manually edit the translate_limit function in the mu-plugins/wp-db-abstraction/translations/sqlsrv/translations.php file:

Change

// Check for true offset
if ( (count($limit_matches) == 5  )  && $limit_matches[1] != '0' ) {
    $true_offset = true;
} elseif ( (count($limit_matches) == 5 )  && $limit_matches[1] == '0' ) {
    $limit_matches[1] = $limit_matches[4];
}

To

// Check for true offset
if ( (count($limit_matches) == 5  )  && $limit_matches[1] != '0' ) {
    $true_offset = true;
} elseif ( (count($limit_matches) >= 5 )  && $limit_matches[1] == '0' ) {
    $limit_matches[1] = $limit_matches[4];
}

And voila, your posts will now show up.

The last thing we’re going to configure is Permalinks (or pretty URLs) for our posts. When you navigate to Settings -> Permalinks on the admin dashboard, you’ll see some options to rewrite URLs to be more human and search engine friendly. For now, select Custom Structure and enter /%year%/%monthnum%/%postname%/ in the text field and hit Save Changes. The last step is to create a web.config file in our WordPress folder to rewrite the URLs according to this scheme with IIS URL Rewrite. Create a new web.config file (if you don’t have one already) in the folder you installed WordPress to and copy in the following:

<?xml version="1.0" encoding="utf-8"?>
<configuration>
  <system.webServer>
    <rewrite>
      <rules>
        <rule name="wordpress" patternSyntax="Wildcard">
          <match url="*" />
          <conditions>
            <add input="{REQUEST_FILENAME}" matchType="IsFile" negate="true" />
            <add input="{REQUEST_FILENAME}" matchType="IsDirectory" negate="true" />
          </conditions>
          <action type="Rewrite" url="index.php"/>
        </rule>
      </rules>
    </rewrite>
  </system.webServer>
</configuration>

You’re now all set to use WordPress on Windows Server 2012 with IIS 8 and SQL Server 2012!


IIS 8.0 Hosting - HostForLIFE.eu :: How to Fix PUT/POST/DELETE Verb Errors On Site ?

clock March 13, 2019 09:41 by author Peter

A customer was getting errror when utilizing PUT/POST/DELETE verbs on their web application as of late. The error looks like this:
<h2>405 - HTTP verb used to access this page is not allowed.</h2>

<h3>The page you are looking for cannot be displayed because an invalid method (HTTP verb) was used to attempt access</h3>

After some troubleshooting the error was disengaged to the way that WebDav was installed on the server and was catching those requests for its own service use.

Instead of removing Webdav from the server, we made a go at searching for an alternate solution. Thankfully somebody on Twitter comprehended the issue and gave an illustration of changes to make to the customer's web.config record with a specific end goal to disable (remove) the Webdav module for simply that particular webpage without requiring any requiring managerial activities on the server.

The code updates to make to your web.config record to intention this error are:
<configuration>
  <system.webServer>
    <handlers>
      <remove name="WebDAV" />
      <remove name="ExtensionlessUrlHandler-ISAPI-4.0_32bit" />
      <remove name="ExtensionlessUrlHandler-ISAPI-4.0_64bit" />
      <remove name="ExtensionlessUrlHandler-Integrated-4.0" />
      <add name="ExtensionlessUrlHandler-ISAPI-4.0_32bit" path="*." verb="GET,HEAD,POST,DEBUG,PUT,DELETE,PATCH,OPTIONS" modules="IsapiModule" scriptProcessor="%windir%\Microsoft.NET\Framework\v4.0.30319\aspnet_isapi.dll" preCondition="classicMode,runtimeVersionv4.0,bitness32" responseBufferLimit="0" />
      <add name="ExtensionlessUrlHandler-ISAPI-4.0_64bit" path="*." verb="GET,HEAD,POST,DEBUG,PUT,DELETE,PATCH,OPTIONS" modules="IsapiModule" scriptProcessor="%windir%\Microsoft.NET\Framework64\v4.0.30319\aspnet_isapi.dll" preCondition="classicMode,runtimeVersionv4.0,bitness64" responseBufferLimit="0" />
      <add name="ExtensionlessUrlHandler-Integrated-4.0" path="*." verb="GET,HEAD,POST,DEBUG,PUT,DELETE,PATCH,OPTIONS" type="System.Web.Handlers.TransferRequestHandler" preCondition="integratedMode,runtimeVersionv4.0" />
    </handlers>
    <modules>
      <remove name="WebDAVModule" />
    </modules>
  </system.webServer>
</configuration>

HostForLIFE.eu IIS 8.0 Hosting
HostForLIFE.eu is European Windows Hosting Provider which focuses on Windows Platform only. We deliver on-demand hosting solutions including Shared hosting, Reseller Hosting, Cloud Hosting, Dedicated Servers, and IT as a Service for companies of all sizes. We have customers from around the globe, spread across every continent. We serve the hosting needs of the business and professional, government and nonprofit, entertainment and personal use market segments.


European IIS 10 Hosting - HostForLIFE.eu :: Set Default Page For A Website In IIS

clock January 18, 2019 10:07 by author Peter

In a few Web sites, if we type the Web site name, (like www.someurl.com) it will automatically load the page www.someurl.com/index.aspx. This is because of the setting of the “Default Document” feature of IIS. In this post we are going to discuss this feature of IIS.

  1. Open IIS, type the command “inetmgr” in Run window.
  2. Select “Default Document” and click.
  3. In the feature view, we can see some type of Document orderly kept.
  4. The top most had the highest priority and the last one had the least priority.

As per the above figure, the document “Default.htm” had the highest priority and the file “Default.aspx” had the lowest priority. This means whenever the user types a url (like www.someurl.com), then IIS looks for any one of the files that exist in the above order on that Virtual Directory. If it finds any one of the files, it will load that page.

IIS also allows, adds/removes the custom default document per Web site. For example, if we specify a page (say home.htm) as the default document which does not exist in the website, then IIS will look into that website and alert the user as shown below, which explicitly states that each time we type the url, IIS will look in that order.


As per the alert, it is advisable to move the default document at the top level, which will increase the performance in the sense IIS can avoid going further down in the list.


IIS 8 Hosting - HostForLIFE.eu :: How to Config ASP.NET and IIS Request Length?

clock April 8, 2016 20:30 by author Anthony

In this post, i will show you how to configuring ASP.NET and IIS request length for post data. One of the most infuriating things about IIS configuration in general is how the Request length is configured in IIS and ASP.NET. There are several places that control how much content you can send to the server and over the years this setting has changed in a number of ways. The places where it's configured is not super obvious and they can be fluid because some of these features are optionally installed IIS features.

So here are the two main places where the request length is set in IIS and ASP.NET:

  • IIS Request Filtering
  • HttpRuntime maxRequestLength

Let's start with the IIS level setting, which is also a relatively new setting. It's based around the Request Filtering module in IIS which is an optional IIS component, but that is a required component if you have ASP.NET installed on your server (at least in the latest versions). If you have ASP.NET enabled in IIS the Request Filtering module is also enabled and the following settings apply.

If you don't use ASP.NET you can still install Request Filtering, but it's an optional component. So if you only use ISAPI or CGI scripts and no ASP.NET content Request Filtering may not be enabled in which case the following settings cannot be set and aren't required. Since most people do run ASP.NET at least for some sites, for all intents and purposes we can assume that the Request Filtering module is installed on IIS.

So to configure the posted content size you can use the following web.config based configuration settings:

<?xml version="1.0" encoding="UTF-8"?>
<configuration>
    <system.webServer>
     <security>
      <requestFiltering>
        <requestLimits maxAllowedContentLength="500000000"  />
      </requestFiltering>
    </security> 
   </system.webServer>
</configuration>

The maxAllowedContentLength determines the size of the POST buffer allowed in bytes. Above I've set the value to 500megs.

Or you can do the same thing in the IIS Management console using Request Filtering option in the IIS options:

As is usually the case you can apply the filtering at all levels of the IIS hierarchy – Machine, Site and Virtual/Application. Using web.config as shown above sets the settings at the Application level.

Because these are IIS settings, the value controls the IIS upload settings so they are applied against any and all requests that are fired against IIS, including ASP.NET, ASP, ISAPI extensions, CGI/FASTCGI executables, IISNodeJs requests and so on.

ASP.NET traditionally has had its own httpRuntime element in the <system.web> section that control ASP.NET runtime settings one of which is the maxRequestLength. This setting controls the ASP.NET pipeline's acceptance of file uploads and it needs to be configured in addition to the Request Filtering settings described above.

<?xml version="1.0" encoding="UTF-8"?>
<configuration>
  <system.web>
    <httpRuntime maxRequestLength="500000000" executionTimeout="120" />
  </system.web>
</configuration>

You can also use the IIS Management Console and the Configuration Manager option, to view all of the options on the httpRuntime element:

What's interesting is that the settings you see here widely mirror the settings in the Request Filtering section, and they are not inherited. It's your responsibility to make sure the settings are set correctly in both places. I recommend that you take a minute and go through the values you care about and set them correctly in both places.

The above describes ASP.NET settings. If you're using another framework, like WCF you may end up with yet another different set of settings on the WCF bindings and Endpoints. Just be aware of the framework you're using and that it too might have specific filters to restrict request size.


HostForLIFE.eu IIS 8 Hosting

HostForLIFE.eu revolutionized hosting with Plesk Control Panel, a Web-based interface that provides customers with 24x7 access to their server and site configuration tools. Plesk completes requests in seconds. It is included free with each hosting account. Renowned for its comprehensive functionality - beyond other hosting control panels - and ease of use, Plesk Control Panel is available only to HostForLIFE's customers. They offer a highly redundant, carrier-class architecture, designed around the needs of shared hosting customers.


IIS 8 Hosting - HostForLIFE.eu :: How to Install SSL Certificate in IIS 8?

clock April 6, 2016 18:31 by author Anthony

In this tutorial, I will show you how to install SSL certificate in IIS 8.0. To communicate securely over the web requires the use of encryption on the messages passed back and forth.  Encryption on the web is accomplised through the use of Transport Layer Security (TLS). Http traffic layered over SSL/TLS is called Https.  It would be all too easy to venture down the rabbit hole and explain in great detail how TLS establishes a secure connection, but the crypto minutia is likely a bit out of scope for the purposes of this discussion.  However, a basic understanding of the mechanisms used by TLS to secure the communication channel will make understanding the use of SSL certificates much easier.

TLS uses public key cryptography, which requires the distribution of a public key.  This public key is transmitted as part of an SSL certificate, along with other identifying information meant to establish trust that a server is who it is supposed to be (and not a malicious eavesdroper).  While it is possible to create self-signed certificates, browsers do not trust these certificates and will give users dire warning when they are encountered (this would be like me printing my own drivers license and saying "See, I am who I say I am... really!").  For a certificate to be trusted, it must be issued by a trusted Certificate Authority (CA).  When a secure connection is made using a trusted certificate, most browsers will display an indicator that the connection is secure.  In Chrome, clicking the green lock icon will reveal information regarding the details of the connection:

And this is what a self-signed certificate will get you:

So to fully take advantage of Https you need to have a certificate from a trusted CA (Symantec [GeoTrust, VeriSign], Comodo, GlobalSign, etc).  Getting a certificate involves first creating a Certificate Signing Request (CSR).  IIS has the capability of creating a CSR, and their are other tools available, including the linux command line using OpenSSL.  This is what it looks like in IIS:

You'll transmit the CSR in one form or another to the CA you are getting your certificate from, and after they've performed whatever level of due diligence they'll send you your SSL certificate.  Once you have the certificate, you'll need to install it on the server hosting your site.  For .NET based web applications, that likely means IIS or Azure.

  • Installing SSL Certificate in IIS 8.0

In IIS Manager, under Server Certificates, there is an option for "Complete Certificate Request".  Here you'll browse to the *.cer file that contains your certificate, add a friendly name to make management easier it doesn't change anything in the certificate and add the certificate to the Personal certificate store.  This installs the certificate to the server.  To use it in your site, you have to bind it.  Navigate to the site settings in IIS, go to bindings, and add a binding for https using port 443 and the created certificate.

  • Using Https in the application

Using the URL Rewrite rule described in the Azure SSL instruction involved adding this rule to the web.config file:

<system.webServer>
  <rewrite>
    <rules>
      <rule name="Force HTTPS" enabled="false">
        <match url="(.*)" ignoreCase="false"/>
      <conditions>
        <add input="{HTTPS}" pattern="off"/>
      </conditions>
        <action type="Redirect" url="https://{HTTP_HOST}/{R:1}"
                appendQueryString="true" redirectType="Permanent"/>
      </rule>
    </rules>
  </rewrite>
  </system.webServer>

In MVC, using the [RequireHttps] attribute gives fine grained control over what portions of the site will need to use https:

[RequireHttps]
public ActionResult About()
{
    ViewBag.Message = "Your application description page.";
 
    return View();
}

HostForLIFE.eu IIS 8 Hosting

HostForLIFE.eu revolutionized hosting with Plesk Control Panel, a Web-based interface that provides customers with 24x7 access to their server and site configuration tools. Plesk completes requests in seconds. It is included free with each hosting account. Renowned for its comprehensive functionality - beyond other hosting control panels - and ease of use, Plesk Control Panel is available only to HostForLIFE's customers. They offer a highly redundant, carrier-class architecture, designed around the needs of shared hosting customers.


IIS 8.0 Hosting Germany - HostForLIFE.eu :: How To Access A Folder With No Default Document

clock October 31, 2015 01:02 by author Rebecca

In this post, I will tell you how to access a folder with no document in IIS. It's easy, just follow these steps:

Step 1

Create a folder called Original--IIS-Files

Step 2

Move all the files into folder Original-IIS-Files

Step 3

Navigate to your web server. By default, the Web Server will render the following message when the folder has no default documents.

And you're done! Simple, right?

HostForLIFE.eu IIS 8.0 Hosting
HostForLIFE.eu is European Windows Hosting Provider which focuses on Windows Platform only. We deliver on-demand hosting solutions including Shared hosting, Reseller Hosting, Cloud Hosting, Dedicated Servers, and IT as a Service for companies of all sizes. We have customers from around the globe, spread across every continent. We serve the hosting needs of the business and professional, government and nonprofit, entertainment and personal use market segments.


IIS 8.0 Hosting France - HostForLIFE.eu :: How to Configure DNS Record for Sub Domain

clock October 16, 2015 11:34 by author Rebecca

In this article, I will tell you how to configure DNS record for sub domain.

Step 1

Open your domain control panel then go to DNS manager.

Step 2

Add following A records for domain.com and www.domain.com which point to IIS server IP address:

domain.com  IN A XXX.XXX.XXX.XXX
www.domain.com  IN A XXX.XXX.XXX.XXX
service.domain.com IN A XXX.XXX.XXX.XXX

First two rows will ensure that whenever user browse domain.com or www.domain.com at that time it will be routed to IIS server and rest will be take care by IIS then it will serve public site. The third row in above is important for next step.

Step 3

Now add following wildcard CNAME record:

*.domain.com  IN CNAME service.domain.com

In above wildcard entry ensure that any sub domain request for domain.com will be routed to server which is pointed by service.domain.com.

In IIS setup, you have to edit website binding to include domain.com and www.domain.com as host header, by this way you can tell IIS that any request from domain.com and www.domain.com will be handled by this particular website. So, whenever user browse domain.com or www.domain.com it is serving public website without any problem.

While in case of sub domain it is showing error that “The connection was reset” this is because IIS does not found host header entry for requested domain in any websites. So, you need to add host header entry in service.domain.com website created in IIS setup because service.domain.com is actual website which is going to serve hosted service application when it is browse from sub domain. Use the following code to add host header entry programmatically in IIS:

private string GetWebSiteId(string serverName, string websiteName)

{

    string result = "-1";


    DirectoryEntry w3svc = new DirectoryEntry(string.Format("IIS://{0}/w3svc", serverName));


    foreach (DirectoryEntry site in w3svc.Children)

    {

        if (site.Properties["ServerComment"] != null)

        {

            if (site.Properties["ServerComment"].Value != null)

            {

                if (string.Compare(site.Properties["ServerComment"].Value.ToString(),

                                        websiteName, true) == 0)

                {

                    result = site.Name;

                    break;

                }

            }

        }

    }


    return result;

}


private void AddHostHeader(string hostHeader, string websiteID)

{

    DirectoryEntry site = new DirectoryEntry("IIS://localhost/w3svc/" + websiteID);

    PropertyValueCollection serverBindings = site.Properties["ServerBindings"];


    serverBindings.Add(hostHeader);


    Object[] newList = new Object[serverBindings.Count];

    serverBindings.CopyTo(newList, 0);


    site.Properties["ServerBindings"].Value = newList;

    site.CommitChanges();

}  


AddHostHeader("127.0.0.1:80:user1.domain.com", GetWebSiteId("localhost", "service.domain.com"));

HostForLIFE.eu IIS 8.0 Hosting
HostForLIFE.eu is European Windows Hosting Provider which focuses on Windows Platform only. We deliver on-demand hosting solutions including Shared hosting, Reseller Hosting, Cloud Hosting, Dedicated Servers, and IT as a Service for companies of all sizes. We have customers from around the globe, spread across every continent. We serve the hosting needs of the business and professional, government and nonprofit, entertainment and personal use market segments.


IIS 8.0 Hosting Ukraine - HostForLIFE.eu :: How to Configure ASP.NET Application on IIS

clock October 13, 2015 12:46 by author Rebecca

In this article, I'm going to explain how to set Windows Authentication to configure ASP.NET application in IIS. To make Windows authorize application you need to make changes in web.config as well as IIS manager.

Configuring Windows Authentication

<system.web>
   <authentication mode="Windows"/>
</system.web>

  1.     Start Internet Information Services (IIS).
  2.     Right-click your application’s virtual directory, and then click Properties.
  3.     Click the Directory Security tab.
  4.     Under Anonymous access and authentication control, click Edit.
  5.     Make sure the Anonymous access check box is not selected and that Integrated Windows authentication is the only selected check box.

If you will put Anonymous check box checked then it will not take windows login Id for the user. e.g. string windowsLogin = Page.User.Identity.Name;

Now, your application will work on windows authentication.

Here is the example code:

protected void Page_Load(object sender, EventArgs e)
{
   try
     {
       //Start:
        if (Session["EmployeeCode"] == null)
          {
             string windowsLogin = Page.User.Identity.Name;
             //Check user is valid or not from data base
            //I am putting simple condition by hard code value
            if (windowsLogin=='ValidUser')
                 {
                   Session["EmployeeCode"] = userId;
                 }
             else
                {
                  Session.Abandon();
                  Response.Redirect("InvalidUser.aspx", false);
                }
         //End
     }
    catch (Exception ex)
    {
       //Handel exception here
       Throw;
     }
}

It's done! You will get user from windows credential and check with existing user with database. If user is valid go ahead other wise navigate the user to Invalid page.

HostForLIFE.eu IIS 8.0 Hosting
HostForLIFE.eu is European Windows Hosting Provider which focuses on Windows Platform only. We deliver on-demand hosting solutions including Shared hosting, Reseller Hosting, Cloud Hosting, Dedicated Servers, and IT as a Service for companies of all sizes. We have customers from around the globe, spread across every continent. We serve the hosting needs of the business and professional, government and nonprofit, entertainment and personal use market segments.


IIS 8.0 Hosting - HostForLIFE.eu :: How to Setting Up IIS On Your Windows 10 OS ?

clock September 23, 2015 21:28 by author Peter

In this article, let me show you how to setting up IIS on your Windows 10 OS. I am using Windows 10 Enterprise edition.

First, open the browser and just type the url http://localhost/ shown on the below picture:

When you pressing Enter, it will throw page not found error.
Now I am going to search for IIS manager. Not found!
Then, open Control Panel -> Click Programs.
Under Programs and Features, click Turn Windows features on or off.

The popup will appear as you can see on the following picture:

Just check the Internet Information Services and its related features.
Under Internet Information Services check the following folders:

  • FTP Server
  • Web Management Tools
  • World wide web services
  • Application development features
  • Common HTTP Feature
  • Health and Diagnostics
  • Perfomance Feature
  • Security

Then click OK to complete the installation of new features.
Click Restart now to apply changes to complete the IIS feature installation.

After restart, you will see the IIS webserver option on the All Programs menu. Now, open the browser then write on address bar http://localhost.

Internet Information Services (IIS) successfully configured!

HostForLIFE.eu IIS 8.0 Hosting
HostForLIFE.eu is European Windows Hosting Provider which focuses on Windows Platform only. We deliver on-demand hosting solutions including Shared hosting, Reseller Hosting, Cloud Hosting, Dedicated Servers, and IT as a Service for companies of all sizes. We have customers from around the globe, spread across every continent. We serve the hosting needs of the business and professional, government and nonprofit, entertainment and personal use market segments.


About HostForLIFE.eu

HostForLIFE.eu is European Windows Hosting Provider which focuses on Windows Platform only. We deliver on-demand hosting solutions including Shared hosting, Reseller Hosting, Cloud Hosting, Dedicated Servers, and IT as a Service for companies of all sizes.

We have offered the latest Windows 2016 Hosting, ASP.NET Core 2.2.1 Hosting, ASP.NET MVC 6 Hosting and SQL 2017 Hosting.


Tag cloud

Sign in