IIS 7.5 and IIS 8.0 European Hosting

BLOG about IIS 7.5 Hosting, IIS 8.0 Hosting and Its Technology - Dedicated to European Windows Hosting Customer

IIS Hosting Europe - HostForLIFE :: Expose A Local WebServer(localhost:3000) To The Internet

clock July 19, 2021 06:34 by author Peter

Sharing work in progress to clients / within the team, then following packages are very useful to expose local servers behind NATs and firewalls to the public internet over secure tunnels.

This application will be useful if we create a website on our local development server for a client. At some point, he will want to see how the work goes. If so, we could host the website on an online server, so the clients can see it.


So here, I am using localtunnel. We can expose our localhost to the world for easy testing and sharing! No need to mess with DNS or deploy just to have others test out your changes.

In the following article, we are going to take a look at Localtunnel.To start with, I will show you the demo using react library. Localtunnel is installed on our system through nodejs as below,


Basic setup
Modules Required
npm,

react - npx create-react-app todo-react

boostrap - npm install react-bootstrap bootstrap


Edit app.js in components,
import React, {Component} from 'react';
rap for react
import Container from 'react-bootstrap/Container';
import Row from 'react-bootstrap/Row';
import Col from 'react-bootstrap/Col';
import Button from 'react-bootstrap/Button';
import InputGroup from 'react-bootstrap/InputGroup';
import FormControl from 'react-bootstrap/FormControl';
import ListGroup from 'react-bootstrap/ListGroup';


class App extends Component {
constructor(props) {
    super(props);

    // Setting up state
    this.state = {
    userInput : "",
    list:[]
    }
}

// Set a user input value
updateInput(value){
    this.setState({
    userInput: value,
    });
}


// Add item if user input in not empty
addItem(){
    if(this.state.userInput !== '' ){
    const userInput = {

        // Add a random id which is used to delete
        id : Math.random(),

        // Add a user value to list
        value : this.state.userInput
    };

    // Update list
    const list = [...this.state.list];
    list.push(userInput);

    // reset state
    this.setState({
        list,
        userInput:""
    });
    }
}


// Function to delete item from list use id to delete
deleteItem(key){
    const list = [...this.state.list];

    // Filter values and leave value which we need to delete
    const updateList = list.filter(item => item.id !== key);

    // Update list in state
    this.setState({
    list:updateList,
    });

}

render(){
    return(<Container>

        <Row style={{
                display: "flex",
                justifyContent: "center",
                alignItems: "center",
                fontSize: '3rem',
                fontWeight: 'bolder',
                }}
                >TODO LIST
            </Row>

        <hr/>
        <Row>
        <Col md={{ span: 5, offset: 4 }}>

        <InputGroup className="mb-3">
        <FormControl
            placeholder="add item . . . "
            size="lg"
            value = {this.state.userInput}
            onChange = {item => this.updateInput(item.target.value)}
            aria-label="add something"
            aria-describedby="basic-addon2"
        />
        <InputGroup.Append>
            <Button
            variant="dark"
            size="lg"
            onClick = {()=>this.addItem()}
            >
            ADD
            </Button>
        </InputGroup.Append>
        </InputGroup>

    </Col>
</Row>
<Row>
    <Col md={{ span: 5, offset: 4 }}>
        <ListGroup>
        {/* map over and print items */}
        {this.state.list.map(item => {return(

            <ListGroup.Item variant="dark" action
            onClick = { () => this.deleteItem(item.id) }>
            {item.value}
            </ListGroup.Item>

        )})}
        </ListGroup>
    </Col>
</Row>
    </Container>
    );
}
}

export default App;


So you can immediately start the app by going into the newly created application folder and running npm start.

Save all files and start the server,

npm start

lt –port 3000 //this command will get the unique URL so that our local system is accessible from anywhere
lt –port 3000 –subdomain cdkapptodo // will have the option to use a subdomain to easier to remember


IIS Hosting Europe - HostForLIFE :: Install SSL Certificate (.pfx File)To IIS On Windows Server Machine?

clock July 13, 2021 06:47 by author Peter

In this article, we are going to install an SSL certificate to IIS with .pfx file which is stored at the server's local drive.


Scenario
We have .pfx file which has an  SSL certificate we need to install on IIS in Windows server.

Prerequisites
Virtual Server Machine (In my case Windows Server 2012 R2 Standard)
IIS (I have used IIS Version: 8.5)
.pfx file

Requirement
We need to install an SSL certificate on IIS (internet information service).

Solution
Please follow these steps to install a certificate on IIS with the .pfx file.

I will consider that you already have a .pfx file.

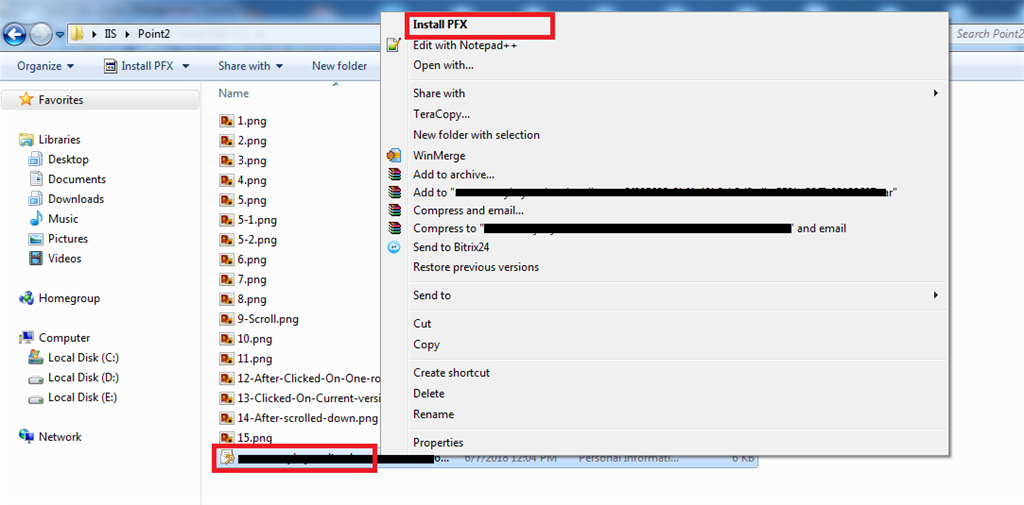
Go to the folder which has .pfx file.
Right-click on that .pfx file highlighted with a red border, it will open a popup window with Install PFX option at first as in Screen 1.

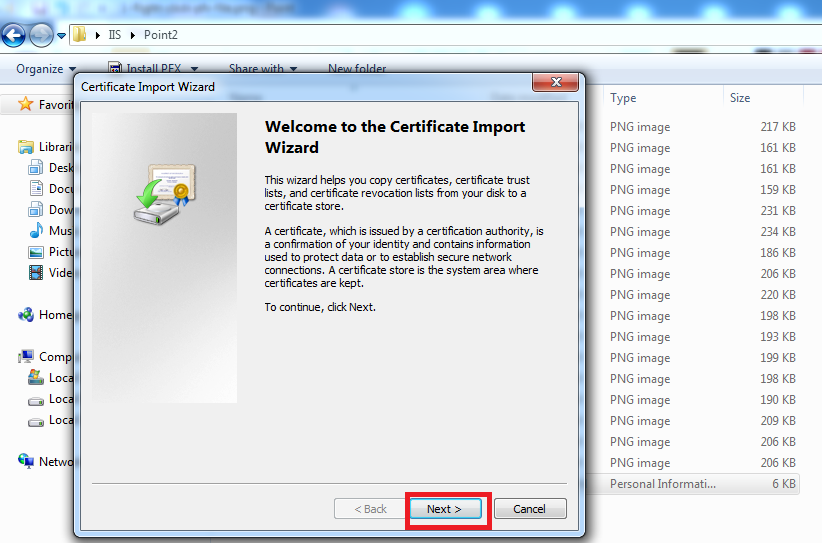
 After clicking on the Install PFX option, it will open a new window called Certificate Import Wizard as in Screen 2. Click on Next button

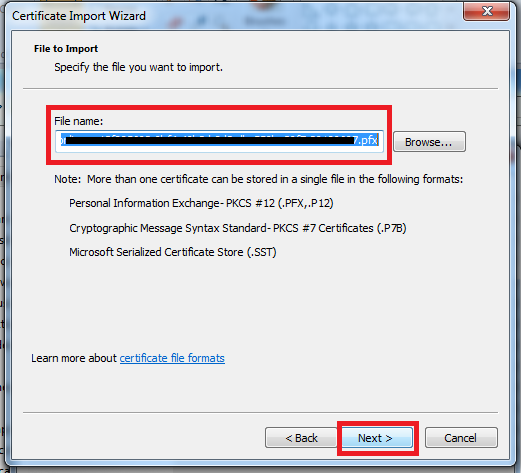
After clicking on the Next button, it will go to File to Import window, Notice Filename in File to Import section, It is already filled with .pfx file name, Now, click on the Next button as in Screen 3.

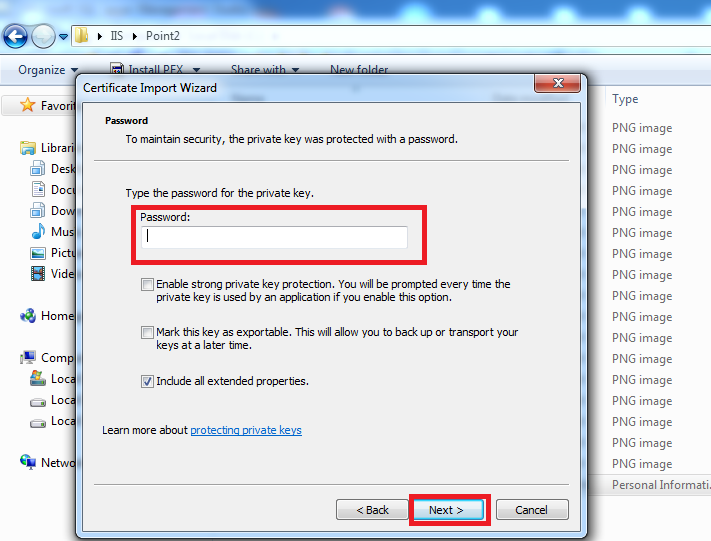
After clicking on the Next button, it will go to the Password window as in Screen 4, if you have added a password while creating the .pfx file then put that password in the password text box, else leave as it is(blank), and click on Next button.

After clicking on the Next button, it will go to Certificate Store Window as in Screen 5, Leave the default selected option as it is, if you don’t want to change it, else you can go with the second option. For now, I am going with the default option and click on the Next button as in Screen5.

After clicking on the Next button, it will open Completing the Certificate Import Wizard window, click on the Finish button as in Screen 6.

After clicking on the Finish button, it will be showing the alert message that The Import was successful as in Screen 7.
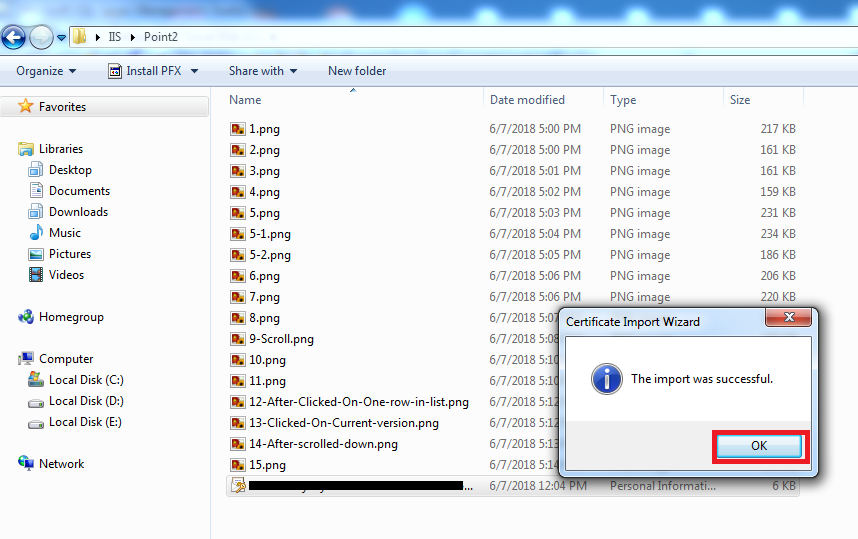
Click on Ok.
Now, we need to check whether the Server certificate installed or not, For check it, we need to go to IIS(Internet Information Service).
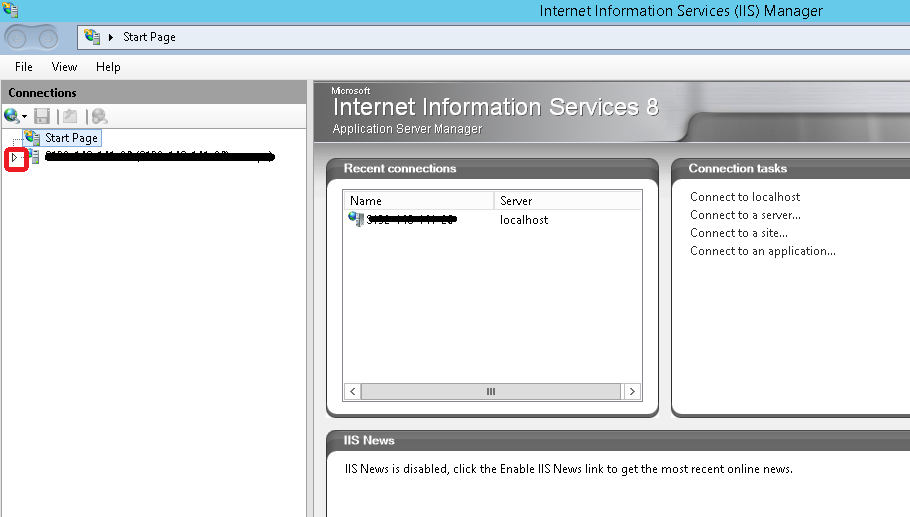
Press Window Key on the keyboard, and search IIS Manager as in Screen 8, and click on IIS Manager in the list.

After clicking on the IIS Manager, it will go to the IIS Manager window, expand the tree structure of the server by clicking on the arrow in the highlighted area in Screen 9.

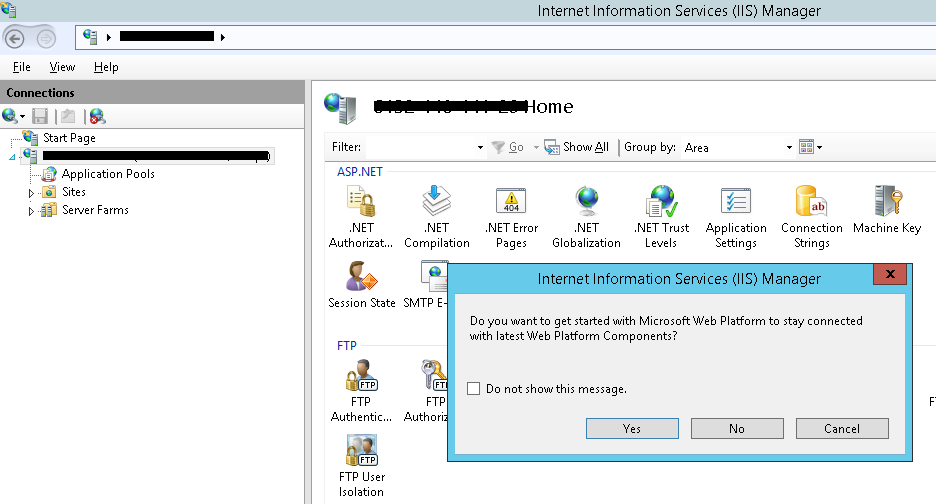
After clicking on the arrow, sometime a popup message will come as in Screen 10, for now, click on cancel, and go to step 14


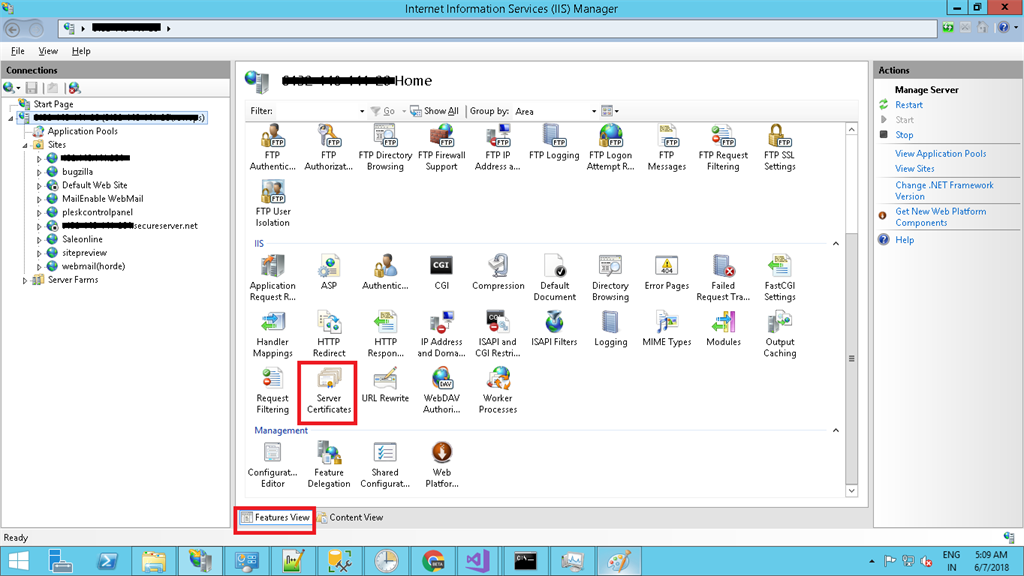
Now, Select the Server (highlighted with red border) as in Screen 11.

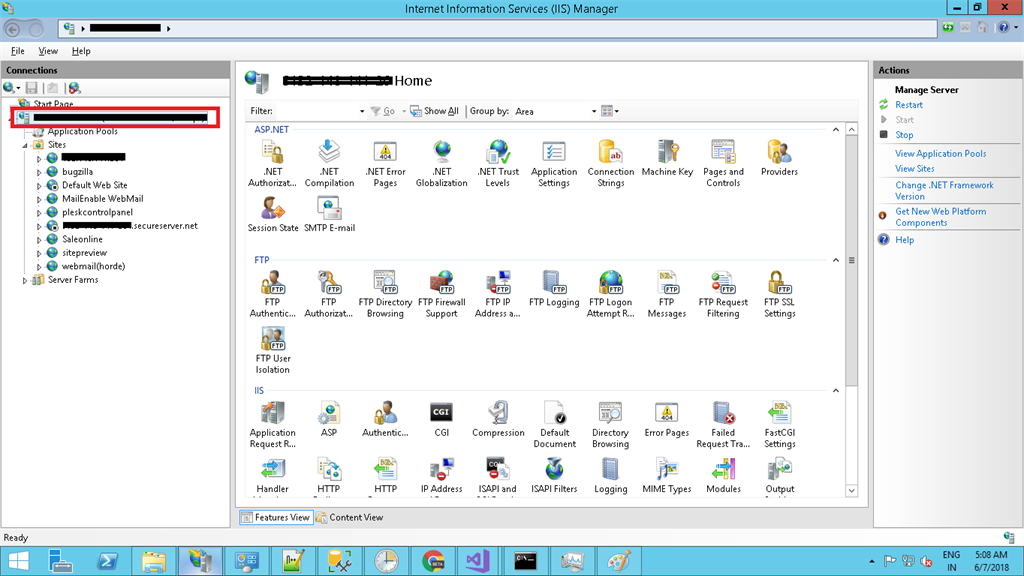
Now, Scroll down for a bit in Features View as in Screen 12, Find Server Certificates, and Double Click on it as in Screen 12.

After Double Clicked on Server Certificates, it will open a list of the installed certificate, I have highlighted the installed certificate in Screen 13.

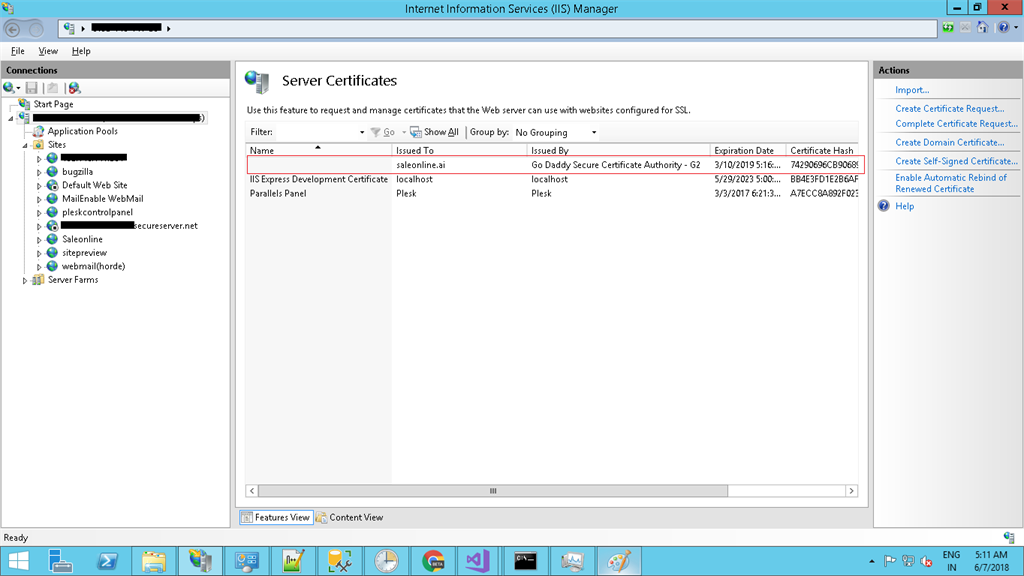
Now, Certificate is successfully imported to IIS after doing this we have also checked whether the certificate imported properly or not.


IIS 8.0 Hosting - HostForLIFE :: Got an Issue on PowerShell AppPool Assignment

clock July 9, 2021 08:23 by author Peter

The WebAdministration module has a Function called IIS :. It basically acts as a drive letter or an uri protocol. The extremely convenient and makes accessing appPool, site info, and ssl bindings simple. I recently noticed 2 issues with assigning values with the IIS : protocol as well as objects and that is works along with :

StartMode Can’t Be Set Directly
For a few cause, utilizing Set-ItemProperty to line the startMode value directly throws an error. However, in case you retrieve the appPool into your variable and established the value using an = operator, every thing works good.

# https://connect.microsoft.com/PowerShell/feedbackdetail/view/1023778/webadministration-apppool-startmode-cant-be-set-directly
ipmo webadministration 
New-WebAppPool "delete.me" 
Set-ItemProperty IIS:\AppPools\delete.me startMode "AlwaysRunning" # throws an error 
$a = Get-Item IIS:\AppPools\delete.me
$a.startMode = "AlwaysRunning"
Set-Item IIS:\AppPools\delete.me $a # works

Here is the error that gets thrown:
Set-ItemProperty : AlwaysRunning is not a valid value for Int32.
At C:\Issue-PowershellThrowsErrorOnAppPoolStartMode.ps1:6 char:1
+ Set-ItemProperty IIS:\AppPools\delete.me startMode "AlwaysRunning" # throws an e ...
+ ~~~~~~~~~~~~~~~~~~~~~~~~~~~~~~~~~~~~~~~~~~~~~~~~~~~~~~~~~~~~~~~~~~
    + CategoryInfo          : NotSpecified: (:) [Set-ItemProperty], Exception
    + FullyQualifiedErrorId :
System.Exception,Microsoft.PowerShell.Commands.SetItemPropertyCommand


CPU’s resetLimit Can’t Immediately Use New-TimeSpan’s Result
I believe the example can show the trouble much better than I will describe it :
# https://connect.microsoft.com/PowerShell/feedbackdetail/view/1023785/webadministration-apppools-cpu-limit-interval-resetlimit-cant-be-set-directly
ipmo webadministration 
New-WebAppPool "delete.me" 
$a = Get-ItemProperty IIS:\AppPools\delete.me cpu
$a.resetInterval = New-TimeSpan -Minutes 4 # this will throw an error
Set-ItemProperty IIS:\AppPools\delete.me cpu $a 
$a = Get-ItemProperty IIS:\AppPools\delete.me cpu
$k = New-TimeSpan -Minutes 4 # this will work
$a.resetInterval = $k
Set-ItemProperty IIS:\AppPools\delete.me cpu $a

And Here is the error that gets thrown:
Set-ItemProperty : Specified cast is not valid.
At C:\Issue-PowershellThrowsErrorOnCpuLimitReset.ps1:8 char:1
+ Set-ItemProperty IIS:\AppPools\delete.me cpu $a
+ ~~~~~~~~~~~~~~~~~~~~~~~~~~~~~~~~~~~~~~~~~~~~~~~
    + CategoryInfo          : NotSpecified: (:) [Set-ItemProperty], InvalidCastException
    + FullyQualifiedErrorId : System.InvalidCastException,Microsoft.PowerShell.Commands.SetItemPropertyCommand

The links on every section correspond with bug reports for the problems, thus hopefully they can get looked into.


IIS Hosting Europe - HostForLIFE.eu :: Performance Optimization Techniques In IIS Server

clock July 2, 2021 08:05 by author Peter

Nowadays, better web application performance is a crucial job froma  business perspective. Everyone expects web applications to be user friendly, secure, better performing and with a good look and feel. So, in this article, I am going to show you a few IIS server performance optimization techniques. Once you apply them in your IIS server, I am sure that you will feel the difference as compared to the current performance of your applications.


Technique #1: HTTP Compression

When you enable this technique, the HTTP response (in both, static and dynamic content) will be compressed first and then the compressed response will be sent to the end user. With this technique, you can utilize the complete bandwidth in a better way. It results in faster data transmission between IIS server and the browser.

To enable the HTTP Compression, follow the below steps:

Step 1: Press Windows Key + R and type INETMGR

Step 2: You will find an option called Compression. Double click on that.

Compression
Step 3:  Here, you will get a different window where you can find the options with checkboxes, like the following:

    Enable dynamic content compression.
    Enable static content compression.

Technique #2: Web page Output Caching

As we know, Caching is a great performance improvement technique in the web application. When one end-user requests for one web page and receives the response, then the complete response will be cached in output cache. If the second user requests for the same page, then the cached response will be served to the second user instead of reprocessing the request.

Please refer this link to configure the Output Caching in IIS server.

Technique #3: Disabled the Client-side and Server-side debugging
In general, we enable the debugging feature in development environment, which is recommended and a good practice too. This helps us testing our code and making sure that everything is working as expected. We have to debug both the client-side and the server-side code. It helps us identifying and fixing the bugs, quickly. Whereas in production environment, it is not recommended or good practice to enable this feature. It causes a lot of performance issues. If you disable this feature in production environment, then you will get little performance boost in your application.

Please follow the below steps to disable this feature in IIS server.

Step 1: Press Windows Key + R and type INETMGR

Step 2: You will find an option called ASP. Double click on that.

Step 3: When you double click on ASP, you will get a different window where you can find the following options:

    Enable Client-side Debugging
    Enable Server-side Debugging

Make the above items False. For reference, please see the following screenshot.

Technique #4: Disable IIS Logging
As we know, whenever the end-user performs any action in web application, the request is processed and responds back to the end-user. From receiving the request to giving response, IIS server keeps track of the following points.
From which IP address the request is received.
How much time was taken in processing the request.
Size of the response.
Cookies.
Error details etc.

let's say, you are maintaining a separate component called Logger module, to track all the information. In that case, I believe IIS server logger details are no longer needed. In such a scenario, you can disable the logger feature in IIS server, which will result in a little performance boost.

Please follow the below steps to disable the Logging in IIS server:
Step 1: Press Windows Key + R and type INETMGR
Step 2: You will find an option called Logging. Double click on that.

Step 3: You will see a window where you can find the Disable option. For reference, please look into the below screenshot.

Technique #6: Increase Queue limit

In the most cases, you might receive the IIS Server response, like “Server too busy” with status code 503. The reason behind it is that when IIS Server receives too many requests, this error occurs. Even you will receive such errors when the queue capacity is very small. Increasing the queue capacity is in your hands. If you increase the queue capacity, it will boost the performance a little.

Pleas follow the below steps to increase the limit.

Step 1: Press Windows Key + R and type INETMGR
Step 2: You will find an option called ASP. Double click on that.


Step 3: On the next window, you can find Limits Properties option. If you expand it, then you will get Queue Length option where you can set the limit.

Technique #7: HTTP Expires Header configuration

This option helps you minimize the number of requests to the IIS Server. The HTTP expires header helps the client browser to cache the web pages and its elements, like CSS, images etc.

Pleas follow the below steps to set the HTTP Expires.

Step 1: Press Windows Key + R and type INETMGR
Step 2: You will find an option called HTTP Response Headers. Double click on that.

Step 3: Once you double click on the HTTP Response Headers, you will get a window where you can find X-Powered-By option. If you right click on it, it will give you Set Common Headers option. Click on that. It will give you one pop up window where you can set the HTTP expires in number of days or hours. Please find the below screenshot for reference.


About HostForLIFE.eu

HostForLIFE.eu is European Windows Hosting Provider which focuses on Windows Platform only. We deliver on-demand hosting solutions including Shared hosting, Reseller Hosting, Cloud Hosting, Dedicated Servers, and IT as a Service for companies of all sizes.

We have offered the latest Windows 2016 Hosting, ASP.NET Core 2.2.1 Hosting, ASP.NET MVC 6 Hosting and SQL 2017 Hosting.


Tag cloud

Sign in