In the previous article of this series, we discussed the route concept with MVC Pattern within .NET Core Application. Now, in this article, we will discuss how can we use URL rewriting mechanism.

Basically URL Rewriting is the act of modifying request URLs based on one or more predefined rules. URL rewriting creates an abstraction between resource locations and their addresses so that the locations and addresses are not tightly linked. There are several scenarios where URL rewriting is valuable:
Moving or replacing server resources temporarily or permanently while maintaining stable locators for those resources
Splitting request processing across different applications or across areas of one application
Removing, adding, or reorganizing URL segments on incoming requests
Optimizing public URLs for Search Engine Optimization (SEO)
Permitting the use of friendly public URLs to help people predict the content they will find by following a link
Redirecting insecure requests to secure endpoints
Preventing image hotlinking
We can define rules for changing the URL in several ways, including regular expression (regex) matching rules, rules based on the Apache mod_rewrite module, rules based on the IIS Rewrite Module, and with your own method and class rule logic. In this article, we will discuss about the URL rewriting with instructions on how to use URL Rewriting Middleware in ASP.NET Core applications.
URL redirect and URL rewrite
A URL redirect is a client-side operation, where the client is instructed to access a resource at another address. This requires a round-trip to the server, and the redirect URL returned to the client will appear in the browser's address bar when the client makes a new request for the resource. If /resource is redirected to /different-resource, the client will request /resource, and the Server will respond that the client should obtain the resource at /different-resource with a status code indicating that the redirect is either temporary or permanent. The client will execute a new request for the resource at the redirect URL.
A URL rewrite is a server-side operation to provide a resource from a different resource address. Rewriting a URL doesn't require a round-trip to the server. The rewritten URL is not returned to the client and won't appear in a browser's address bar. When /resource is rewritten to /different-resource, the client will request /resource, and the server will internally fetch the resource at /different-resource. Although the client might be able to retrieve the resource at the rewritten URL, the client won't be informed that the resource exists at the rewritten URL when it makes its request and receives the response.
When to use URL Rewriting Middleware
Use URL Rewriting Middleware when you are unable to use the URL Rewrite module in IIS on Windows Server, the Apache mod_rewrite module on Apache Server, URL rewriting on Nginx, or your application is hosted on WebListener server. The main reasons to use the server-based URL rewriting technologies in IIS, Apache, or Nginx are that the middleware doesn't support the full features of these modules and the performance of the middleware probably won't match that of the modules. However, there are some features of the server modules that don't work with ASP.NET Core projects, such as the IsFile and IsDirectory constraints of the IIS Rewrite module. In these scenarios, you can use the middleware instead.
Package
To include the middleware in your project, add a reference to the Microsoft.AspNetCore.Rewrite package. The middleware depends on .NET Framework 4.5.1 or .NET Standard 1.3 or later. This feature is available for apps that target ASP.NET Core 1.1.0 or later.
Extension and options
Establish your URL rewrite and redirect rules by creating an instance of the RewriteOptions class with extension methods for each of your rules. Chain multiple rules in the order that you would like them processed. The RewriteOptions are passed into the URL Rewriting Middleware as it's added to the request pipeline with app.UseRewriter(options);
var options = new RewriteOptions()
.AddRedirect("redirect-rule/(.*)", "redirected/$1")
.AddRewrite(@"^rewrite-rule/(\d+)/(\d+)", "rewritten?var1=$1&var2=$2", skipRemainingRules: true)
.AddApacheModRewrite(env.ContentRootFileProvider, "ApacheModRewrite.txt")
.AddIISUrlRewrite(env.ContentRootFileProvider, "IISUrlRewrite.xml")
.Add(RedirectXMLRequests)
.Add(new RedirectImageRequests(".png", "/png-images"))
.Add(new RedirectImageRequests(".jpg", "/jpg-images"));
app.UseRewriter(options);
URL redirect
Use AddRedirect() to redirect requests. The first parameter will contain your regex for matching on the path of the incoming URL. The second parameter is the replacement string. The third parameter, if present, specifies the status code. If you don't specify the status code, it defaults to 302 (Found), which indicates that the resource has been temporarily moved or replaced.
var options = new RewriteOptions()
.AddRedirect("redirect-rule/(.*)", "redirected/$1")
.AddRewrite(@"^rewrite-rule/(\d+)/(\d+)", "rewritten?var1=$1&var2=$2", skipRemainingRules: true)
.AddApacheModRewrite(env.ContentRootFileProvider, "ApacheModRewrite.txt")
.AddIISUrlRewrite(env.ContentRootFileProvider, "IISUrlRewrite.xml")
.Add(RedirectXMLRequests)
.Add(new RedirectImageRequests(".png", "/png-images"))
.Add(new RedirectImageRequests(".jpg", "/jpg-images"));
app.UseRewriter(options);
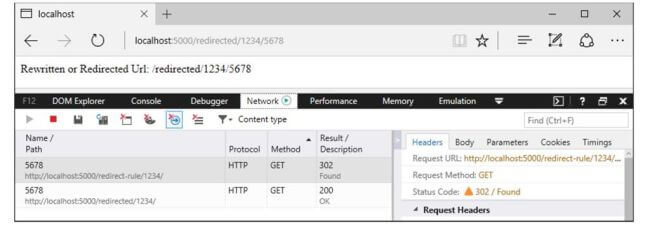
In a browser with developer tools enabled, make a request to the sample application with the path /redirect-rule/1234/5678. The regex matches the request path on redirect-rule/(.*), and the path is replaced with /redirected/1234/5678. The redirect URL is sent back to the client with a 302 (Found) status code. The browser makes a new request at the redirect URL, which will appear in the browser's address bar. Since no rules in the sample application match on the redirect URL, the second request receives a 200 (OK) response from the application and the body of the response shows the redirect URL. A complete roundtrip is made to the server when a URL is redirected.
Original Request: /redirect-rule/1234/5678

The part of the expression contained by parentheses is called a capture group. The dot ( . ) of the expression means match any character, and the asterisk ( * ) signifies to match the preceding character zero or more times. Therefore, the last two path segments of the URL, 1234/5678, are captured by capture group (.*). Any value you provide in the request URL after redirect-rule/ will be captured by this single capture group. In the replacement string, captured groups are injected into the string with the dollar sign ( $ ) followed by the sequence number of the capture. The first capture group value is obtained with $1, the second with $2, and they continue in sequence for the capture groups in your regex. There is only one captured group in the redirect rule regex in the sample application, so there is only one injected group in the replacement string, which is $1. When the rule is applied, the URL becomes /redirected/1234/5678.
URL redirect to a secure endpoint
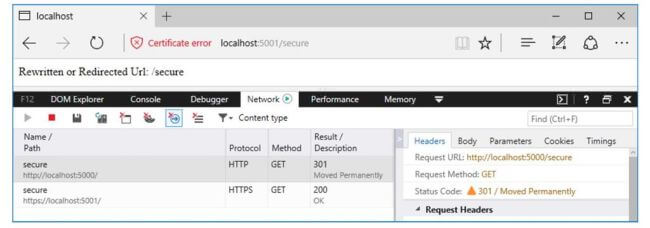
Use AddRedirectToHttps() to redirect insecure requests to the same host and path with secure HTTPS protocol (https:// ) with the flexibility to choose the status code and port. If the status code is not supplied, the middleware will default to 302 (Found). If the port is not supplied, the middleware will default to null, which means the protocol will change to https:// and the client will access the resource on port 443. The example shows how to set the status code to 301 (Moved Permanently) and change the port to 5001.
var options = new RewriteOptions()
.AddRedirectToHttps(301, 5001);
app.UseRewriter(options);
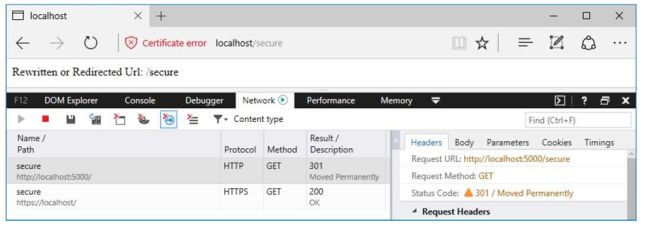
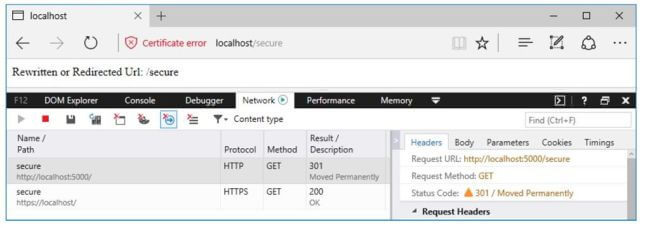
Use AddRedirectToHttpsPermanent() to redirect insecure requests to the same host and path with secure HTTPS protocol ( https:// on port 443). The middleware will set the status code to 301 (Moved Permanently).
Original Request using AddRedirectToHttps(301, 5001) : /secure

Original Request using AddRedirectToHttpsPermanent() : /secure

URL rewrite
Use AddRewrite() to create a rules for rewriting URLs. The first parameter will contain your regex for matching on the incoming URL path. The second parameter is the replacement string. The third parameter,
skipRemainingRules: {true|false} , will indicate to the middleware whether or not to skip additional rewrite rules if the current rule is applied.
var options = new RewriteOptions()
.AddRedirect("redirect-rule/(.*)", "redirected/$1")
.AddRewrite(@"^rewrite-rule/(\d+)/(\d+)", "rewritten?var1=$1&var2=$2", skipRemainingRules: true)
.AddApacheModRewrite(env.ContentRootFileProvider, "ApacheModRewrite.txt")
.AddIISUrlRewrite(env.ContentRootFileProvider, "IISUrlRewrite.xml")
.Add(RedirectXMLRequests)
.Add(new RedirectImageRequests(".png", "/png-images"))
.Add(new RedirectImageRequests(".jpg", "/jpg-images"));
app.UseRewriter(options);
Original Request: /rewrite-rule/1234/5678

The first thing you will notice in the regex is the carat ( ^ ) at the beginning of the expression. This means that matching should be attempted starting at the beginning of the URL path.
Code for startup.cs
using System;
using System.IO;
using Microsoft.AspNetCore.Builder;
using Microsoft.AspNetCore.Hosting;
using Microsoft.AspNetCore.Http;
using Microsoft.AspNetCore.Rewrite;
using Microsoft.Extensions.Logging;
using Microsoft.Net.Http.Headers;
using CoreLibrary;
namespace Prog7_URLRewrite
{
public class Startup
{
// This method gets called by the runtime. Use this method to add services to the container.
// For more information on how to configure your application, visit https://go.microsoft.com/fwlink/?LinkID=398940
public void Configure(IApplicationBuilder app, IHostingEnvironment env)
{
var options = new RewriteOptions()
.AddRedirect("redirect-rule/(.*)", "redirected/$1")
.AddRewrite(@"^rewrite-rule/(\d+)/(\d+)", "rewritten?var1=$1&var2=$2", skipRemainingRules: true)
.AddApacheModRewrite(env.ContentRootFileProvider, "ApacheModRewrite.txt")
.AddIISUrlRewrite(env.ContentRootFileProvider, "IISUrlRewrite.xml")
.Add(RedirectXMLRequests)
.Add(new RedirectImageRequests(".png", "/png-images"))
.Add(new RedirectImageRequests(".jpg", "/jpg-images"));
app.UseRewriter(options);
app.Run(context => context.Response.WriteAsync($"Rewritten or Redirected Url: {context.Request.Path + context.Request.QueryString}"));
}
static void RedirectXMLRequests(RewriteContext context)
{
var request = context.HttpContext.Request;
if (request.Path.StartsWithSegments(new PathString("/xmlfiles")))
{
return;
}
if (request.Path.Value.EndsWith(".xml", StringComparison.OrdinalIgnoreCase))
{
var response = context.HttpContext.Response;
response.StatusCode = StatusCodes.Status301MovedPermanently;
context.Result = RuleResult.EndResponse;
response.Headers[HeaderNames.Location] = "/xmlfiles" + request.Path + request.QueryString;
}
}
public static void Main(string[] args)
{
var host = new WebHostBuilder()
.ConfigureLogging(factory =>
{
factory.AddConsole(LogLevel.Debug);
})
.UseContentRoot(Directory.GetCurrentDirectory())
.UseKestrel(options =>
{
options.UseHttps("testCert.pfx", "testPassword");
})
.UseStartup<Startup>()
.UseUrls("http://localhost:5000", "https://localhost", "https://localhost:5001")
.Build();
host.Run();
}
}
}
Code for rewrite.cs
using Microsoft.AspNetCore.Http;
using Microsoft.AspNetCore.Rewrite;
using Microsoft.Net.Http.Headers;
using System;
using System.Text.RegularExpressions;
namespace CoreLibrary
{
public class RewriteRules : IRule
{
private string _extension;
private PathString _newPath;
public RedirectImageRequests(string extension, string newPath)
{
if (string.IsNullOrEmpty(extension))
{
throw new ArgumentException(nameof(extension));
}
if (!Regex.IsMatch(extension, @"^\.(png|jpg|gif)$"))
{
throw new ArgumentException("The extension is not valid. The extension must be .png, .jpg, or .gif.", nameof(extension));
}
if (!Regex.IsMatch(newPath, @"(/[A-Za-z0-9]+)+?"))
{
throw new ArgumentException("The path is not valid. Provide an alphanumeric path that starts with a forward slash.", nameof(newPath));
}
_extension = extension;
_newPath = new PathString(newPath);
}
public void ApplyRule(RewriteContext context)
{
var request = context.HttpContext.Request;
if (request.Path.StartsWithSegments(new PathString(_newPath)))
{
return;
}
if (request.Path.Value.EndsWith(_extension, StringComparison.OrdinalIgnoreCase))
{
var response = context.HttpContext.Response;
response.StatusCode = StatusCodes.Status301MovedPermanently;
context.Result = RuleResult.EndResponse;
response.Headers[HeaderNames.Location] = _newPath + request.Path + request.QueryString;
}
}
}
}