IIS 7.5 and IIS 8.0 European Hosting

BLOG about IIS 7.5 Hosting, IIS 8.0 Hosting and Its Technology - Dedicated to European Windows Hosting Customer

IIS Hosting Europe - HostForLIFE :: WebApi Hosting in Internet Information Server (IIS 7.5)

clock December 23, 2022 07:46 by author Peter

The Web API is a platform to develop HTTP / HTTPS based services that can be used by native applications like on smartphones, tablets and browsers. The WebApi is a core part of ASP.NET and provides ways to create Restful services and can be used by any application that can understand HTTP communications.


This article will cover the hosting of a WebApi in IIS using a sample demo. I hope you have gone through with the link above and now you at least understand the execution of WebApi. In this article we'll host the WebApi in IIS and execute all the CRUD operations step-by-step.

Step 1
Build your solution in release mode.

To build the solution, kindly download the sample application from the link Restful CRUD Operations in WebApi Using ADO.NET Objects and SQL Server and start working further. Please choose the release option from the dropdown list as encircled in red.

Step 2
Right-click on the project and choose the publish command to publish the Web API. Kindly look at the images shown below.

As soon as you click on the publish button it publishes the build and prompts for a message in the bottom of success as shown in the image below:

Step 3
Now type "Inetmgr” in the Start window and click on inetmgr to open IIS as shown in the image below:

Step 4
To add a new application as a virtual directory right-click on the default website and click on the Add application property. Please refer to the following image.


Provide an alias name of your choice and provide the physical path from your directory.

Note:
    It should be a published solution path that we've created in Step 2 above.
    Change the application pool “DefaultAppPool” to ASP.Net v4.0 after clicking on the “select” option. If you encounter an error like “unrecognized attribute 'targetframework'. Note that attribute names are case-sensitive IIS7” then here is the solution for that.

Step 5
The sample application has been hosted in IIS

The preceding Blue screen shows that the Web API is up and running. I've used Fiddler to trace the requests, so I will open Fiddler to execute the following link to retrieve the information of the EmployeeId 15: http://localhost/hfl/api/Employees/GetEmployeeById/15


Execution of AddEmployee (POST) Method of WebApi
Since the WebApi is already in running mode, I'll execute the following link to add an employee to the database. http://localhost/hfl/api/Employees/AddEmployee and will pass the following JSON parameters { "EmployeeId": 30, "Name" : "Peter", "ManagerId" : 7 }.


Please open the database to confirm whether or not the user has been added to the database. We are nearly done with the execution of the Post method.

Execution of DeleteEmployeeById (Delete) Method of WebApi.
Now open the EmployeeController again and paste the following code into that as the Delete WebApi method:

Since the WebApi is already in running mode, I'll execute the following link to delete an employee by the employee id database. http://localhost/DotnetPiper/api/Employees/Delete/20.

Note: If you face an error at time of execution of DELETE and PUT.Kindly refer this link for resolution.

WepApi HTTP Error 405.0 - Method Not Allowed

Please open the database to confirm that EmployeeId “20” has been deleted. Kindly look at the image shown below.

Note: I have intentionally left the implementation of the Update method so that the end user can have hands-on to this. I'll also add a database backup for user help.

Go through with these detailed links to learn more about the WebApi.
    How MediaTypeFormatter and MediaTypeMapping are associated with each other in the WebApi.
    WebAPI: MediaTypeFrommatters in WebAPI.

Detailed links to learn more about the WebApi.

Points to consider:
    You should have a little knowledge of the WebApi.
    You should have knowledge of the Fiddler tool to execute the functionality.
    There is a need for SQL Server also.

I hope it will help you somewhere down the line.
Keep coding and smiling.


IIS Hosting Europe - HostForLIFE :: netTcpBinding In WCF Service With IIS Hosting

clock December 16, 2022 06:50 by author Peter

Today, we will learn about creating the WCF Service using netTcpBinding and hosting it on IIS Server. If you are new to WCF, then please read my previous article (Create Simple WCF Service And Host It On Console Application).


Now, let's make simple WCF Service which gives the sum of two numbers.

Start the Visual Studio with administrator rights and create one class library project named as 'WCFAddition'.

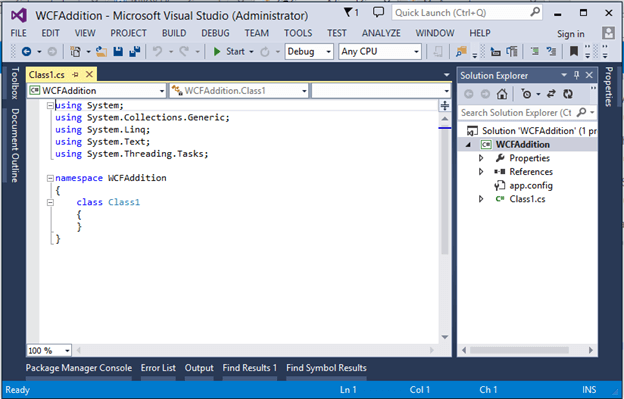
This will generate default class file automatically. So, we have to delete it and add one new item as 'WCF Service' with the same name, 'WCFAddition'. This will generate one class file and one interface (WCFAddition.cs and IWCFAddition.cs).

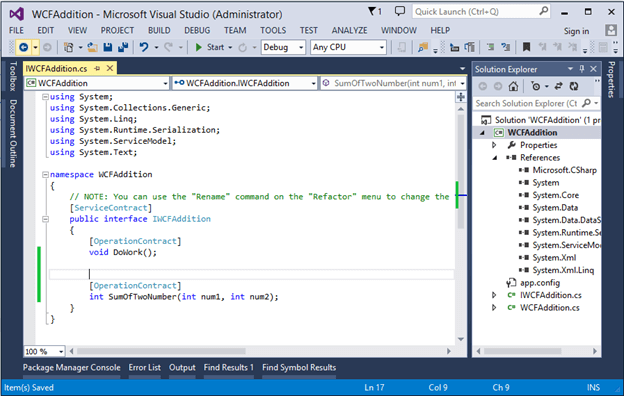
Open the interface file and create method 'SumOfTwoNumber'.

    [ServiceContract] 
    public interface IWCFAddition { 
        [OperationContract] 
        void DoWork(); 
        [OperationContract] 
        int SumOfTwoNumber(int num1, int num2); 
    } 

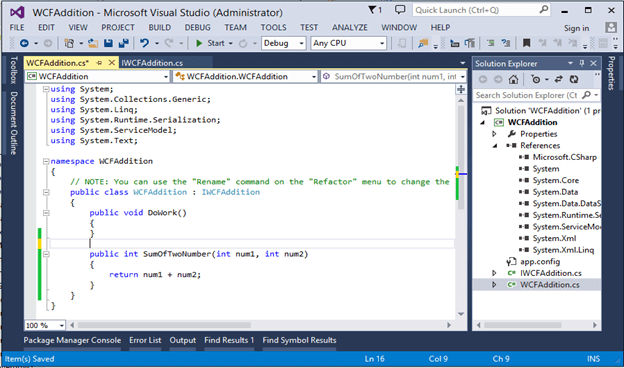
Now, implement this interface on class file.
    public class WCFAddition: IWCFAddition { 
        public void DoWork() {} 
        public int SumOfTwoNumber(int num1, int num2) { 
            return num1 + num2; 
        } 
    }

Now, let's build the project solution and then add new web site in same solution for IIS hosting.

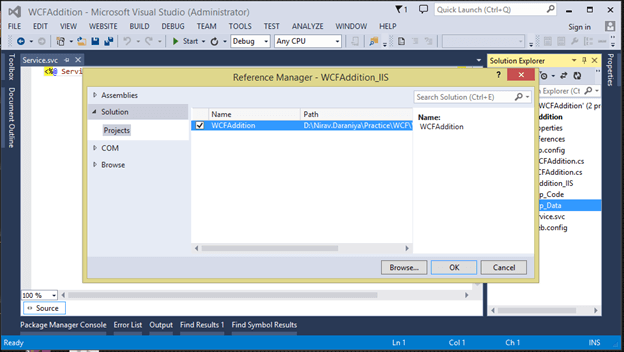
Give reference of WCF Service to this new website, as shown below.

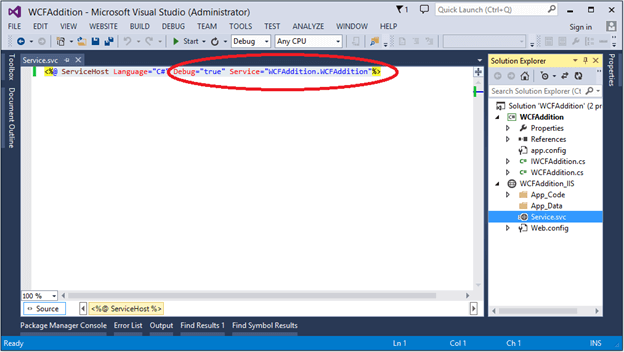
Now, open Service.svc file and modify it as below.
    <%@ ServiceHost Language="C#" Debug="true" Service="WCFAddition.WCFAddition"%>   

The main part will start now and we have to make changes in web.config file. So here, first we have defined endpoint with netTcpBinding and then defined the base address for the same, as show below.
    <services> 
        <service name="WCFAddition.WCFAddition"> 
            <endpoint binding="netTcpBinding" bindingConfiguration="ultra" contract="WCFAddition.IWCFAddition" /> 
            <host> 
                <baseAddresses> 
                    <add baseAddress="net.tcp://localhost:5050/implementclass" /> 
                    <add baseAddress="http://localhost:5051/implementclass" /> </baseAddresses> 
            </host> 
        </service> 
    </services>  

Define the behavior for the netTcpBinding.
    <behaviors> 
        <serviceBehaviors> 
            <behavior> 
                <serviceMetadata httpGetEnabled="true" /> 
                <serviceDebug includeExceptionDetailInFaults="true" /> </behavior> 
        </serviceBehaviors> 
    </behaviors>  

Define binding as netTcpBinding with its default parameter properties. Also, define the security mode.
    <bindings> 
        <netTcpBinding> 
            <binding name="ultra" maxBufferPoolSize="2147483647" maxBufferSize="2147483647" maxConnections="2147483647" maxReceivedMessageSize="2147483647" portSharingEnabled="false" transactionFlow="false" listenBacklog="2147483647"> 
                <security mode="None"> 
                    <message clientCredentialType="None" /> 
                    <transport protectionLevel="None" clientCredentialType="None" /> </security> 
                <reliableSession enabled="false" /> </binding> 
        </netTcpBinding> 
    </bindings>  

Full web.config
    <?xml version="1.0"?> 
    <configuration> 
        <appSettings> 
            <add key="aspnet:UseTaskFriendlySynchronizationContext" value="true" /> </appSettings> 
        <system.web> 
            <compilation debug="false" targetFramework="4.5.1" /> 
            <httpRuntime targetFramework="4.5.1" /> </system.web> 
        <system.serviceModel> 
            <services> 
                <service name="WCFAddition.WCFAddition"> 
                    <endpoint binding="netTcpBinding" bindingConfiguration="ultra" contract="WCFAddition.IWCFAddition" /> 
                    <host> 
                        <baseAddresses> 
                            <add baseAddress="net.tcp://localhost:5050/implementclass" /> 
                            <add baseAddress="http://localhost:5051/implementclass" /> </baseAddresses> 
                    </host> 
                </service> 
            </services> 
            <bindings> 
                <netTcpBinding> 
                    <binding name="ultra" maxBufferPoolSize="2147483647" maxBufferSize="2147483647" maxConnections="2147483647" maxReceivedMessageSize="2147483647" portSharingEnabled="false" transactionFlow="false" listenBacklog="2147483647"> 
                        <security mode="None"> 
                            <message clientCredentialType="None" /> 
                            <transport protectionLevel="None" clientCredentialType="None" /> </security> 
                        <reliableSession enabled="false" /> </binding> 
                </netTcpBinding> 
            </bindings> 
            <behaviors> 
                <serviceBehaviors> 
                    <behavior> 
                        <serviceMetadata httpGetEnabled="true" /> 
                        <serviceDebug includeExceptionDetailInFaults="true" /> </behavior> 
                </serviceBehaviors> 
            </behaviors> 
            <serviceHostingEnvironment aspNetCompatibilityEnabled="true" multipleSiteBindingsEnabled="true" /> </system.serviceModel> 
        <system.webServer> 
            <modules runAllManagedModulesForAllRequests="true" /> 
            <!-- 

     
To browse web app root directory during debugging, set the value below to true.     
Set to false before deployment to avoid disclosing web app folder information. 
    --> 
            <directoryBrowse enabled="true" /> </system.webServer> 
    </configuration>  

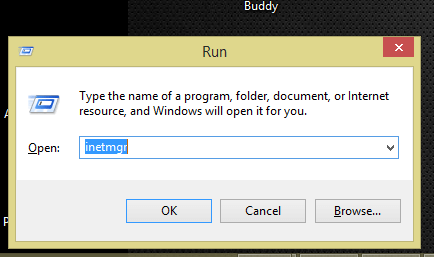
Now, when we have built the solution, we have to host it on IIS. So, open the IIS type 'inetmgr' command on run window.

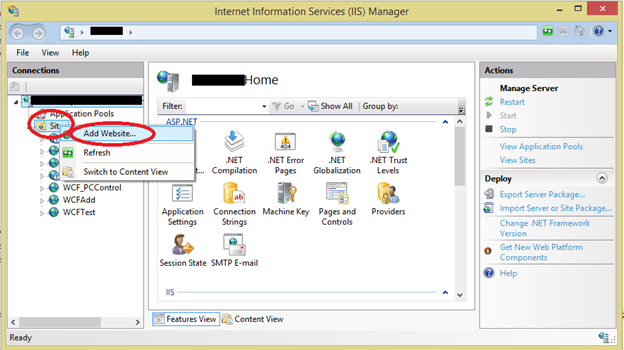
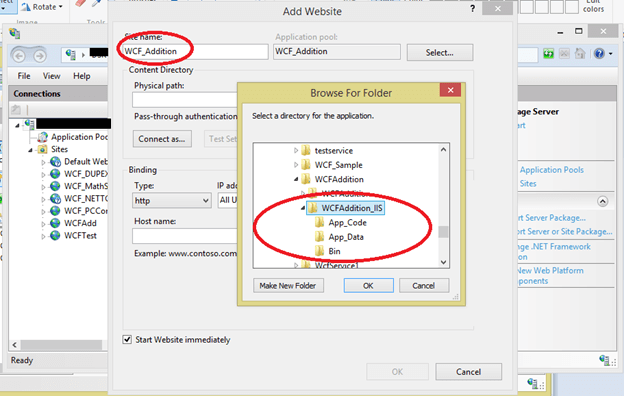
It will open IIS. Go to ‘Sites’ and add new website

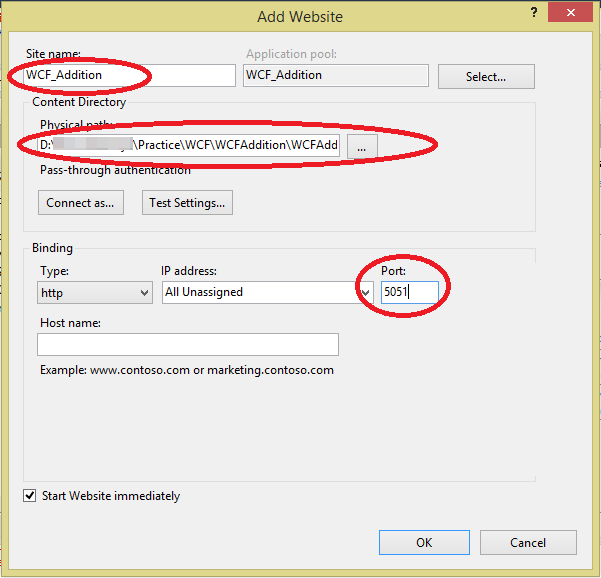
New window is open now. Give it a name as 'WCF_Addition' and assign physical path of your IIS project.

Now, in 'binding' section, select Type as http and add port '5051'. Click on OK button.


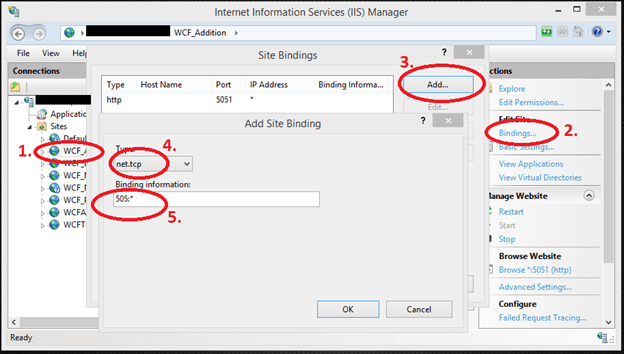
Now, select your web site and click on ‘Advance settings', as shown in the below image.

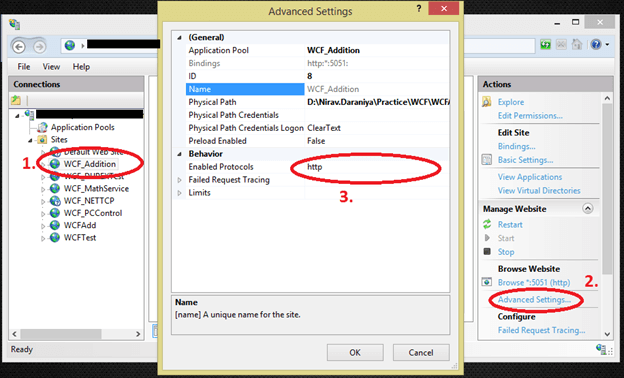
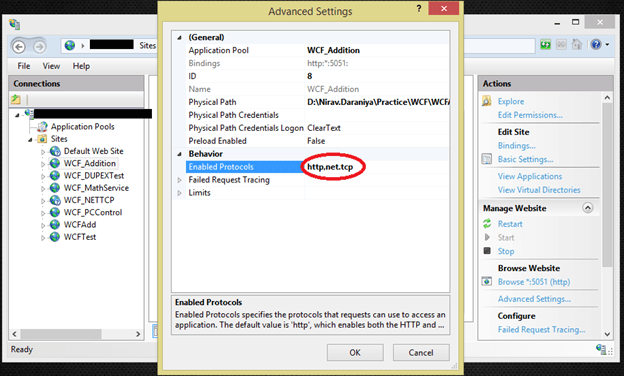
In 'Behavior' => 'Enable Protocols' = http,net .tcp and click on OK.

Now, click on 'Binding' link >> 'Add' button >> and add "net.tcp" and "505:*"

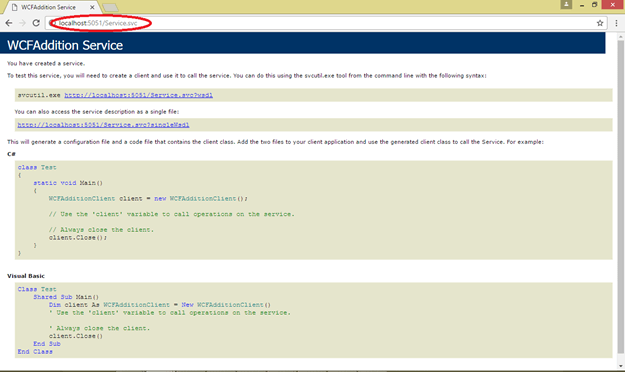
Our service is hosted now. Let's check it.


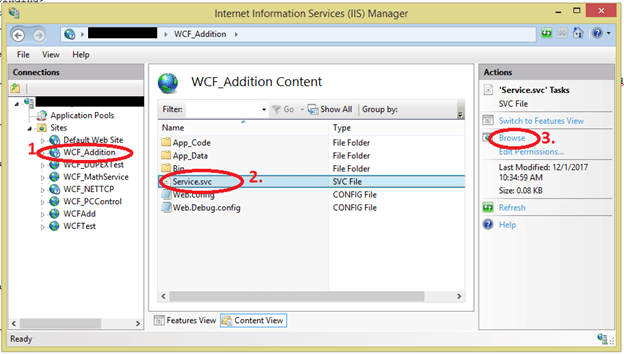
You can see that the service is hosted successfully on IIS and you can browse it on given URL.


IIS Hosting Europe - HostForLIFE :: IP Address and Domain Restrictions in IIS 8

clock December 2, 2022 06:32 by author Peter

This article covers how to configure Dynamic IP Restrictions.

Introduction
IP Address and Domain Restrictions is one of the great built-in features of IIS 8. Configuring this feature allows a website administrator to selectively permit or deny access to the web server, websites, folders or files that makes your server more secure. One can configure and set the limits based on specific IP address(es) or frequency of requests from a specific IP over a period of time. By default all the clients requesting the website are permitted all access unless specifically rejected.


Background
This feature was available in previous versions of IIS where you can block one IP or range of IP addresses. The disadvantage in this was first you need to know the person doing suspicious activity on your website based on the tools like Log Parser for checking the site logs then you can just block that IP or range of IP addresses using Deny Rules. Most of professional attackers (hackers) will use a variety of IPs from proxy servers so by the time you've blocked a handful a new range could be starting up.

Installing IP Address and Domain Restrictions in IIS 8

This feature is not installed by default. One must install the feature from the Turn Windows features On and Off window.

For that use the following procedure:

  1. Open the Control Panel.
  2. Click on the Programs feature.
  3. In that Click on Turn Windows features on or off under Programs and Features.
  4. Install the required features.

Configuring IP address and Domain Restrictions in IIS Manager
Open the IIS Manager. (Click WIN+R, enter inetmgr in the dialog and click OK. Alternatively, search for IIS Manger in the Start window).
Click on the IP Address and Domain Restrictions feature in the feature pane under the IIS section.

Once you opened this feature, you will see a window as in the following image.

The Action Pane elements are the elements used for defining the rules for allowing or denying the specific IP address(es). Let's have a deeper look into each of these elements.
Edit Feature Settings
This action is used for specifying the default access to all unspecified clients in Add and Deny rules.
On clicking this action, it will open up a window as in the following image.

Select Allow in the Access for unspecified clients dropdown if you are to allow all clients by default else select Deny.

If you want to configure rules based on the client's DNS name then check the Enable Domain Name Restrictions checkbox. If you click on OK to save the settings when this checkbox was checked then it will show a warning (as in the following image) that states that doing DNS lookups is a potentially expensive operation. Click on Yes to enable DNS lookup restrictions.

If you want to enable the requests that come through a proxy server then check Enable Proxy Mode checkbox.
Choose the Default Deny Action Type for sending the response to clients when you are denied a request. It can be either Unauthorized (401), Forbidden (403), Not Found (404) or Abort the request.
Once you have selected your options click on OK to save the settings.

Add Allow/ Deny Entry
These two action types are used for defining the rule for allowing or blocking the specific IP address or range of IP addresses.
On clicking the action, it will open one window as provided in the following image.

To create a rule for a specific IP Address, select Specific IP Address and enter the client IP address in the provided TextBox.
To create a rule for a range of IP addresses, select IP address range and enter the subnet and subnet mask in the provided textboxes. For example, to permit access to all IP addresses in the range from 192.168.8.0 to 192.168.8.8 then enter the subnet as 192.168.8.0 and subnet mask as the 255.0.0.0.

If you have enabled Domain Name Restrictions in the feature settings, then you will be able to set restrictions based on DNS names else this option will not be available. To create a rule for a client domain name, then select Domain name and enter the DNS name.

After entering the details click on OK to add the rule.

Edit Dynamic Restriction Settings
This is the new feature that came with IIS 8.
On configuring this feature one can secure their web applications from automated attacks like Dictionary attacks.
This action allows to dynamically determine whether to block certain clients, based on number of concurrent requests at a time or number of requests over a period of time.
On clicking this action, it will open a window as provided in the following image.

If you want to restrict the client based on a number of concurrent requests, then check the Deny IP Address based on number of concurrent requests check boxand enter Maximum number of concurrent requests count in the provided TextBox.

If you want to restrict the client based on number of requests over a period of time, then check the provided checkbox and enter the details in the provided textboxes.

Check the Enable the Logging Only Mode checkbox if you want IIS to log requests that would be rejected.

View Ordered List
This action is used for changing the rule priority.
On clicking this action, you will be able to see the screen that is showing rules places in the order and with multiple action elements as provided in the following image.

Rules located at the top of the list have higher priority.
Use Move Up and Move Down actions to change the priority of the rules.
Once you are done with changing the order of the rules then click on View Unordered List to return to the screen that allows you to add and remove rules.

Remove

This action is used to remove the rules that are not required.
To view this action click on any of the rules in the feature pane and then click on Remove to remove the rule.
On clicking Remove, you will get a warning as in the following image. Click on Yes to remove the rule.

Feature pane elements that give the information about the rules are applicable to the current web site or virtual application.
    Mode
      This displays the type of rule. It contains the values, either Allow or Deny, that indicates whether the created rule is to allow or deny access to content.

    Requester
      This displays the specific IP address or range of IP addresses or domain name defined in the Add Allow/Deny Restriction Rule.

    Entry Type
      This displays whether the item is local or inherited. Local items are added in the current application level and inherited items are added from a parent application level.


About HostForLIFE.eu

HostForLIFE.eu is European Windows Hosting Provider which focuses on Windows Platform only. We deliver on-demand hosting solutions including Shared hosting, Reseller Hosting, Cloud Hosting, Dedicated Servers, and IT as a Service for companies of all sizes.

We have offered the latest Windows 2016 Hosting, ASP.NET Core 2.2.1 Hosting, ASP.NET MVC 6 Hosting and SQL 2017 Hosting.


Tag cloud

Sign in