IIS 7.5 and IIS 8.0 European Hosting

BLOG about IIS 7.5 Hosting, IIS 8.0 Hosting and Its Technology - Dedicated to European Windows Hosting Customer

IIS 8.0 Hosting UK – HostForLIFE.eu :: How to Enable Compression for HTTP 1.0 Request ?

clock November 20, 2014 06:45 by author Peter

Recently I'd been a web hosting in this blog. Throughout the integration I found which default IIS 8.0 configuration don't compress static source when requested along with HTTP 1. 0. Thus in this quick & brief article we'll notice how you can enable static source compression for HTTP 1. 0 request in IIS.

So I made a decision to look into IIS 8.0 log and I found that uses HTTP 1. 0 to request custom origin server.

I didn't anticipated HTTP 1. 0 request here thus once again I requested origin server along with HTTP 1. 0 using fiddler and also as a surprise IIS returned un-compressed response. In IIS by default compression for HTTP 1. 0 request is disabled. We have to explicitly enable compression for HTTP 1. 0 request. To Allow compression for HTTP 1. 0 request we have to alter web. config as beneath.

<configuration>
    <system.webServer>   
<httpCompression noCompressionForHttp10="false" noCompressionForProxies="false">
</httpCompression>
   
</system.webServer>
</configuration>

When changing web. config as above, IIS started to server compressed response for HTTP 1. 0. Hope this quick and brief publish could be useful !


IIS 8.0 Hosting with France Data Center - HostForLIFE.eu :: Dynamic IP Address & Domains Restrictions on IIS 8.0

clock November 19, 2014 05:17 by author Peter

Just before IIS 8. 0, server administrators may permit or deny accessibility for particular IP address or range of IP addresses. Other then still acquiring IP address that trigger mass attack was tedious process for server administrator because it involve analyzing IIS 8 log periodically and manually add it to deny record whether it found new IP address.

An answer to above issue is instead of blocking IP based mostly on addresses, we must block IP primarily based on it is activity. For example, maximum no of concurrent request, total no of request in excess of a time period, and many others. Sure this really is wherever IIS 8. 0 and Dynamic IP Addresses & Domains Restrictions are available in picture. Dynamic IP Addresses & Domains Restrictions attribute of IIS 8. 0 allow administrators to block IP based mostly on it is activity.

Blocking access based mostly on no of requests in IIS 8
First, Open up IIS manager and navigate to web page for that you desire to configure and click on IP Address and Domain Restrictions function.

Next step, click Edit Dynamic Restriction Settings... link in action pane as shown on the picture below.

Select on it will open up the dialog box that permits you to configure dynamic IP blocking. There will be 2 choices to block IP based mostly on his activity.

Maximum no of concurrent requests
This setting ensures that in case concurrent requests of any IP address exceed than configured limit then IIS won't serve which ask for and it'll deny.

Maximum no of requests more than a period of time
This setting ensures that in case any IP address sends additional requests than authorized limit among specified time then IIS won't serve which ask for and it'll deny. For e. g. as shown in above image in the event any IP can deliver greater than 20 requests among 200 milliseconds then IIS can deny to serve request.

Response behavior when denying requests
To configure response behavior when denying any requests in IIS 8, click on Edit Feature Settings... link in action pane on right side bar.

In beneath image we will notice available deny action type while denying any requests. These are generally Unauthorized, Forbidden, Not Found, and Abort. Based mostly for this settings IIS can deliver response along with respective HTTP status code.

Dynamic IP restrictions and Proxy
Many clients are accessing web sites through a number of proxy server ; during this case it might happen IIS might obtain same IP altogether requests though it is asked for by totally different client. To address this condition, we will configure IIS 8 to examine x-forwarded-for HTTP header. To allow this just check Enable Proxy Mode checkbox as displayed in subsequent image.

Thus in nutshell, we will claim that Dynamic IP address and domain restrictions feature of IIS 8 adds security improvements towards the web site by blocking mass requests from one client.


IIS 7.5 Hosting with Paris (France) Server - HostForLIFE.eu :: How to work with IIS Metabase and DirectoryServices ?

clock November 12, 2014 10:31 by author Peter

While operating with the IIS we all prefer to understand the settings done on the Virtual Directory are correct or not. therefore we are planning to see a way to do this programmatically. To check some properties of the IIS (Virtual Directory) of web based application after  install, one will create custom application for that. There are list of IIS Properties that we will get once post installation. The list of properties exposed by the IIS API or net Settings Property is mentioned below:


  • AuthFlags
  • Path
  • AppFriendlyName
  • EnableDirBrowsing
  • AccessRead
  • AccessExecute
  • AccessWrite
  • AccessScript
  • AuthNTLM
  • EnableDefaultDoc
  • DefaultDoc
  • AspEnableParentPaths

The top of settings are designed within the Metabase of the IIS.

IIS Metabase:
IIS Metabase may be a structure wherever IIS configuration settings are stored. You'll be able to navigate through the IIS Metabase using MetaEdit or Metabase explorer. The Metabase is predicated on a hierarchical  style with inheritance. Every object within the metabase has a KeyType. The KeyType property specifies the type of metabase key.
.NET provides the namespace that is used to induce the properties of the IIS Virtual Directory. .Net have the "System.DirectoryServices" namespace that exposes the DirectoryEntry class.

Code:
WebSettings.cs

public class WebSettings
{
     //Authentication Bitmask Values
     //Constant Value Description
     public const int MD_AUTH_ANONYMOUS = 0x00000001;
     //Anonymous authentication available.
     public const int MD_AUTH_BASIC = 0x00000002;
     //Basic authentication available.
     public const int MD_AUTH_NT = 0x00000004;

     //Windows authentication schemes available.
     string Auth_Type;
     public string calc(int AuthValue)
     {
         if (AuthValue == MD_AUTH_ANONYMOUS)
          {
               Auth_Type = "ANONYMOUS ACCESS ENABLED";
          }
          if (AuthValue == MD_AUTH_BASIC)
          {
               Auth_Type = "BASIC ACCESS ENABLED";
          }
          if (AuthValue == MD_AUTH_NT)
          {
               Auth_Type = "INTEGRATED WINDOWS ACCESS ENABLED";
         }
          if (AuthValue == (MD_AUTH_ANONYMOUS + MD_AUTH_NT))
          {
               Auth_Type = "INTEGRATED WINDOWS + ANONYMOUS ACCESS ENABLED";
          }
          if (AuthValue == (MD_AUTH_ANONYMOUS + MD_AUTH_BASIC))
         {
              Auth_Type="BASIC + ANONYMOUS";
         }
         if (AuthValue == (MD_AUTH_ANONYMOUS + MD_AUTH_NT))
         {
              Auth_Type = "INTEGRATED + ANONYMOUS";
         }
         if (AuthValue == (MD_AUTH_BASIC + MD_AUTH_NT))
         {
             Auth_Type = "BASIC + INTEGRATED";
        }
         if (AuthValue == (MD_AUTH_ANONYMOUS + MD_AUTH_BASIC + MD_AUTH_NT))
         {
             Auth_Type = "ANONYMOUS + BASIC + INTEGRATED";
         }
          return Auth_Type;
     }

Main.cs

string serverName;
string vDir;

serverName = System.Environment.MachineName;
vDir = "DirectoryName";
vdir = new DirectoryEntry("IIS://" + serverName + "/W3SVC/1/ROOT/" + vDir);
wbs = new WebSettings();
string[] sComp = new string[12];
sComp[0] = "AuthFlags";
sComp[1] = "Path";
sComp[2] = "AppFriendlyName";
sComp[3] ="EnableDirBrowsing";
sComp[4] ="AccessRead";
sComp[5] ="AccessExecute";
sComp[6] ="AccessWrite";
sComp[7] ="AccessScript";
sComp[8] ="AuthNTLM";
sComp[9] ="EnableDefaultDoc";
sComp[10] ="DefaultDoc";
sComp[11] ="AspEnableParentPaths";
ListViewItem[] listViewItem = new ListViewItem[12];
lstIISProperty.Items.Clear();
for (int i = 0; i < sComp.Length; i++)
{
    //lstComponents.MultiColumn = 2;
    lstIISProperty.Sorting = SortOrder.Ascending;
    if (sComp[i] != null)
    {
    listViewItem[i] = new ListViewItem(new string[]{ sComp[i], IISPropertyValue(sCompi]), fnExpected_Value(sComp[i])}, -1);
    lstIISProperty.Items.Add(listViewItem[i]);
    }
}


HostForLIFE.eu Windows Hosting Proudly Launches New Data Center in Paris (France)

clock November 10, 2014 10:56 by author Peter

HostForLIFE.eu, a leading Windows web hosting provider with innovative technology solutions and a dedicated professional services team proudly announces New Data Center in Paris (France) for all costumers. HostForLIFE’s new data center in Paris will address strong demand from customers for excellent data center services in Europe, as data consumption and hosting services experience continued growth in the global IT markets.

The new facility will provide customers and our end users with HostForLIFE.eu services that meet in-country data residency requirements. It will also complement the existing HostForLIFE.eu. The Paris (France) data center will offer the full range of HostForLIFE.eu web hosting infrastructure services, including bare metal servers, virtual servers, storage and networking.

HostForLIFE.eu expansion into Paris gives us a stronger European market presence as well as added proximity and access to HostForLIFE.eu growing customer base in region. HostForLIFE.eu has been a leader in the dedicated Windows & ASP.NET Hosting industry for a number of years now and we are looking forward to bringing our level of service and reliability to the Windows market at an affordable price.

The new data center will allow customers to replicate or integrate data between Paris data centers with high transfer speeds and unmetered bandwidth (at no charge) between facilities. Paris itself, is a major center of business with a third of the world’s largest companies headquartered there, but it also boasts a large community of emerging technology startups, incubators, and entrepreneurs.

Our network is built from best-in-class networking infrastructure, hardware, and software with exceptional bandwidth and connectivity for the highest speed and reliability. Every upstream network port is multiple 10G and every rack is terminated with two 10G connections to the public Internet and two 10G connections to our private network. Every location is hardened against physical intrusion, and server room access is limited to certified employees.

All of HostForLIFE.eu controls (inside and outside the data center) are vetted by third-party auditors, and we provide detailed reports for our customers own security certifications. The most sensitive financial, healthcare, and government workloads require the unparalleled protection HostForLIFE.eu provides.

Paris data centres meet the highest levels of building security, including constant security by trained security staff 24x7, electronic access management, proximity access control systems and CCTV. HostForLIFE.eu is monitored 24/7 by 441 cameras onsite. All customers are offered a 24/7 support function and access to our IT equipment at any time 24/7 by 365 days a year.

For more information about new data center in Paris, please visit http://hostforlife.eu/Paris-Hosting-Data-Center

About HostForLIFE.eu
HostForLIFE.eu is an European Windows Hosting Provider which focuses on the Windows Platform only. HostForLIFE.eu deliver on-demand hosting solutions including Shared hosting, Reseller Hosting, Cloud Hosting, Dedicated Servers, and IT as a Service for companies of all sizes.

HostForLIFE.eu is awarded Top No#1 SPOTLIGHT Recommended Hosting Partner by Microsoft (see http://www.asp.net/hosting/hostingprovider/details/953). Our service is ranked the highest top #1 spot in several European countries, such as: Germany, Italy, Netherlands, France, Belgium, United Kingdom, Sweden, Finland, Switzerland and other European countries. Besides this award, we have also won several awards from reputable organizations in the hosting industry and the detail can be found on our official website.


European IIS 7 Hosting - HostForLIFE.eu :: How to Easily Create Multiple 301 Redirects with a URL Rewrite Map

clock November 6, 2014 08:33 by author Frank

Redesigning a website or creating a new version of an existing web page is a common task for web developers and webmasters. If you have an established web site with good search engine traffic it’s critical to be able to redirect that search traffic from the old pages to the new pages even if the name of the page or the page location changes. Even if that content is great and plenty of people have linked to your page/s, all your hard work won’t matter if search engines like Google are unaware of the new location or people are trying to link to the old, non-existent, page location.

The way to properly communicate these changes to search engines is to use a 301 Redirect which tells search engines the new permanent location of the content.

Using 301 redirects used to be a manual process where you had to place code in the old page using Javascript in the page body or add a special metatag like this:

<meta http-equiv=”refresh” content=”0;url=http://www.domain.com/newpage.html”>

As you can imagine, this can be a tedious and time consuming task if you have several of pages to update. One additional downside to the old manual redirects option is performance. The old page still has to be accessed in order for the redirection to take effect.

URL Rewrite Module with IIS7

Now there’s an easier solution, and one that offers better performance.  Starting with IIS 7 one can implement different kinds of url rewriting and redirecting with ease by using the URL Rewrite Module. The various rules can be configured using the IIS 7 Manager GUI or by directly editing the web.config. To open the URL Rewrite Module simply double click the URL Rewrite icon on your site properties as shown below.


From there you will be able to maintain your existing rules or add new ones as seen in this picture.


This is a pretty easy way to create server-side rules for rewriting and redirecting, but what happens when you have 30 or 40 legacy URLs that need to be redirected to new pages? Do you have to enter each one manually? Of course not. The solution to that is to use a URL Rewrite Map.

URL Rewrite MAP

By using a URL Rewrite Map it has never been easier to create and maintain multiple 301 redirects for different pages on your web site.  The rewrite rules are stored in the <system.webServer> section of your web.config so you can quickly make changes as needed.

Here is all the code you need to accomplish this:

<system.webServer>
  <rewrite>
<rewriteMaps>
  <rewriteMap name=”Redirects”>
<add key=”/test.aspx” value=”/test2.aspx” />
<add key=”/aboutus.aspx” value=”/about” />
  </rewriteMap>
</rewriteMaps>
  <rules>
<rule name=”Redirect rule1 for Redirects”>
  <match url=”.*” />
  <conditions>
<add input=”{Redirects:{REQUEST_URI}}” pattern=”(.+)” />
  </conditions>
  <action type=”Redirect” url=”{C:1}” appendQueryString=”false” />
</rule>
  </rules>
</rewrite>
</system.webServer>

In the example above I’m performing a 301 redirect on the test.aspx file to test2.aspx file. There’s also a 301 redirect for the aboutus.aspx file to folder called /about, however, in this case it’s important to note that the /about folder will also need a default page or else a 404 error will result.

As you add more URLs to your Rewrite Map you’ll notice that your web.config can become a bit cluttered. The solution to this will be to store the redirect rules in an external file. Let’s call this file myrewritemaps.config. This file will now contain this code block:

<rewriteMaps>
  <rewriteMap name=”Redirects”>
<add key=”/test.aspx” value=”/test2.aspx” />
<add key=”/aboutus.aspx” value=”/about” />
  </rewriteMap>
 </rewriteMaps>

In your web.config you add the following line of code under the <rewrite> section referencing the external config file:

<rewriteMaps configSource=”myrewritemaps.config” />

Your web.config will now look nice and clean like this:

<system.webServer>
  <rewrite>
<rewriteMaps configSource=”myrewritemaps.config” />  
<rules>
  <rule name=”Redirect rule1 for Redirects”>
<match url=”.*” />
<conditions>
  <add input=”{Redirects:{REQUEST_URI}}” pattern=”(.+)” />
</conditions>
<action type=”Redirect” url=”{C:1}” appendQueryString=”false” />
  </rule>
</rules>  

  </rewrite>
</system.webServer>

Here is a 3rd party site which offers a free test to ensure your 301 redirect rules are working:

http://www.ragepank.com/redirect-check/

There is no real limit on how many URLs can be configured for redirecting with the URL Rewrite Map.  You should perform regular search engine analysis to see when the new URLs have been picked up. Once the old URL is no longer indexed and traffic has dropped off you could remove it from your map.


IIS 8.0 Hosting Netherlands - HostForLIFE.eu :: How To Fix IIS Error 500 Internal Server Error Errors ?

clock November 5, 2014 06:30 by author Peter

Problem:
This is another common error that troubles plenty of ASP.NET users. Generally, the questions are framed like: “This error (HTTP 500 Internal Server Error) means that the website you are visiting had a server problem which prevented the webpage from displaying”
Or you can see on the picture below:

What is a 500 Internal Server Error?

In short, a HTTP 500 error implies that there's a drag with the configuration of the server. An HTTP 500 error isn't a problem the end user will solve themselves.  In their case, they need to report the matter to the server administrator or web site owner. however if you're managing your own IIS server and it’s your job to diagnose 500 server errors, there are many ways that to create the method easier.

Why am I getting HTTP 500 Internal Server Error IIS error?

The HTTP 500 Internal Server Error Iis error is also caused by windows system files harm. The corrupted system files entries may be a true threat to the well being of your PC.
There may be several events which can have resulted within the system files errors. an incomplete installation, an incomplete uninstall, improper deletion of applications or hardware. It also can be caused if your PC is recovered from a virus or adware/spyware attack or by an improper closedown of the PC. All the above actives could lead to the deletion or corruption of the entries within the windows system files. This corrupted system file can cause the missing and incorrectly joined info and files required for the right operating of the application.

How to Fix “HTTP 500 Internal Server Errors”
1. First, log on as an administrator
2. Then, Click the Start button -> All Programs -> Accessories -> System Tools, and then click System Restore.
3. On new window, choose the "Restore my computer to an earlier time" choice so click Next button.
4. choose the most recent system restore purpose from the "On this list, click a restore point" list, so click Next.
5. Click Next on the confirmation window.
6. Now, Restarts your Computer when the restoration is finished.


European IIS 8.5 Hosting - UK :: How to Install Wordpress on Windows Server 2012

clock November 4, 2014 08:56 by author Scott

In this tutorial, I will show you how to install Wordpress on Windows Server 2012 with IIS 8. Assume that you have your own dedicated server and you want to install Wordpress. If you use shared hosting provider, all can be done via one click installation via your hosting provider Control panel, or you can ask your hosting provider to install Wordpress for you. Now, how about if you own your dedicated server and you want to install Wordpress on server?

Configuration

The configuration of IIS 8 is quite easy: you just enable the Web Server role through Server Manager. Please see the screenshot below

Then, please make sure you install PHP Manager, I would recommend you to use http://phpmanager.codeplex.com/. This is good tool and help you to enable and disable PHP extensions.

Installation

To make things easy, you can install and configure PHP quite easily using the Microsoft Web Platform Installer. When you run the Web Platform Installer (Web PI), you can do a quick search for “sql php” and it comes up a few results. When you select “Microsoft Drivers 3.0 for PHP v5.4 for SQL Server in IIS”, which is what we need, all other prerequisites will be automatically installed as well as dependencies (PHP and URL Rewrite for IIS).

After Web PI finishes, you will have PHP installed and configured for use in IIS. Time to do a little test to see if everything is running smoothly. Create a new file under C:\inetpub\wwwroot\ (or wherever your Default Web Site is pointing to) named test.php with the following content:

<?php echo phpinfo(); ?>

This will output information about your PHP configuration (ref: http://php.net/manual/en/function.phpinfo.php).

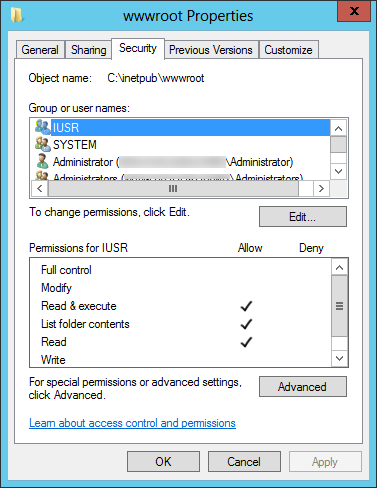
Time to try it out: navigate to the page (likely http://localhost/test.php). If you are greeted with a screen with purple blocks of information about your PHP configuration, you’re all set and you can skip ahead to the WORDPRESS INSTALLATION section. Chances are you’re going to be greeted with an IIS 403.1 error screen, however, which is due to the fact that the user account that IIS is currently using for the anonymous access to your site doesn’t have the proper privileges to access your wwwroot (or equivalent) folder on disk. This is solved quite easily by granting this user (called IUSR by default) access to the wwwroot folder through Windows Explorer or your other favorite method.

Then, please retry

Wordpress Installation

Now we can start downloading the actual WordPress files and start the installation. First off, grab the latest version (or the version of your choice) of WordPress. We will also need the WP Db Abstraction plugin. After downloading, unblock and unZIP both files in a folder under wwwroot (or your Web Site’s location). Installation of the WP Db Abstraction plugin is quite easy, just follow the steps outlined in the readme.txt:

  • Upload wp-db-abstraction.php and the wp-db-abstraction directory to wp-content/mu-plugins. This should be parallel to your regular plugins directory. If the mu-plugins directory does not exist, you must create it.
  • Put the db.php file from inside the wp-db-abstraction.php directory to wp-content/db.php
  • Visit $your_wordpress_url/wp-content/mu-plugins/wp-db-abstraction/setup-config.php to generate your wp-config.php file

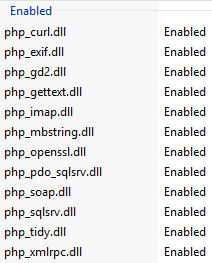
Before you perform the last step, though, go to IIS Manager and enter PHP Manager (it’s located on the Features page of your server under IIS). Scroll down and click the “Enable or disable an extension” link. You need to make sure that php_pdo_sqlsrv.dll and php_sqlsrv.dll are both enabled. You can also go ahead and disable the *mysql*.dll extensions. Here’s my list of enabled extensions:

Now we can visit the setup-config.php page as outlined above. The steps here are quite straightforward, so I’m not going to walk you through them. You will need to create a user on your SQL Server 2012 installation with SQL Server authentication that has access to a database that you also need to create to use for your WordPress installation. 

One note about this process: I had some issues when choosing the default selected “SQL Server using MS PHP driver” and went with the “PDO SqlSrv” option the second time to eliminate these issues.

If the wizard has trouble automatically creating the wp-config.php file, you can either choose to give IUSR write permissions on the folder you created to hold all your WordPress files or you can manually create the file under that folder and paste the output you see on screen in there (I chose the latter). After the wp-config.php file is created, you can start the installation of WordPress by clicking the link on the bottom of the page you’re on.

Wordpress Configuration

After the install, which should only take a minute tops, you are now ready to log in to your WordPress admin dashboard and start configuring it how you’d like. As you can see, there’s a sample post and comment already waiting for you. If your experience is anything like mine, you will notice that when you navigate to the Posts -> All Posts option on the top left of your dashboard you won’t actually see these posts in the list. It took some hunting around the web to figure this out, but apparently there’s a line in the translations.php file of the WP Db Abstraction plugin that’s causing this (thanks to tm3ister on http://sourceforge.net/projects/wp-sqlsrv/forums/forum/1124403/topic/5004241 for figuring this out!). The solution is to manually edit the translate_limit function in the mu-plugins/wp-db-abstraction/translations/sqlsrv/translations.php file:

Change

// Check for true offset
if ( (count($limit_matches) == 5  )  && $limit_matches[1] != '0' ) {
    $true_offset = true;
} elseif ( (count($limit_matches) == 5 )  && $limit_matches[1] == '0' ) {
    $limit_matches[1] = $limit_matches[4];
}

To

// Check for true offset
if ( (count($limit_matches) == 5  )  && $limit_matches[1] != '0' ) {
    $true_offset = true;
} elseif ( (count($limit_matches) >= 5 )  && $limit_matches[1] == '0' ) {
    $limit_matches[1] = $limit_matches[4];
}

The last thing we’re going to configure is Permalinks (or pretty URLs) for our posts. When you navigate to Settings -> Permalinks on the admin dashboard, you’ll see some options to rewrite URLs to be more human and search engine friendly. For now, select Custom Structure and enter/%year%/%monthnum%/%postname%/ in the text field and hit Save Changes. The last step is to create a web.config file in our WordPress folder to rewrite the URLs according to this scheme with IIS URL Rewrite. Create a new web.config file (if you don’t have one already) in the folder you installed WordPress to and copy in the following:

<?xml version="1.0" encoding="utf-8"?>
<configuration>
  <system.webServer>
    <rewrite>
      <rules>
        <rule name="wordpress" patternSyntax="Wildcard">
          <match url="*" />
          <conditions>
            <add input="{REQUEST_FILENAME}" matchType="IsFile" negate="true" />
            <add input="{REQUEST_FILENAME}" matchType="IsDirectory" negate="true" />
          </conditions>
          <action type="Rewrite" url="index.php"/>
        </rule>
      </rules>
    </rewrite>
  </system.webServer>
</configuration>

Done!! Your Wordpress is ready on Windows Server 2012.


About HostForLIFE.eu

HostForLIFE.eu is European Windows Hosting Provider which focuses on Windows Platform only. We deliver on-demand hosting solutions including Shared hosting, Reseller Hosting, Cloud Hosting, Dedicated Servers, and IT as a Service for companies of all sizes.

We have offered the latest Windows 2016 Hosting, ASP.NET Core 2.2.1 Hosting, ASP.NET MVC 6 Hosting and SQL 2017 Hosting.


Tag cloud

Sign in