IIS 7.5 and IIS 8.0 European Hosting

BLOG about IIS 7.5 Hosting, IIS 8.0 Hosting and Its Technology - Dedicated to European Windows Hosting Customer

IIS Hosting Europe - HostForLIFE :: How To Deploy React Application On IIS Server?

clock August 31, 2022 09:31 by author Peter

Today, I am going to show you how to deploy the React App to the IIS server, so let's grab a cup of coffee and start coding.

 
What is IIS?
IIS stands for "Internet Information Services", which is a web server provided by Microsoft to host the websites and other stuff on the web.
 
How to enable IIS?
If you have already enabled IIS then you can skip this step. But if you have not enabled it already then follow the below steps:
    Open Control Panel and then click on the "Programs and Features".
    Click on "Turn Windows features on or off".
    Select Internet Information Services and click on the OK button.
    To see whether or not IIS is enabled, press Windows + R key and type inetmgr and click on OK.
    IIS Manager is open.

Create a Simple React App
Open a command prompt or your favorite terminal and type the below command to create a react app.
    npx create-react-app my-react-app  

 After successfully creating the app go to the new app.
    cd my-react-app  

To see how it look likes type the below command.
    npm start  

and it will start the development server and navigate you to http://localhost:3000/
 
You can see the default landing page:

To host an app in any web server we first need to create a production build. To create a production build of our react app use the below command.

    npm run build  

The output of the above command creates a new build folder inside the project which contains production build. So far we have created a React app & created a production build of that app. Now the next step is to deploy it on IIS. Press Windows + R key and write inetmgr to open the IIS Manager. You can see the below screen.

 
First, we will create a new Application Pool, so right-click on Application Pools and click on Add Application Pool. Then give it a name as you want and click on OK button.
 
After that right-click on the new app pool and select Advanced Settings. You will see the below window.


Then click on Identity and choose a Custom account and click on the set button and then add your windows credentials and click on OK.
 
After that right-click on Sites and then click on Add Website. Add the Site name and select application pool which we created earlier. After that under the physical path section, you have to give the path of build folder & also give the port number where you want to host.

Now right click on new website i.e ReactApp -> Manage Website -> Browse. Your react app is now successfully deployed.


Now the next step is to add routing in our react application. So I have created 2 components and also added react-router-dom package for routing. Here we are not going into detail about react routing.
 
Home page

Blog page


Create a production build again and try to browse the application which we hosted on IIS. You will see the application is working fine but now try to refresh the page and see what happens. You will get the below error.

So to fix this issue you have to install URL Rewrite module. After successful installation, you have to create a web.config file under public folder of app and copy-paste the below content into it.
<?xml version="1.0"?>  
<configuration>  
<system.webServer>  
    <rewrite>  
        <rules>  
            <rule name="React Routes" stopProcessing="true">  
                <match url=".*" />  
                <conditions logicalGrouping="MatchAll">  
                    <add input="{REQUEST_FILENAME}" matchType="IsFile" negate="true" />  
                    <add input="{REQUEST_FILENAME}" matchType="IsDirectory" negate="true" />  
                    <add input="{REQUEST_URI}" pattern="^/(api)" negate="true" />  
                </conditions>  
                <action type="Rewrite" url="/" />  
            </rule>  
        </rules>  
    </rewrite>  
</system.webServer>  
</configuration>     


Again build the application in production mode and browse. So now if you refresh the app you will not get an error and will be able to see the correct page. That's it -- so you have successfully created and deployed React application into the IIS server.

Conclusion

I hope that you have enjoyed this article, and please do not hesitate to send me your thoughts or comments about what could I have done better.


IIS Hosting Europe - HostForLIFE :: Publish And Host ASP.NET Core Web API On IIS

clock August 16, 2022 08:46 by author Peter

In this article you are going to learn about how to publish and host an ASP .Net Core Web API project on IIS.

Tools
    Visual Studio
    .Net Core SDK (Any Compatible Version)
    IIS Manager

Continuing from my previous article I’m going to use my project which I created already. There are several ways to do this but we will discuss the simplest way to do this. Just follow the steps as defined below.
 
Steps
First download .Net Core SDK compatible with your API version, I’m using .NET Core 2.1 so I downloaded it from here.
After downloading the SDK, open it and install it on your PC.

After installation create a new folder in C:\inetpub\wwwroot directory with the name “publish” as shown in figure below.

Right click the project and select Publish.

Visual Studio gives a default path, you can publish your API there but I am using another way to do this. So, click on browse.

Select the folder (publish) you created before and click Open.


After this the target location for publish project files will be changed, then simply click Publish.


It will take some time to publish. After the files are published, Open IIS Manager.

Now open IIS Manager.

Expand your connection and right click on Sites folder to add Website.


Give the site name and the Select the application Pool to DeaultAppPool.

Give a physical path of your folder where you published the API project.


Give the Port number 8085 or any you want and then click OK.

Right click on your new added site and Manage Site and click Browse, it will automatically open your hosted website in the browser.


Now give the URL http://localhost:8085/Values/GetStatus, this is the actual path of your Controller action and after writing just press enter. You will see the following results.


You can test other actions also by giving their URL as in given example above.
 
Conclusion
This article provides a brief introduction of publishing .NET Core Web API project and hosting it on IIS. Hope you find it useful and helpful for your work or studies.


IIS Hosting Europe - HostForLIFE :: Hosting ASP.NET Web API REST Service On IIS 10

clock August 5, 2022 07:35 by author Peter

To make any application accessible to the end-user, we need to host it on a server. So, in this article, we will learn how to host ASP.NET Web API REST Service in IIS 10. The following steps are required to host any application.

Step 1 Install IIS
Before hosting any application, make sure that IIS (Internet Information Services) is installed on your Hosting Server. If it is not installed or enabled, then follow the below steps.
    Click on Windows icon at the bottom left corner and find the "Control Panel" menu and click on it.
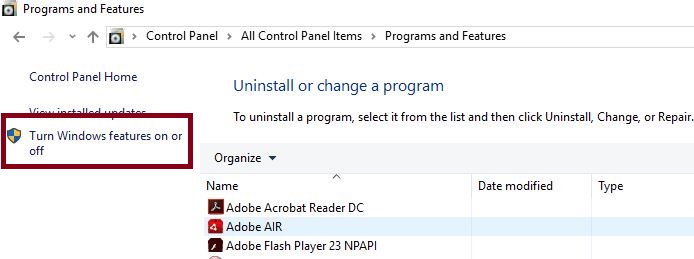
    In the "Control Panel", find the "Program and Features" option from the displayed list.
    This shows the list of installed programs. Find and click the "Turn Windows feature on or off" option from the left pane, as shown in the following image.

    Now, in the next popup, find Internet Information Services (IIS) and check on it.
    Click "Next" button and then "Finish". It takes a few minutes to install IIS.
    After installing IIS, restart your machine.

Note - I have Windows 10 OS and the above process is for Windows 10 PC. The steps might differ depending on your Operating System version.
 
Step 2 Install .NET Framework
 
Although Visual Studio is not required on your hosting Server, it must have .NET Framework installed, as per the .NET framework used to develop the application. If it is not installed, then please install the appropriate .NET Framework available on Microsoft official website.
 
I assume, you have installed the .NET framework on your Hosting Server.
 
Step 3 Move the published code on Hosting Server
 
Copy the "Published files" and paste those on respective Servers where you want to host the Web API REST Service. In our last article, we published Web API REST Service in the E drive of my Server, as shown in the following image .
 

Step 4 Open IIS Manager
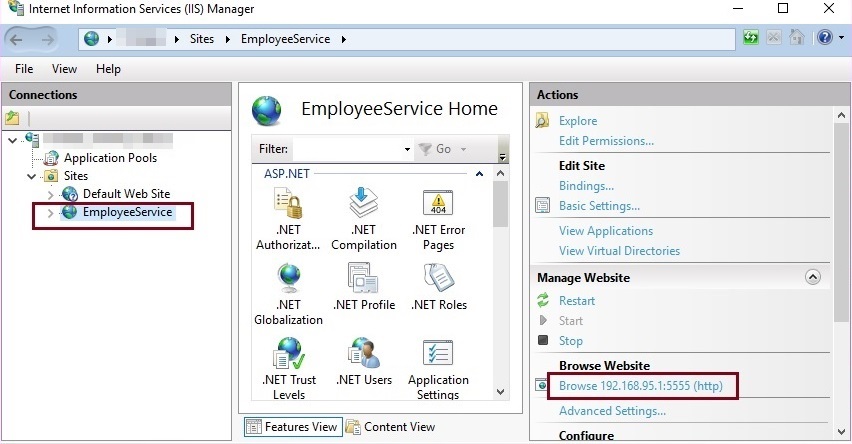
Now, open the IIS Manager from Windows menu or in any other ways you have known.


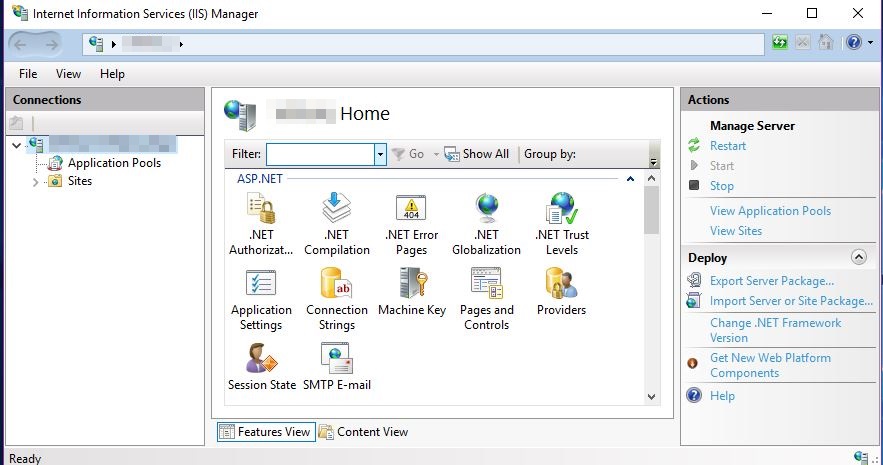
The above image is of IIS 10 Manager of my Windows 10 machine. The view as well as options might be different on your machine depending on the OS version.

Step 5 Add Website
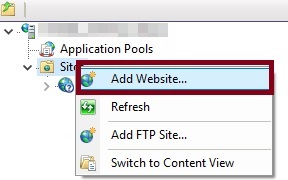
Right click on "Site" in IIS and click on add new website, as shown in the following screenshot.


After clicking on "Add Website" option, it displays the following configuration window.


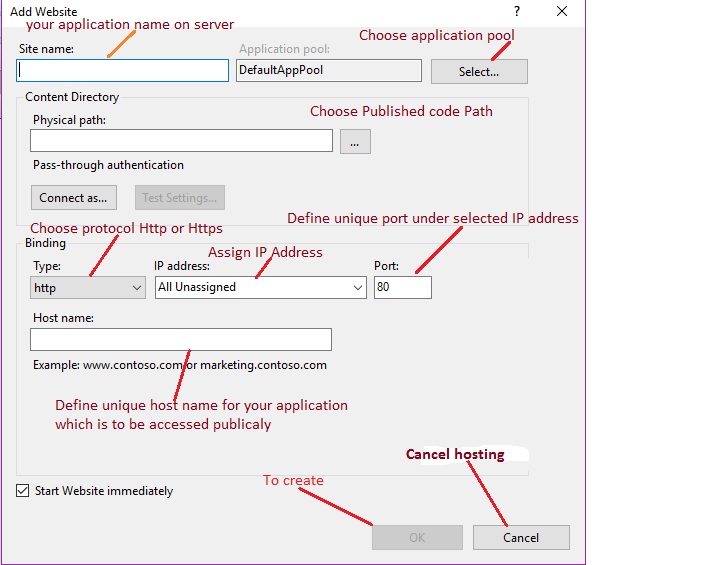
I hope you understood the preceding configuration by highlighted text.
 
Step 6 Define Site Name & Application Pool
Define the site name which will be useful to uniquely identify the site within the IIS Server. After specifying the site name, choose the Application Pool from available pools. You can even create a custom application pool with any desired name. Currently, our IIS Manager has the following Application Pools.


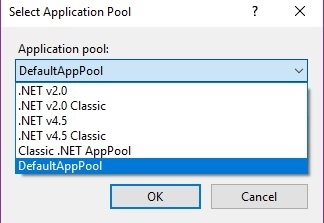
Choose the application pool depending on your application configuration. In this article, we are going to choose DefaultAppPool.

Step 7 Browse and select Published Folder path
Now, choose the physical location of published code files by clicking on "Browse" button, as shown in the following image.


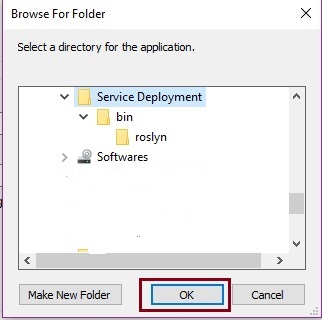
Now, click on "OK" button.
 
Step 8 Define IP address & Port
 
Choose one IP address from the list of available IP addresses and define the unique port number for the application, which will be unique within the defined IP address.

Step 9 Choose Protocol & Host name (optional )
 
Choose the protocol for your application i.e HTTP or HTTPS which requires port 443 to be open and choose the Host name which will be used publicly to access the application. After defining all the configurations, the web site configuration window will look like this.


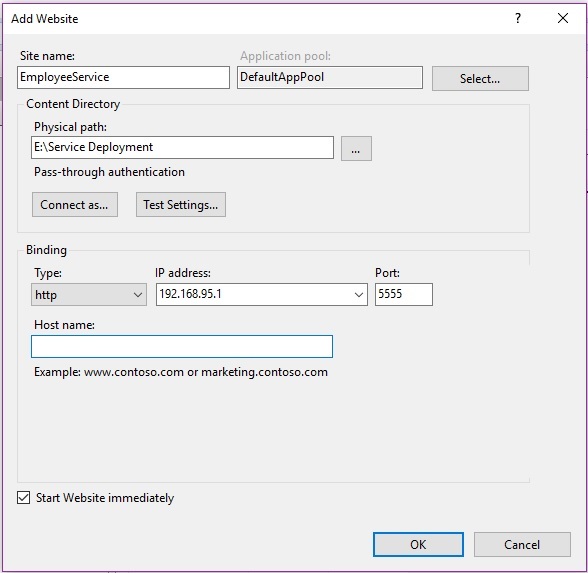
Now, click on OK button. It will create and add the application in IIS.


Step 10 Browse the URL with REST Client
 
Browse the hosted application using REST client with base URL along with API, Controller name, and Action method name, with pattern defined in routing template inside the webapiconfig.cs file.
 
We can browse applications using the browser but then, we can only test the GET method. So, to test all types of Action Methods, we are using  advanced REST client which is a developer extension tool in Firefox browser.
 
Our hosted Web API REST Service includes these two methods, as given below.

    GetAllEmployees (GET )
    GetEmployeeById  (POST ) which takes id as input parameter

Browse GetAllEmployees method using Advanced REST client which has used HTTP GET verb.

The GetAllEmployees hosted Web API REST method is returning all the employee lists.
 
Now, browse GetEmployeeById method using Advanced REST client which uses HTTP POST verb and takes id as input parameter.


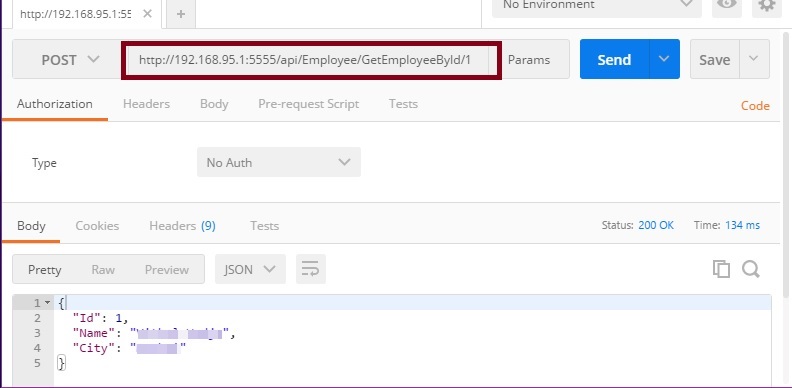
From the above desired output, it's clear that our Web API REST Service is hosted on IIS successfully.

Note
    Download the Zip file of the Published code to learn and start quickly.
    This article is just guideline to show how to host Web API REST Service on IIS .
    Optimize the speed by setting debug as false etc., from web.config file as per your skills.
    In this article, the optimization is not covered in depth.
    Configure the authentication in IIS as per your REST Service .

Summary

I hope, this article is useful for all readers. If you have any suggestions, please mention them in the comments section.


About HostForLIFE.eu

HostForLIFE.eu is European Windows Hosting Provider which focuses on Windows Platform only. We deliver on-demand hosting solutions including Shared hosting, Reseller Hosting, Cloud Hosting, Dedicated Servers, and IT as a Service for companies of all sizes.

We have offered the latest Windows 2016 Hosting, ASP.NET Core 2.2.1 Hosting, ASP.NET MVC 6 Hosting and SQL 2017 Hosting.


Tag cloud

Sign in