IIS 7.5 and IIS 8.0 European Hosting

BLOG about IIS 7.5 Hosting, IIS 8.0 Hosting and Its Technology - Dedicated to European Windows Hosting Customer

IIS 8.0 Hosting - HostForLIFE.eu :: URL Rewriting Middleware In ASP.NET Core

clock June 24, 2021 09:08 by author Peter

In the previous article of this series, we discussed the route concept with MVC Pattern within .NET Core Application. Now, in this article, we will discuss how can we use URL rewriting mechanism.


Basically URL Rewriting is the act of modifying request URLs based on one or more predefined rules. URL rewriting creates an abstraction between resource locations and their addresses so that the locations and addresses are not tightly linked. There are several scenarios where URL rewriting is valuable:

    Moving or replacing server resources temporarily or permanently while maintaining stable locators for those resources
    Splitting request processing across different applications or across areas of one application
    Removing, adding, or reorganizing URL segments on incoming requests
    Optimizing public URLs for Search Engine Optimization (SEO)
    Permitting the use of friendly public URLs to help people predict the content they will find by following a link
    Redirecting insecure requests to secure endpoints
    Preventing image hotlinking

We can define rules for changing the URL in several ways, including regular expression (regex) matching rules, rules based on the Apache mod_rewrite module, rules based on the IIS Rewrite Module, and with your own method and class rule logic. In this article, we will discuss about the URL rewriting with instructions on how to use URL Rewriting Middleware in ASP.NET Core applications.

URL redirect and URL rewrite
A URL redirect is a client-side operation, where the client is instructed to access a resource at another address. This requires a round-trip to the server, and the redirect URL returned to the client will appear in the browser's address bar when the client makes a new request for the resource. If /resource is redirected to /different-resource, the client will request /resource, and the Server will respond that the client should obtain the resource at /different-resource with a status code indicating that the redirect is either temporary or permanent. The client will execute a new request for the resource at the redirect URL.

A URL rewrite is a server-side operation to provide a resource from a different resource address. Rewriting a URL doesn't require a round-trip to the server. The rewritten URL is not returned to the client and won't appear in a browser's address bar. When /resource is rewritten to /different-resource, the client will request /resource, and the server will internally fetch the resource at /different-resource. Although the client might be able to retrieve the resource at the rewritten URL, the client won't be informed that the resource exists at the rewritten URL when it makes its request and receives the response.

When to use URL Rewriting Middleware
Use URL Rewriting Middleware when you are unable to use the URL Rewrite module in IIS on Windows Server, the Apache mod_rewrite module on Apache Server, URL rewriting on Nginx, or your application is hosted on WebListener server. The main reasons to use the server-based URL rewriting technologies in IIS, Apache, or Nginx are that the middleware doesn't support the full features of these modules and the performance of the middleware probably won't match that of the modules. However, there are some features of the server modules that don't work with ASP.NET Core projects, such as the IsFile and IsDirectory constraints of the IIS Rewrite module. In these scenarios, you can use the middleware instead.

Package
To include the middleware in your project, add a reference to the Microsoft.AspNetCore.Rewrite package. The middleware depends on .NET Framework 4.5.1 or .NET Standard 1.3 or later. This feature is available for apps that target ASP.NET Core 1.1.0 or later.

Extension and options
Establish your URL rewrite and redirect rules by creating an instance of the RewriteOptions class with extension methods for each of your rules. Chain multiple rules in the order that you would like them processed. The RewriteOptions are passed into the URL Rewriting Middleware as it's added to the request pipeline with app.UseRewriter(options);
    var options = new RewriteOptions()  
    .AddRedirect("redirect-rule/(.*)", "redirected/$1")  
    .AddRewrite(@"^rewrite-rule/(\d+)/(\d+)", "rewritten?var1=$1&var2=$2", skipRemainingRules: true)  
    .AddApacheModRewrite(env.ContentRootFileProvider, "ApacheModRewrite.txt")  
    .AddIISUrlRewrite(env.ContentRootFileProvider, "IISUrlRewrite.xml")  
    .Add(RedirectXMLRequests)  
    .Add(new RedirectImageRequests(".png", "/png-images"))  
    .Add(new RedirectImageRequests(".jpg", "/jpg-images"));  
    app.UseRewriter(options);  


URL redirect
Use AddRedirect() to redirect requests. The first parameter will contain your regex for matching on the path of the incoming URL. The second parameter is the replacement string. The third parameter, if present, specifies the status code. If you don't specify the status code, it defaults to 302 (Found), which indicates that the resource has been temporarily moved or replaced.
    var options = new RewriteOptions()  
    .AddRedirect("redirect-rule/(.*)", "redirected/$1")  
    .AddRewrite(@"^rewrite-rule/(\d+)/(\d+)", "rewritten?var1=$1&var2=$2", skipRemainingRules: true)  
    .AddApacheModRewrite(env.ContentRootFileProvider, "ApacheModRewrite.txt")  
    .AddIISUrlRewrite(env.ContentRootFileProvider, "IISUrlRewrite.xml")  
    .Add(RedirectXMLRequests)  
    .Add(new RedirectImageRequests(".png", "/png-images"))  
    .Add(new RedirectImageRequests(".jpg", "/jpg-images"));  
    app.UseRewriter(options);  


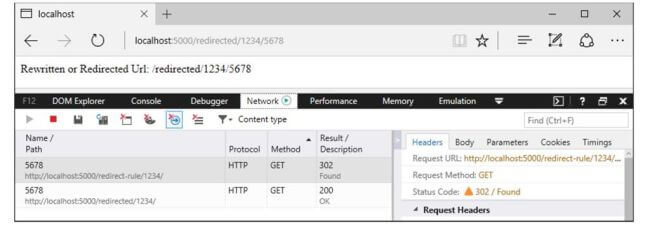
In a browser with developer tools enabled, make a request to the sample application with the path /redirect-rule/1234/5678. The regex matches the request path on redirect-rule/(.*), and the path is replaced with /redirected/1234/5678. The redirect URL is sent back to the client with a 302 (Found) status code. The browser makes a new request at the redirect URL, which will appear in the browser's address bar. Since no rules in the sample application match on the redirect URL, the second request receives a 200 (OK) response from the application and the body of the response shows the redirect URL. A complete roundtrip is made to the server when a URL is redirected.

Original Request: /redirect-rule/1234/5678

The part of the expression contained by parentheses is called a capture group. The dot ( . ) of the expression means match any character, and the asterisk ( * ) signifies to match the preceding character zero or more times. Therefore, the last two path segments of the URL, 1234/5678, are captured by capture group (.*). Any value you provide in the request URL after redirect-rule/ will be captured by this single capture group. In the replacement string, captured groups are injected into the string with the dollar sign ( $ ) followed by the sequence number of the capture. The first capture group value is obtained with $1, the second with $2, and they continue in sequence for the capture groups in your regex. There is only one captured group in the redirect rule regex in the sample application, so there is only one injected group in the replacement string, which is $1. When the rule is applied, the URL becomes /redirected/1234/5678.

URL redirect to a secure endpoint
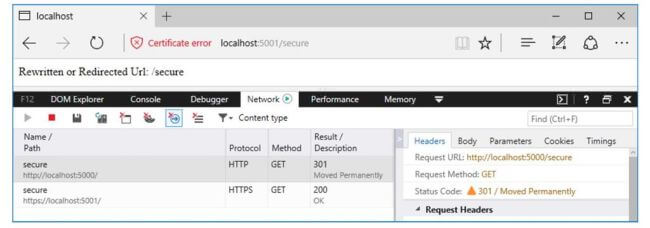
Use AddRedirectToHttps() to redirect insecure requests to the same host and path with secure HTTPS protocol (https:// ) with the flexibility to choose the status code and port. If the status code is not supplied, the middleware will default to 302 (Found). If the port is not supplied, the middleware will default to null, which means the protocol will change to https:// and the client will access the resource on port 443. The example shows how to set the status code to 301 (Moved Permanently) and change the port to 5001.
    var options = new RewriteOptions()  
    .AddRedirectToHttps(301, 5001);  
    app.UseRewriter(options);  


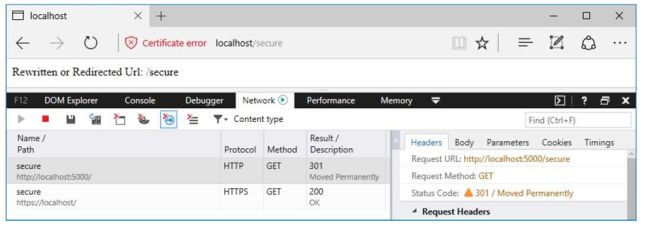
Use AddRedirectToHttpsPermanent() to redirect insecure requests to the same host and path with secure HTTPS protocol ( https:// on port 443). The middleware will set the status code to 301 (Moved Permanently).

Original Request using AddRedirectToHttps(301, 5001) : /secure

Original Request using AddRedirectToHttpsPermanent() : /secure

URL rewrite
Use AddRewrite() to create a rules for rewriting URLs. The first parameter will contain your regex for matching on the incoming URL path. The second parameter is the replacement string. The third parameter,

skipRemainingRules: {true|false} , will indicate to the middleware whether or not to skip additional rewrite rules if the current rule is applied.
    var options = new RewriteOptions()  
    .AddRedirect("redirect-rule/(.*)", "redirected/$1")  
    .AddRewrite(@"^rewrite-rule/(\d+)/(\d+)", "rewritten?var1=$1&var2=$2", skipRemainingRules: true)  
    .AddApacheModRewrite(env.ContentRootFileProvider, "ApacheModRewrite.txt")  
    .AddIISUrlRewrite(env.ContentRootFileProvider, "IISUrlRewrite.xml")  
    .Add(RedirectXMLRequests)  
    .Add(new RedirectImageRequests(".png", "/png-images"))  
    .Add(new RedirectImageRequests(".jpg", "/jpg-images"));  
    app.UseRewriter(options);  

Original Request: /rewrite-rule/1234/5678


The first thing you will notice in the regex is the carat ( ^ ) at the beginning of the expression. This means that matching should be attempted starting at the beginning of the URL path.

Code for startup.cs
using System;  
using System.IO;  
using Microsoft.AspNetCore.Builder;  
using Microsoft.AspNetCore.Hosting;  
using Microsoft.AspNetCore.Http;  
using Microsoft.AspNetCore.Rewrite;  
using Microsoft.Extensions.Logging;  
using Microsoft.Net.Http.Headers;  
using CoreLibrary;  
 
namespace Prog7_URLRewrite  
{  
    public class Startup  
    {  
        // This method gets called by the runtime. Use this method to add services to the container.  
        // For more information on how to configure your application, visit https://go.microsoft.com/fwlink/?LinkID=398940  
        public void Configure(IApplicationBuilder app, IHostingEnvironment env)  
        {  
            var options = new RewriteOptions()  
                                .AddRedirect("redirect-rule/(.*)", "redirected/$1")  
                .AddRewrite(@"^rewrite-rule/(\d+)/(\d+)", "rewritten?var1=$1&var2=$2", skipRemainingRules: true)  
                .AddApacheModRewrite(env.ContentRootFileProvider, "ApacheModRewrite.txt")  
                .AddIISUrlRewrite(env.ContentRootFileProvider, "IISUrlRewrite.xml")  
                .Add(RedirectXMLRequests)  
                .Add(new RedirectImageRequests(".png", "/png-images"))  
                .Add(new RedirectImageRequests(".jpg", "/jpg-images"));  
            app.UseRewriter(options);  
            app.Run(context => context.Response.WriteAsync($"Rewritten or Redirected Url: {context.Request.Path + context.Request.QueryString}"));  
        }  
 
        static void RedirectXMLRequests(RewriteContext context)  
        {  
            var request = context.HttpContext.Request;  
            if (request.Path.StartsWithSegments(new PathString("/xmlfiles")))  
            {  
                return;  
            }  
            if (request.Path.Value.EndsWith(".xml", StringComparison.OrdinalIgnoreCase))  
            {  
                var response = context.HttpContext.Response;  
                response.StatusCode = StatusCodes.Status301MovedPermanently;  
                context.Result = RuleResult.EndResponse;  
                response.Headers[HeaderNames.Location] = "/xmlfiles" + request.Path + request.QueryString;  
            }  
        }  
 
        public static void Main(string[] args)  
        {  
            var host = new WebHostBuilder()  
                .ConfigureLogging(factory =>  
                                {  
                                    factory.AddConsole(LogLevel.Debug);  
                                })  
                .UseContentRoot(Directory.GetCurrentDirectory())  
                                .UseKestrel(options =>  
                {  
                    options.UseHttps("testCert.pfx", "testPassword");  
                })  
                                .UseStartup<Startup>()  
                                                .UseUrls("http://localhost:5000", "https://localhost", "https://localhost:5001")  
                                                                .Build();  
            host.Run();  
 
        }  
          
    }  
}  


Code for rewrite.cs
using Microsoft.AspNetCore.Http;  
using Microsoft.AspNetCore.Rewrite;  
using Microsoft.Net.Http.Headers;  
using System;  
using System.Text.RegularExpressions;  
 
namespace CoreLibrary  
{  
    public class RewriteRules : IRule  
    {  
        private string _extension;  
 
        private PathString _newPath;  
 
        public RedirectImageRequests(string extension, string newPath)  
        {  
            if (string.IsNullOrEmpty(extension))  
            {  
                throw new ArgumentException(nameof(extension));  
            }  
            if (!Regex.IsMatch(extension, @"^\.(png|jpg|gif)$"))  
            {  
                throw new ArgumentException("The extension is not valid. The extension must be .png, .jpg, or .gif.", nameof(extension));  
            }  
 
            if (!Regex.IsMatch(newPath, @"(/[A-Za-z0-9]+)+?"))  
            {  
                throw new ArgumentException("The path is not valid. Provide an alphanumeric path that starts with a forward slash.", nameof(newPath));  
            }  
            _extension = extension;  
            _newPath = new PathString(newPath);  
        }  


        public void ApplyRule(RewriteContext context)  
        {  
            var request = context.HttpContext.Request;  
            if (request.Path.StartsWithSegments(new PathString(_newPath)))  
            {  
                return;  
            }  
 
            if (request.Path.Value.EndsWith(_extension, StringComparison.OrdinalIgnoreCase))  
            {  
                var response = context.HttpContext.Response;  
                response.StatusCode = StatusCodes.Status301MovedPermanently;  
                context.Result = RuleResult.EndResponse;  
                response.Headers[HeaderNames.Location] = _newPath + request.Path + request.QueryString;  
            }  
        }  
    }  
}


IIS 8.5 Hosting - HostForLIFE.eu :: Enable IIS Server to Serve .mp4 Files through web.config File

clock March 26, 2021 08:44 by author Peter

Now, most of the websites are being developed using HTML5 and using videos on the background. It is an easy job to use  the video tag.. It is advised to serve video files using a CDN, however, in case you want to host videos from your own server, you need to configure IIS to server .mp4 files. In case you don’t configure it, you will get a 404 error or an error saying “The page you are requesting cannot be served because of the extension configuration. If the page is a script, add a handler. If the file should be downloaded, add a MIME map.” Again, if you have got access to IIS , it’s a great thing but what if you’re hosting the website on a shared server where you don’t have access to IIS Server? In this post, we will see how can we enable IIS Server to serve .mp4 files through web.config file.


To allow IIS to server files, we need to configure proper mimeType for the required files. The mimeType for a .mp4 is video/mp4. Just add the following line in your web.config file under system.webServer tag and you should be good to go.

<configuration>  
    <system .webServer>  
        <staticcontent>  
            <mimemap fileExtension=".mp4" mimeType="video/mp4"></mimemap>  
        </staticcontent>  
    </system>  
</configuration> 

Once you do the above changes, your web server should start serving .mp4 files without issues. Hope this blog post helps you! In case you know other ways of doing the same, do let me know via comments.


IIS 8.0 Hosting - HostForLIFE.eu :: Publish And Deploy ASP.NET Core MVC On IIS

clock March 5, 2021 08:51 by author Peter

ASP.NET Core is able to run as a standalone Application (out of process Console Application). It does not host inside IIS, which does not require IIS to run an application. ASP.NET Core app has its own self-hosted Web Server and processes the requests, which internally use the self-hosted Server instance. ASP.NET Core uses Kestrel Server to host the core Application but it does not support all the features of the Server such as IIS.

In older ASP.NET Web applications, everything is hosted inside IIS Worker process, which can also refer to an Application pool. The Application Pool hosts our Web Application and our Web Application is instantiated by the built-in ASP.NET hosting features in IIS. The ASP.NET Core Application does not run in the IIS worker process but runs as a separate out of process Console Application, which runs its own Web Server, using Kestrel Web Server. If we run on Windows, we may want to run Kestrel behind IIS to gain infrastructure features such as port forwarding via host headers, life cycle and certificate management.

ASP.NET Core Application is a standalone console Application that is invoked through the "dotnet" runtime command. It does not load into the IIS worker process but loads in the native IIS module called "AspNetCoreModule" which runs the console application. We need to install the AspNetCoreModule on the Server and it is part of ASP.NET Core Server Hosting Bundle.


All IIS applications are run on application pool. For ASP.net core, application pool must set to use No Managed Code. The Application pool acts only as a proxy to forward the requests. There is no need to instantiate a .NET runtime.


The primary job of AspNetCoreModule is to ensure that our Application gets loaded when the first request comes. All incoming Http request are handled by AspNetCoreModule and then it is routed to ASP.NET Core Application. Kestrel picks up the incoming request and passes into ASP.NET Core middleware pipeline that subsequently handles the request and passes to the Application logic, which is the same as the response of the Application which is pushback to the IIS and then Http client.
 
AspNetCoreModule is configured via the web.config file, which is stored in an Application root folder, which contains the startup command and argument. The dotnet is a startup command and our Application main DLL, which is used to launch application as aargument.
 
The Web.config file looks, as shown below.
    <?xml version="1.0" encoding="utf-8"?>  
    <configuration>  
    <system.webServer>  
         <handlers>  
          <add name="aspNetCore" path="*" verb="*" modules="AspNetCoreModule" resourceType="Unspecified"/>  
        </handlers>  
        <aspNetCore processPath="dotnet" arguments=".\FirstCoreApplication.dll" stdoutLogEnabled="false" stdoutLogFile=".\logs\stdout" forwardWindowsAuthToken="false"/>  
    </system.webServer>  
    </configuration>  


Publishing ASP.NET Core Application
To host our Application on IIS, we first need to publish it. There are two ways to publish .NET Core Application
    Using CLI command dotnet publish.
    Using Visual Studio Publishing feature.

Before publishing ASP.NET Core Application, we make sure that we are including all the required folders in PublishOptions node of project.json file. This node looks, as shown below.
    "publishOptions": {  
      "include": [  
        "Views",  
        "web.config"  
      ]  
    }  


Using CLI command “dotnet publish”
.NET Core Application also supports CLI. Using CLI tool, we can create, build and publish the .NET Core Application. The "dotnet publish" command compiles the Application and publishes the Application with the project dependencies (specified in project.json file) and puts it into a specified folder.

    >dotnet publish  


Using Visual Studio Publishing feature
To publish our application, using Visual Studio, the first step is to right click on the project which we want to to publish and select publish option. Next step is to select custom option and enter the profile name. Once the profile is created, we need to select publishing method. Here, we have four different publishing methods, namely File system, Web deploy, Web deploy pack and FTP. In this example, I have selected File System as publish option and also need to pass target location.
 
In the next step, we can select the configuration, target framework and some other publish option. When we click Publish button, Visual Studio publish requires file in to the selected folder.


Host publish folder on IIS Manually
To host ASP.NET Core Application on IIS, we must have Windows 7 or newer / Windows Server 2008 R2 or newer. To configure IIS on Windows machine, we need to turn on some IIS related features of Windows.

Once our Application is published, we can hook up IIS to the published folder. Now, I am going to create a virtual Application directory.


Now, I am creating ASPNETCore Application with .NET runtime "No Managed Code", as shown earlier.


IIS 8.0 Hosting Germany - HostForLIFE.eu :: How to Use LogParser to Check Visitor IPs to a Certain Page?

clock February 21, 2020 10:50 by author Peter

Today I noticed we were getting an expanding measure of spam on one of our sform pages. I was interested to check whether the majority of the client IP locations were the same (in which case I'd simply add them to the IIS IP Restrictions list). To rapidly and effortlessly make sense of this I chose to utilize LogParser.

Other than simply questioning for the page however, I needed to add an extra condition to prohibit lines that originated from a certain  internal IP address that we use for checking.

Here’s a generic version of the query I used:
LogParser.exe -q:on "SELECT * FROM x:\wwwlogs\W3SVC1\u_ex130411.log WHERE cs-uri-stem='/SomePage/' and c-ip<>'10.10.1.100' >c:\temp\PageVisitors.txt"

I needed to see the full logged information for the request, but if I didn’t, I could have very easily just pulled the IP addresses using:
LogParser.exe -q:on "SELECT c-ip FROM x:\wwwlogs\W3SVC1\u_ex130411.log WHERE cs-uri-stem='/SomePage/' and c-ip<>'10.10.1.100' >c:\temp\PageVisitors.txt"

You can see that I'm funneling the outcomes to a content record (the ">c:\temp\PageVisitors.txt" part) so I can without much of a stretch manage the outcomes. You might likewise need to observe that I'm utilizing the "-q:on" flag which runs the command in Quite Mode. In the event that you don't set this banner then LogParser will show comes about one page at once. At the point when funneling to a content record as opposed to the summon prompt window, you clearly can't hit a key for "next page" so without this banner the question will really hang forever if there is more than one page worth of results.

HostForLIFE.eu IIS 8.0 Hosting
HostForLIFE.eu is European Windows Hosting Provider which focuses on Windows Platform only. We deliver on-demand hosting solutions including Shared hosting, Reseller Hosting, Cloud Hosting, Dedicated Servers, and IT as a Service for companies of all sizes. We have customers from around the globe, spread across every continent. We serve the hosting needs of the business and professional, government and nonprofit, entertainment and personal use market segments.


IIS 8.0 Hosting - HostForLIFE.eu :: Enable Other Protocols (TCP, PIPE, MSMQ etc.) In IIS

clock February 7, 2020 11:18 by author Peter

By default it's available only in HTTP, HTTPS and FTP protocols Windows IIS though it supports others like TCP, PIPE protocols as well.

This blog demonstrates how to enable other protocols like TCP in IIS. Getting started, we know that Windows IIS by default supports only HTTP, HTTPS and FTP protocols and you will get those protocols in the binding window of IIS.

But other protocols like TCP, PIPE etc. Can be enabled by changing IIS feature, the below steps defines how to tune IIS features to enable TCP protocols.

Follow the Steps
     Open Control Panel=>Programs=>Click on Uninstall or Change a Program=> Click on Link ‘Turn Windows Features on or off’.

  1. Windows Features window will be opened, expand .NET Framework Advance Service.

  2. Expand WCF Services=>Select All the Features HTTPActivation, Message Queuing (MSMQ) Activation, Named Pipe Activation, TCPActivation, TCP Port Sharing .Click OK button.

Windows will apply the changes you made and you will get message popup, close the window (Clicking on close button), restart your machine and follow the below steps. Open IIS=> in Connections panel=> expand Sites=>Select your website=>Go to Right site Action Pane=> click on Advanced Settings=> Expand the ‘Behavior’ section In the field ‘Enable Protocols’ set these below values by commas, (http,net.tcp,net.pipe,net.msmq,msmq.formatname). Click OK button.

  • For activating TCP protocol set ‘net.tcp’
  • For activating PIPE protocol set ‘net.pipe’
  • For activating MSMQ Protocol set’ net.msmq’

Now you are done, if you follow the above steps correctly, you will get the mentioned protocols in the binding window.


IIS 8.0 Hosting - HostForLIFE.eu :: PUT , POST & DELETE Verbs Not Allowed in IIS 8

clock January 31, 2020 11:42 by author Peter

Today, I will write about PUT, POST and DELETE verbs on the web application in IIS. And this is the error:

<h2>405 - HTTP verb used to access this page is not allowed.</h2>
<h3>The page you are looking for cannot be displayed because an invalid method (HTTP verb) was used to attempt access


After some troubleshooting the error was isolated to the actual fact that WebDav was put in on the server and was intercepting those requests for its own service use.
Rather than removing WebDav from the server, we tend to went searching for another answer. thankfully somebody on Twitter understood the problem and gave an example of changes to create to the client’s web.config get in order to disable (remove) the WebDav module for simply that specific website while not requiring any manual body actions on the server.

The code updates to create to your web.config file to resolve this error are:
<configuration>
  <system.webServer>
    <handlers>
      <remove name="WebDAV" />
      <remove name="ExtensionlessUrlHandler-ISAPI-4.0_32bit" />
      <remove name="ExtensionlessUrlHandler-ISAPI-4.0_64bit" />
      <remove name="ExtensionlessUrlHandler-Integrated-4.0" />
      <add name="ExtensionlessUrlHandler-ISAPI-4.0_32bit" path="*." verb="GET,HEAD,POST,DEBUG,PUT,DELETE,PATCH,OPTIONS" modules="IsapiModule" scriptProcessor="%windir%\Microsoft.NET\Framework\v4.0.30319\aspnet_isapi.dll" preCondition="classicMode,runtimeVersionv4.0,bitness32" responseBufferLimit="0" />
      <add name="ExtensionlessUrlHandler-ISAPI-4.0_64bit" path="*." verb="GET,HEAD,POST,DEBUG,PUT,DELETE,PATCH,OPTIONS" modules="IsapiModule" scriptProcessor="%windir%\Microsoft.NET\Framework64\v4.0.30319\aspnet_isapi.dll" preCondition="classicMode,runtimeVersionv4.0,bitness64" responseBufferLimit="0" />
      <add name="ExtensionlessUrlHandler-Integrated-4.0" path="*." verb="GET,HEAD,POST,DEBUG,PUT,DELETE,PATCH,OPTIONS" type="System.Web.Handlers.TransferRequestHandler" preCondition="integratedMode,runtimeVersionv4.0" />
    </handlers>
    <modules>
      <remove name="WebDAVModule" />
    </modules>
  </system.webServer>
</configuration>

I hope this tutorial works for you!

HostForLIFE.eu IIS 8.0 Hosting
HostForLIFE.eu is European Windows Hosting Provider which focuses on Windows Platform only. We deliver on-demand hosting solutions including Shared hosting, Reseller Hosting, Cloud Hosting, Dedicated Servers, and IT as a Service for companies of all sizes. We have customers from around the globe, spread across every continent. We serve the hosting needs of the business and professional, government and nonprofit, entertainment and personal use market segments.


IIS 8.0 with Free ASP.NET Hosting - HostForLIFE.eu :: How to Use Appcmd.exe to Perform Common IIS Administrative Task?

clock July 4, 2019 12:11 by author Peter

IIS provides a new command-line tool, AppCmd.exe, to configure and query objects on your Web server, and to return output in text or XML. In this article, I will explain how to perform common IIS administrative tasks such as creating new sites, stopping/starting services, and viewing status of the site.

AppCmd.exe allows you to perform just about all the typical management functions you would want to perform using the CLI instead of the GUI. For example, here are some of the things that AppCmd.exe can do:

  •     Start and stop IIS web sites
  •     Create IIS websites, applications, application pools, and virtual directories
  •     Show running IIS processes and list currently executing requests
  •     Import, export, and search IIS ASP.NET configurations

Five ways that you can use AppCmd.exe to make your IIS website administration easier:

Sure, you can do just about everything in the IIS management MMC (GUI) that you can do with AppCmd.exe at the command line but GUI interfaces also have their disadvantages. To name a few, with a GUI you cannot do repetitive tasks quickly (like with a Windows Desktop Shortcut) nor can you use output from one AppCmd.exe output and send it to an AppCmd Action. Here are 5 ways that using AppCmd.exe can make your IIS website administration easier:

1. Start and Stop IIS websites from the command line

This is actually very simple. If you don’t know the name of your sites, just do:

Appcmd list sites

Now that you know what sites you have, you can start and stop your IIS web sites like this:
Appcmd start sites “Default Web Site” (or whatever site you want to start)

2. Add a new website

Adding a new website is easy. Just use:
Appcmd add sites /name:”Dave’s Site” /id:12 /bindings:http://mysite.com:80

Like this:

While this may add a new website, that website may not be as complete as a site added in the GUI unless all command options are added then an application is added for it. To get a more fully functioning IIS site, use the following two commands:
AppCmd add site /name:ddsite /id:99 /bindings:http/*:81: /physicalPath:C:\ddsite
AppCmd add app /site.name:DDSite /path:/ddapp /physicalPath:C:\sites\ddsite

3. Listing objects that meet certain information

Using the list command is easy. I showed you how to list our websites running on the server in #1, above. Notice in the output how you can see that the sites are running or not (the sites state). You can also list all objects (like sites) that meet certain criteria. For example, this command lists all sites that are stopped. Here is an example:

4. Backing up you IIS configuration

AppCmd.exe can backup your IIS configuration using the add backup command. You can also list your commands with the list backup command the and the restore backup can put your backup data back where it needs to go with the restore backup command.

Below, you see me backing up my IIS configuration then listing out what backups were available after that.

5. Report on IIS configurations

AppCmd has the power to report on your IIS configurations and export that configuration to a text file. To do this, just run:
Appcmd list site “sitename” /config
Here is what the output looks like:

IIS 8.0 with Free ASP.NET Hosting
Try our IIS 8.0 with Free ASP.NET Hosting today and your account will be setup soon! You can also take advantage of our Windows & ASP.NET Hosting support with Unlimited Domain, Unlimited Bandwidth, Unlimited Disk Space, etc.


IIS 8.0 Hosting with Free ASP.NET Hosting - HostForLIFE.eu :: Hosting WCF Service in IIS 8.0

clock June 26, 2019 11:58 by author Peter

In this tutorial, I’ll explain how to install WCF in IIS 8.0. So in order to host our WCF Service in IIS, use the following simple step-by-step approach. First, Add a website to our solution. select the “ASP.NET Empty web Site” example. For web location, select “HTTP” rather than “File System” and provide the path and press the “OK” button.

Next step, add the Reference of the StudentService project to our web site, in other words StudentIISHost.

Next, Add a reference of System.ServiceModel to the web site. And then, Add a new .svc file to our web site project as.

Then write the following configuration for System.ServiceModel in the web.config :
<system.serviceModel> 
     <behaviors> 
           <serviceBehaviors> 
                  <behavior name=”StudentServiceBehavior”> 
                       <serviceMetadata httpGetEnabled=”true”/> 
                       <serviceDebug includeExceptionDetailInFaults=”false”/> 
                  </behavior> 
           </serviceBehaviors> 
      </behaviors> 
      <services> 
          <service behaviorConfiguration=”StudentServiceBehavior” name=”StudentService.StudentService”> 
           <endpoint address=”http://localhost/StudentIISHost/MyStudentHost.svc” 
                 binding=”wsHttpBinding” 
                 contract=”StudentService.IStudentService”> 
            <identity> 
                <dns value=”localhost”/> 
            </identity> 
          </endpoint> 
          <endpoint address=”mex” 
                binding=”mexHttpBinding” 
                contract=”IMetadataExchange”/> 
          </service> 
       </services> 
   </system.serviceModel> 

Finally, Access the hosted WCF Service, in other words StudentService using the following path.
http://localhost/StudentIISHost/MyStudentHost.svc

I hope this WCF Tutorial will help you to understand the implementation for hosting a WCF Service in Internet Information Services (IIS).

IIS 8.0 Hosting with Free ASP.NET Hosting

Try our IIS 8.0 Hosting with Free ASP.NET Hosting today and your account will be setup soon! You can also take advantage of our Windows & ASP.NET Hosting support with Unlimited Domain, Unlimited Bandwidth, Unlimited Disk Space, etc. You will not be charged a cent for trying our service for the next 3 days. Once your trial period is complete, you decide whether you'd like to continue.


IIS 8.0 Hosting with Free ASP.NET Hosting - HostForLIFE.eu :: Configure IIS to Require SSL on both Federation Servers

clock April 24, 2019 12:11 by author Peter

In this post, let me tell you about how to configure IIS to require SSL on both Federation Servers. First step, open the Administrative Tools from the Start menu as shown on the following picture:

And then, in the Administrative Tools many options will be available, among these options one will be for IIS Manager. Double-click on this option to open it as shown on the below picture:

The IIS Manager Wizard will open. On the left hand side will be the Connections Pane.

Next step, expand the Server Name available under the Connection Pane, on expanding an option will appear named "Sites", again expand this option. This will bring the default Website under the IIS.

Click on this default Website, on clicking an option will come in the center Pane named SSL Settings, double-click on it to open it.

Now, check the "Require SSL" and then select on the "Accept Client Certificate".


Go to the Actions Pane and then select on the "Apply" button to apply the changes made.

IIS 8.0 Hosting with Free ASP.NET Hosting

Try our IIS 8.0 Hosting with Free ASP.NET Hosting today and your account will be setup soon! You can also take advantage of our Windows & ASP.NET Hosting support with Unlimited Domain, Unlimited Bandwidth, Unlimited Disk Space, etc. You will not be charged a cent for trying our service for the next 3 days. Once your trial period is complete, you decide whether you'd like to continue.


IIS 8.0 with Free ASP.NET Hosting - HostForLIFE.eu :: IIS Express Failed to Register URL - Access is Denied

clock March 1, 2019 10:34 by author Peter

I was working on a web application, and suddenly the application stopped running on the browser and I got this error message,

“Unable to connect to the configured development Web server. Failed to register URL http://localhost :57660/ for site “sandbox” application “/”. Error description: Access is denied. (0x80070005)”

I tried many things like restarting Visual Studio and running Visual Studio as administrator but nothing worked. Finally, after spending a few hours on it I got the solution, so here I am sharing the solution.

Open windows registry and browse parameters in HTTP where you can see what URLs are allowed to be bound to services without admin privileges. The parameter is called ListenOnlyList and it needs to be set to the address that exists on your machine.

You need to configure this parameter by running the following in the administrative command prompt:

 
Once IP address is successfully added, you can see ListenOnlyList added in the registry with correct value.

Now run your web application again. I hope that will resolve your problem.

IIS 8.0 with Free ASP.NET Hosting
Try our IIS 8.0 with Free ASP.NET Hosting today and your account will be setup soon! You can also take advantage of our Windows & ASP.NET Hosting support with Unlimited Domain, Unlimited Bandwidth, Unlimited Disk Space, etc. You will not be charged a cent for trying our service for the next 3 days. Once your trial period is complete, you decide whether you'd like to continue.


About HostForLIFE.eu

HostForLIFE.eu is European Windows Hosting Provider which focuses on Windows Platform only. We deliver on-demand hosting solutions including Shared hosting, Reseller Hosting, Cloud Hosting, Dedicated Servers, and IT as a Service for companies of all sizes.

We have offered the latest Windows 2016 Hosting, ASP.NET Core 2.2.1 Hosting, ASP.NET MVC 6 Hosting and SQL 2017 Hosting.


Tag cloud

Sign in