July 25, 2018 11:18 by
 Peter
PeterHere, we are going to connect with the Docker engine remotely using PowerShell. For this, we can either use our local machine or a VM. Before we proceed further, make sure that your Nano Server is up and running.
Step 1 Downloading the Docker Daemon and extracting them
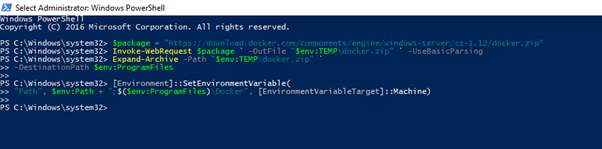
Create a variable that references the zip file which is in the official docker website. This zip file will have the Docker engine data that is required to create the client and server. Open the PowerShell with administrator privileges and run the below given command.
This will assign the link to that variable named,
$package = "https://download.docker.com/components/engine/windows-server/cs-1.12/docker.zip"
The next step is to invoke a web request to get the link that has been referenced in the variable called. Then, the file will be stored in a temporary storage by getting downloaded from the Docker site. For this, we have to run the following command.
Invoke-WebRequest $package ` -OutFile "$env:TEMP\docker.zip" ` -UseBasicParsing
Now, we shall expand the downloaded zip file to the programming files of our machine. For this, run -
Expand-Archive -Path "$env:TEMP\docker.zip" `
-DestinationPath $env:ProgramFiles
The final step is to create an environment variable that will add the Docker directory to the path daemon. Run the command
[Environment]::SetEnvironmentVariable("Path", $env:Path + ";$($env:ProgramFiles)\Docker", [EnvironmentVariableTarget]::Machine)

Nano Server
Now, we have finished installing the Docker (client) and Dcokerd (engine) in "Program Files" folder. Check for these inside the Docker folder.

Step 2 Creating Environment variable to connect Docker easily
Here, Docker is client and Dockerd is engine. Now, we are going to configure an environment variable that will store the DNS name of our Nano Server and connect with it. For this, run the below command.
[Environment]::SetEnvironmentVariable("DOCKER_HOST","nanoserver007.southindia.cloudapp.azure.com",[EnvironmentVariableTarget]::Machine)
Note - Replace the DNS name with your Nano Server DNS or IP.
Now, open the new PowerShell console and run the command "docker version" . This will show you the client (Docker) and engine (Dockerd). This means we have created a connection in between these two services which we have actually downloaded from the Docker website.
July 18, 2018 11:36 by
PeterIn this article, we will learn the most useful and powerful command line tool, AppCmd, for publishing or hosting a website on IIS. Using the AppCmd tool, we can host static as well as a dynamic website (ASP.NET Webform, MVC, Dot Net Core etc) easily.
Description
I assume you are aware of (or have knowledge of) how to Host or Publish Website in IIS using inetmgr. This will help you understand AppCmd.exe.
AppCmd.exe is the command line tool for managing IIS 7 and above. It provides an easy way to manage a website without Graphical User Interface.
Some of the things you can do with AppCmd,
- Create and configure sites, apps, application pools, and virtual directories
- Start and stop sites, and recycle application pools
- Search, manipulate, export, and import IIS and ASP.NET configuration
How to Use AppCmd.exe
The AppCmd.exe command line is built on top of a set of top-level server management objects, such as Site and Application. These objects expose methods that can be used to perform various actions on those objects, and object instances expose properties that can be inspected and manipulated.
AppCmd.exe is located in the %systemroot%\system32\inetsrv\ directory. Because it is not a path of the PATH automatically, you need to use the full path to the executable when executing commands like in %systemroot%\system32\inetsrv\AppCmd.exe list sites. Alternatively, you can manually add the inetsrv directory to the path on your machine so that you can access AppCmd.exe directly from any location.
Note
Run Command Prompt as Administrator to using AppCmd.
In this article, we learn basic command to host websites.
List all available commands and actions in AppCmd
AppCmd
AppCmd /?
From the above screenshot, it is clear that Command Prompt is run as administrator and run AppCmd which return list of supported Command.
List all hosted or published websites in IIS.
AppCmd List Site
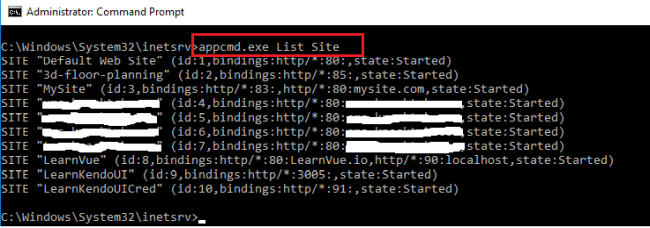
In the above screenshot, I have run List Site command which returns all published site with bindings and state of site e.g. Started or Stop.
Create the website using AppCMD
APPCMD add site /name:WebByAppCMD /bindings:"http/*:94:" /physicalPath:"C:\Users\Mepani\Desktop\2018 Article\Kendo Grid" -virtualDirectoryDefaults.userName:USERNAME -virtualDirectoryDefaults.password:PASSWORD
For any website hosting we require information as above like Site Name, Bindings (Protocal, hostname), Physical Path, Credential for access or permission to folder path.
Sometimes, if you don't provide access/permission to a physical path then you might be getting Access denied error.
View Newly Hosted or published website
appcmd.exe list site "WEbByAppCMD"
Start and stop hosted or publish a website
appcmd.exe start site "WEbByAppCMD"
appcmd.exe stop site "WEbByAppCMD"
Delete or remove published or hosted website from IIS
appcmd.exe delete site "WEbByAppCMD"
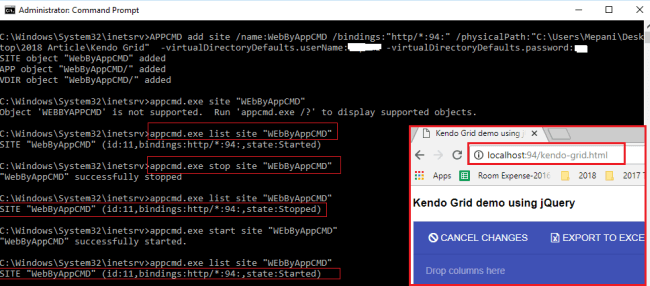
App CMD Create website
In the above screenshot, we have covered all the above site commands except delete. Possible issue or challenges might be faced during command line website hosting niclude,
- Site name already created
- Port is already in use
- Bad Request -Invalid hostname
Hope you enjoyed this and learned a new way to host or publish a website using AppCmd.
July 11, 2018 11:52 by
PeterHTTPS is a secure communications channel that is used to exchange information between a client computer and a server. It uses Secure Sockets Layer (SSL). This article describes how to configure the SSL/HTTPS service in Internet Information Services (IIS) and compares this process to the similar process in Apache.
Configuring Your Web Server for SSL
To enable SSL in IIS, you must first obtain a certificate that is used to encrypt and decrypt the information that is transferred over the network. IIS includes its own certificate request tool that you can use to send a certificate request to a certification authority. This tool simplifies the process of obtaining a certificate. If you use Apache, you must obtain the certificate manually.
In both IIS and Apache, you receive a certificate file from the certification authority, which you must configure on the computer. Apache reads the certificate from its source file by using the SSLCACertificateFile directive. However, in IIS, you can configure and manage certificates by using the Directory Security tab of the Web site or folder properties.
You can migrate certificates from Apache to IIS; however, Microsoft recommends that you re-create or obtain a new certificate for IIS.
Configure Folder or Web Site to Use SSL/HTTPS
This procedure assumes that your site has already has a certificate assigned to it.
- Log on to the Web server computer as an administrator.
- Click Start, point to Settings, and then click Control Panel.
- Double-click Administrative Tools, and then double click Internet Services Manager.
- Select the Web site from the list of different served sites in the left pane.
- Right-click the Web site, folder, or file for which you want to configure SSL communication, and then click Properties.
- Click the Directory Security tab.
- Click Edit.
- Click Require secure-channel (SSL) if you want the Web site, folder, or file to require SSL communications.
- Click Require 128-bit encryption to configure 128-bit (instead of 40-bit) encryption support.
- To allow users to connect without supplying their own certificate, click Ignore client certificates. Alternatively, to allow a user to supply their own certificate, use Accept client certificates.
- To configure client mapping, click Enable client certificate mapping, and then click Edit to map client certificates to users. If you configure this functionality, you can map client certificates to individual users in Active Directory. You can use this functionality to automatically identify a user according to the certificate they supplied when they access the Web site. You can map users to certificates on a one-to-one basis (one certificate identifies one user) or you can map many certificates to one user (a list of certificates is matched against a specific user according to specific rules. The first valid match becomes the mapping).
- Click OK.