IIS 7.5 and IIS 8.0 European Hosting

BLOG about IIS 7.5 Hosting, IIS 8.0 Hosting and Its Technology - Dedicated to European Windows Hosting Customer

IIS Hosting Europe - HostForLIFE :: Deploy ASP.NET Core API application In IIS

clock March 29, 2022 09:04 by author Peter

ASP.NET Core is a cross platform and open source framework which is used to build  modern web apps, API services and many more. In this article we are going to see how to deploy the ASP.NET Core API application in IIS.

 
Tooling

    Visual Studio 2019
    IIS
    POSTMAN

Creating an application
 
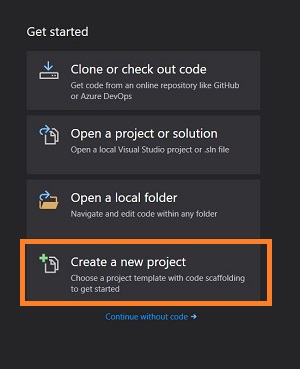
Open Visual Studio 2019 -> Click on create new project from the start up screen.

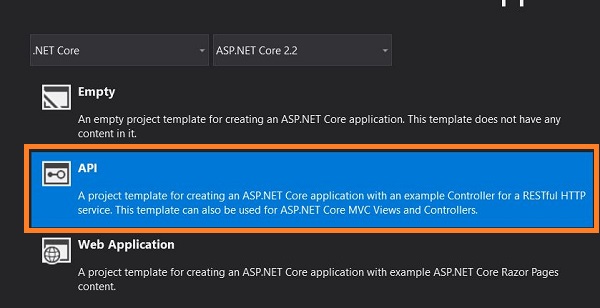
Click on ASP.NET Core Web application template -> give the project name, in my case I named it as AspCoreHosting -> click on create.
Choose API template, as shown in below figure.

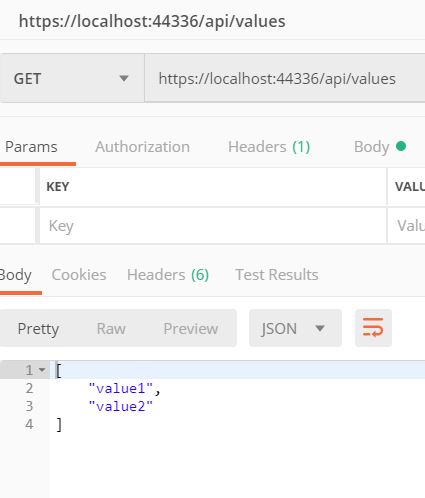
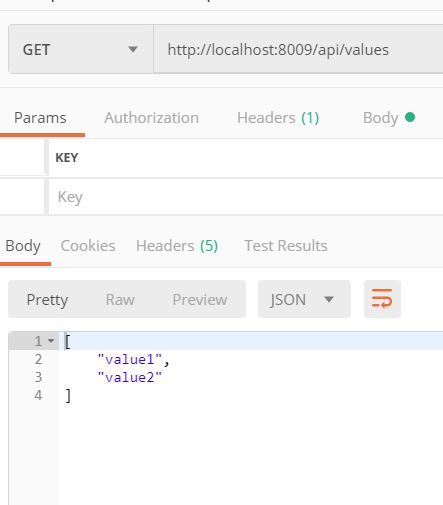
Now run the application from visual studio and test the API in POSTMAN as shown in the below figure.

Deploy the application to IIS
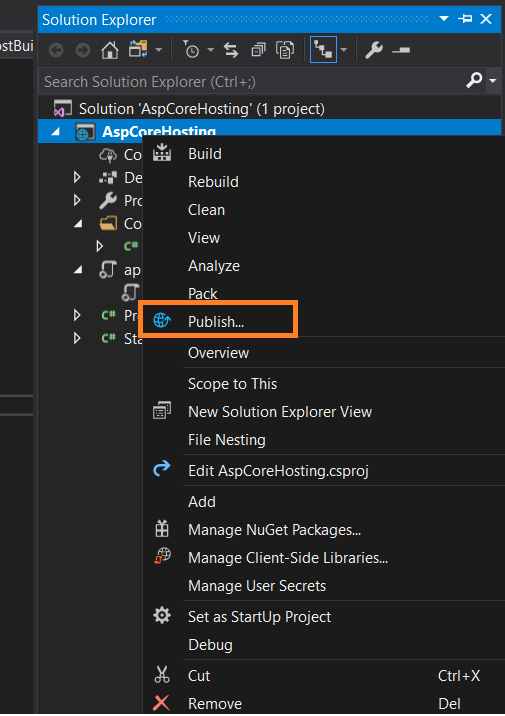
Let’s create a package of the application, right click on the project and select publish, as shown in the below figure.


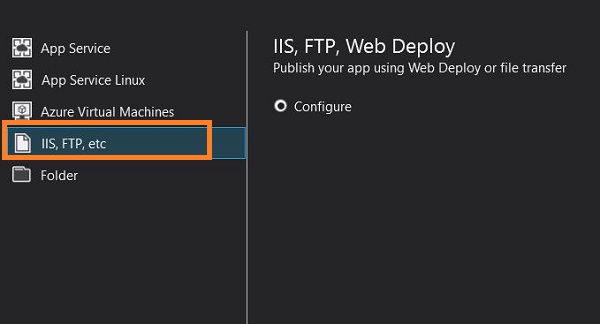
Choose IIS, FTP, etc option from publish target list and choose the publish method as file system, and click on save.

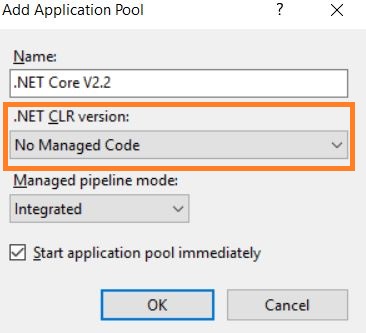
Open IIS, right click on application pools -> Add app pool -> Choose the .NET CLR Version as No Manager Code and name the app pool. in my case I named it as .NET Core V2.2 with pipeline mode as Integrated.


Note
Creating a new application pool for .NET Core is optional
 
Right click on sites -> Add site ->Give the Site name -> select the Application pool as .NET Core V2.2 -> choose the package path -> and give a port number as shown in the below figure.


Run the web site


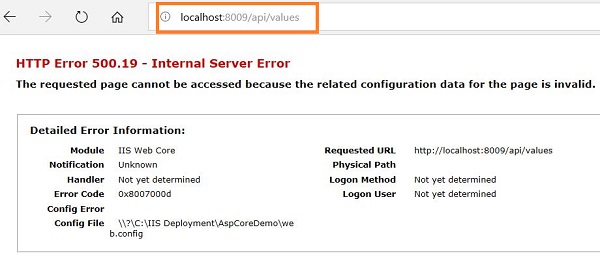
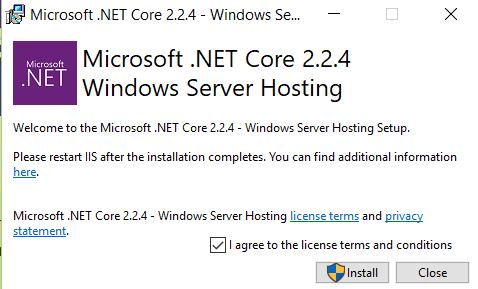
Oops we got a configuration error. The problem is, to run the .NET Core application in IIS we need to install “dot net core windows hosting bundle”. Just download and install it using the below link.


Once it is installed, test the API using POSTMAN tool


Yes, now the application is up and running in IIS
We have seen how to deploy the ASP.NET Core API application in IIS by installing the dot net core windows hosting bundle.


IIS Hosting Europe - HostForLIFE :: Error Occurred in Deployment Step Recycle IIS Application Pool

clock March 25, 2022 09:01 by author Peter

This article describes what to do about a specific error that could occurr in the deployment step of recycling an IIS application pool.

Steps
An error has occurred in the deployment step of "Recycle IIS Application Pool': The communication object, System.ServiceModel.InstanceContext, cannot be used for communication because it has been Aborted.

Simple way to let the Deploy occur
1. Click "Start" -> "Run...".

2. Type "iisreset" as in the following:


3. Wait untill IIS stops then starts again as in the following:

4. Right-click on your SharePoint project then click "Deploy" as in the following:


5. Deploy will now succeed.

6. If you are still seeing "Error occurred in deployment step 'Recycle IIS Application Pool'" then please restart your SharePoint Server Front Web application.


IIS Hosting Europe - HostForLIFE :: Configure And Host On IIS For .Net Core/.Net 5+ Web Application In Windows 10

clock March 14, 2022 07:38 by author Peter

What is ISS?
Internet Information Services (IIS) is web server from Microsoft that runs on Windows systems to serve requested HTML pages or files.

Enable ISS
By default, ISS is disabled in windows, so to use it, first needs to be enabled. To enable and use IIS, Administrator Rights are required.

For .net core application hosting we need to install net core host bundle. Click here for the download link.

After the installation we need to enable IIS by following the next steps:

  • Open Control Panel
  • Select Programs and features
  • Select Turn Windows features on or off

Select Internet Information Services and Hostable Web core. Press ok. It will take some minutes to load everything.


After ISS is enabled, go to search bar in windows and type IIS, and open Internet Information Services Manager
That’s it, you have successfully enabled ISS on your machine.

Publish
An application to run on ISS needs to be published. Publishing in visual Studio for IIS is very easy by using the following steps:

  • Right click on your project
  • Select Publish
  • Select Folder option. With this you will select where the application will be published

Select the path

Press Finish

  • Press publish button
  • Done, your application is not published on the desired path


Host application
In order to host an application on ISS, a website and an application pool needs to be created.

Create Website

  • From left area Select Sites
  • Right click -> Add Website
  • Configure the Site
  • Site name: your desired site name

            Physical Path: the location of the folder for the published location
            Biding, select your IP address, this will be your site address
            Change port from 80 to something else, example 90

  • Press ok

Application pool

  1. From left area Select Application Pools
  2. Select Default application pool
  3. On the Right select Basic Settings
  4. At .NET CLR version select no managed code (specific for .net core applications)
  5. Press ok

Now you have a hosted application in IIS.


About HostForLIFE.eu

HostForLIFE.eu is European Windows Hosting Provider which focuses on Windows Platform only. We deliver on-demand hosting solutions including Shared hosting, Reseller Hosting, Cloud Hosting, Dedicated Servers, and IT as a Service for companies of all sizes.

We have offered the latest Windows 2016 Hosting, ASP.NET Core 2.2.1 Hosting, ASP.NET MVC 6 Hosting and SQL 2017 Hosting.


Tag cloud

Sign in