IIS 7.5 and IIS 8.0 European Hosting

BLOG about IIS 7.5 Hosting, IIS 8.0 Hosting and Its Technology - Dedicated to European Windows Hosting Customer

IIS Hosting Europe - HostForLIFE :: Fix To No Access-Control-Allow-Origin Header Is Present Or Working With Cross Origin Request In ASP.NET Web API

clock July 25, 2025 10:03 by author Peter

When attempting to retrieve data from an other source, possibly through an AJAX call, we encounter this problem. We will go over the fixes for this problem in detail in this post, along with a discussion on Cross Origin Requests. I'll be using Visual Studio and Web API 2 here. I'm hoping you'll enjoy this.

Background
I hosted my Web API in a server, and what that API does is, it will just return the data in JSON format. But when I tried to consume this Web API via an Ajax call, I was getting the error “No ‘Access-Control-Allow-Origin’ header is present on the requested resource." I solved the same issues in different ways. Here I am going to share those.

Using the code
I assume that you have created a Web API and hosted it in your server. If you are new to Web API, you can always get some information from here Articles Related To Web API.

We all will have some situations where we need to fetch some data from another domain or another site, right? If it is from the same site, you won’t be facing any issues at all. Like you are calling an Ajax call from the page www.SibeeshPassion.com/Receiver.html to www.SibeeshPassion.com/Sender.html to get the data, here the origin is same. and therefore you will get the data. What happens is when the sender and receiver is not in the same origin, like you need to get the data from www.Microsoft.com by an Ajax call in www.SibeeshPassion.com/Receiver.html. The browser will not allow you to get the sensitive data from other domain, for security purposes your browser will return to you “No ‘Access-Control-Allow-Origin'”. To overcome this, we have something called Cross Origin Resource Sharing (CORS). Basically process of allowing other sites to call your Web API is called CORS. According to W3 Org CORS is a standard which tell server to allow the calls from other origins given. It is much more secure than using JSONP(Previously we had been using JSON for getting the data from other domains.).

Fix To No Access-Control-Allow-Origin header is present.

We can fix this issue in two ways,

  • By using Microsoft.AspNet.WebApi.Cors
  • By adding header informations in Web.config

We will explain both now.

By using Microsoft.AspNet.WebApi.Cors,

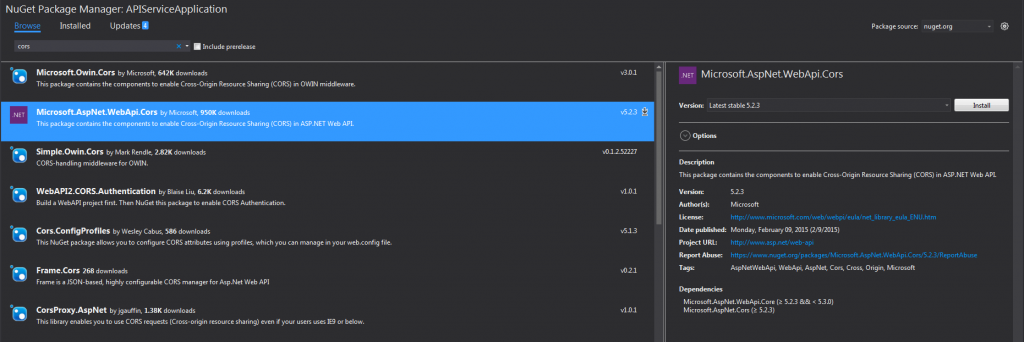
To work with this fix, you must include the package By using Microsoft.AspNet.WebApi.Cors from Manage Nuget window.
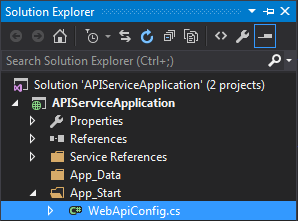
Now got to App_Start folder from your solution. Then click on the file WebApiConfig.cs, this is the file where we set the configuration for our Web API.
Then you can add the preceding codes in the static function Register.
    var cors = new EnableCorsAttribute("*", "*", "*");  
    config.EnableCors(cors); 

If you do this, the CORS will be applied globally for all the Web API controller you have. This is the easiest way of doing it. Now if you want to see the metadata of EnableCorsAttribute, you can see find it below.
    // Summary:  
    // Initializes a new instance of the System.Web.Http.Cors.EnableCorsAttribute class.  
    //  
    // Parameters:  
    // origins:  
    // Comma-separated list of origins that are allowed to access the resource. Use  
    // "*" to allow all.  
    //  
    // headers:  
    // Comma-separated list of headers that are supported by the resource. Use "*" to  
    // allow all. Use null or empty string to allow none.  
    //  
    // methods:  
    // Comma-separated list of methods that are supported by the resource. Use "*" to  
    // allow all. Use null or empty string to allow none.  
    public EnableCorsAttribute(string origins, string headers, string methods);  

As it is mentioned, it accepts the parameter's origins, headers, methods. Here we pass * to all the three parameters to make everything allowable. 

You can also try the same as below in the Register function. Here we are going to apply CORS for particular controller, which means it will be applied for all the actions in the controller. Before that make sure you have added the preceding code in your WebApiConfig.cs file.
    config.EnableCors();  

And in the API controller you need to set the origins,headers,methods as preceding.
    using System;  
    using System.Collections.Generic;  
    using System.IO;  
    using System.Linq;  
    using System.Net;  
    using System.Net.Http;  
    using System.Web.Http;  
    using Newtonsoft.Json;  
    using Newtonsoft.Json.Converters;  
    using System.Configuration;  
    using System.Data;  
    using System.Data.SqlClient;  
    using System.Runtime.Serialization;  
    using System.Text;  
    using System.Web;  
    using System.Web.Http.Cors;  
    namespace APIServiceApplication.Controllers  
    {  
        [EnableCors(origins: "*", headers: "*", methods: "*")]  
        public class DefaultController: ApiController {}  
    }  


Make sure that you have added namespace using System.Web.Http.Cors; to use CORS. You can always disable CORS in an action by using [DisableCors].
    namespace APIServiceApplication.Controllers  
    {  
        [EnableCors(origins: "*", headers: "*", methods: "*")]  
        public class DefaultController: ApiController  
        {  
            [DisableCors]  
            public string XMLData(string id)  
            {  
                return "Your requested product" + id;  
            }  
        }  
    }  

Here we have disabled CORS for the action XMLData. And again if you need to apply CORS only in a single action, you can do that as follows.
    namespace APIServiceApplication.Controllers  
    {  
        public class DefaultController: ApiController  
        {  
            [EnableCors(origins: "*", headers: "*", methods: "*")]  
            public string XMLData(string id)  
            {  
                return "Your requested product" + id;  
            }  
        }  
    }  


I hope you are aware of how to enable CORS now. By adding header informations in Web.config, Another fix we can do is that add some tags in our Web.config file.
    <system.webServer>  
        <httpProtocol>  
            <customHeaders>  
                <add name="Access-Control-Allow-Origin" value="*" />  
                <add name="Access-Control-Allow-Headers" value="Content-Type" />  
                <add name="Access-Control-Allow-Methods" value="GET,POST,PUT,DELETE,OPTIONS" />  
                <add name="Access-Control-Allow-Credentials" value="true" />  
            </customHeaders>  
        </httpProtocol>  
    </system.webServer>  


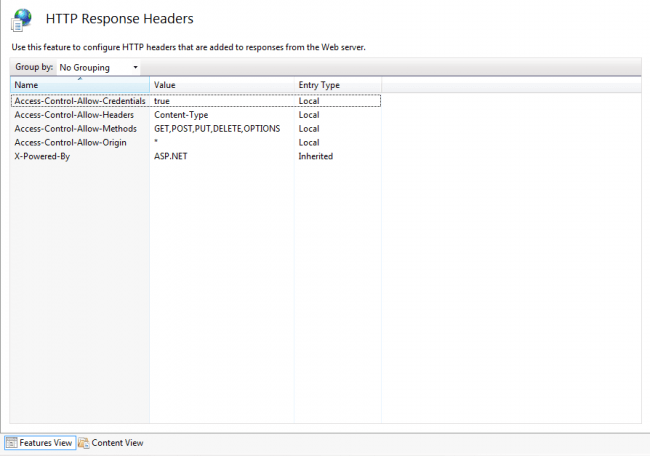
As you can see we have added keys with value for the listed items.

  • Access-Control-Allow-Origin (For Origin)
  • Access-Control-Allow-Headers (For Headers)
  • Access-Control-Allow-Methods (For Methods)

Now if you go to your server and check, you can see that all the things are configured perfectly. I have configured my API in my server IIS, so I am going to see my Response Header settings in IIS.

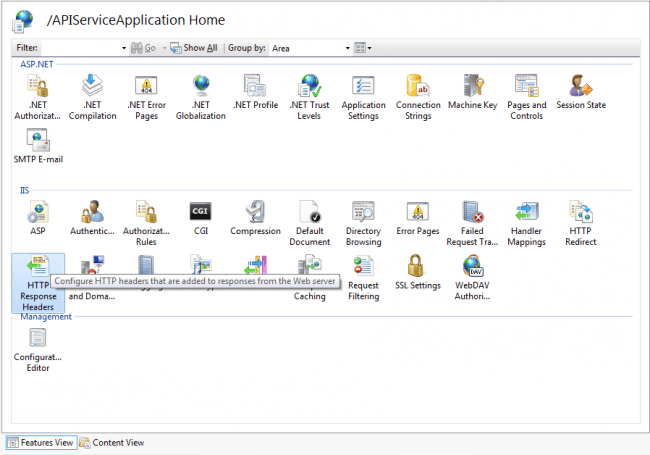
Go to command window and type inetmgr and click OK, your IIS will opened shortly, now find your Web API which you have already configured under Default Web Site. Before doing this, please make sure that you have configured IIS in your windows. If you don’t know how to configure, I strongly recommend you to read Configure IIS in Windows.

Go to Features View and double click on HTTP Response Headers under IIS category.
You can see all the settings has been configured there.
That’s all, now if you run your application, you will be able to fetch the data from your Web API.

Conclusion
Did I miss anything that you may think is needed? Have you ever faced this issue? Did you try Web API yet? I hope you liked this article. Please share with me your valuable suggestions and feedback.

Your turn. What do you think?

A blog isn’t a blog without comments, but do try to stay on topic. If you have a question unrelated to this post, you’re better off posting it on C# Corner, Code Project, Stack Overflow, Asp.Net Forum instead of commenting here. Tweet or email me a link to your question there and I’ll definitely try to help if I am able to.


IIS Hosting Europe - HostForLIFE :: ASP.NET Core 9 Application Deployment on IIS

clock June 26, 2025 09:24 by author Peter

I assume that you already have a pool on your Windows Server IIS system before reading this post. 

To learn how to publish ASP.NET Core 9 applications on IIS environments, follow these steps. You must configure the project to run on the architecture from the target pool and set up your code to support IIS. Verify the inetmgr console, check the Advanced setting, and see if Enable 32-Bit programs is set to true to see if your pool is operating on x86.

Let's do the steps to publish
Step 1. Start your new ASP.NET Core MVC.
dotnet new mvc -n MyTestApp

Step 2. If you compile the application and start publishing, you face these default parameters.

Step 3. I tried to publish it but got an error of 503. It's normal. This is what we will fix.
Step 4. Open the solution configuration, and choose New... from the Active solution platform.
Step 5. Choose your architecture pool. It should be the same as the pool on IIS (x86 for 32 bits).

Step 6. It will look like this.

Step 7. Back to the Publish configuration, you need to change this.

Step 8. But you will get the same error if you try to publish.

Step 9. To fix this, you need to configure your application to run under Windows, adding <TargetFramework>net9.0-windows</TargetFramework>, unload the project and edit it.
<Project Sdk="Microsoft.NET.Sdk.Web">
  <PropertyGroup>
    <TargetFramework>net9.0-windows</TargetFramework>
    <Nullable>enable</Nullable>
    <ImplicitUsings>enable</ImplicitUsings>
    <Platforms>AnyCPU;x86</Platforms>
  </PropertyGroup>
</Project>


Step 10. Now, if you open the Properties of your application, you will see that it is enabled to Target OS version 7.0.

Step 11. Now, you need to select the c: with "net8.0-windows":

Step 12. Before publishing a dotnet, copy the file app_offline.htm to the target IIS installation folder. This turns off the website so this message is displayed if you try to use it:

Step 13. Extra source code, Microsoft default source code. If the file name app_offline.htm indicates to dotnet that the execution should be terminated, it automatically redirects to it. You can customize this file as you like.
<!doctype html>
<title>Site Maintenance</title>
<style>
   body {
   text-align: center;
   padding: 150px;
   font: 20px Helvetica, sans-serif;
   color: #333;
   }
   h1 {
   font-size: 50px;
   }
   article {
   display: block;
   text-align: left;
   width: 650px;
   margin: 0 auto;
   }
   a {
   color: #dc8100;
   text-decoration: none;
   }
   a:hover {
   color: #333;
   text-decoration: none;
   }
</style>
<article>
   <h1>We&rsquo;ll be back soon!</h1>
   <div>
      <p>Sorry for the inconvenience but we&rsquo;re performing some maintenance at the moment. We&rsquo;ll be back online shortly!</p>
   </div>
</article>

Step 14. You may face an error 503 yet, so add <AspNetCoreHostingModel>OutOfProcess</AspNetCoreHostingModel> to run OutOfProcess.
<Project Sdk="Microsoft.NET.Sdk.Web">
   <PropertyGroup>
      <TargetFramework>net9.0-windows</TargetFramework>
      <Nullable>enable</Nullable>
      <ImplicitUsings>enable</ImplicitUsings>
      <Platforms>AnyCPU;x86</Platforms>
      <AspNetCoreHostingModel>OutOfProcess</AspNetCoreHostingModel>
   </PropertyGroup>
</Project>

Step 15. Copy the files, then delete the app_offline.htm file to run the application. This is the result.


IIS Hosting Europe - HostForLIFE :: Respond to IIS Requests in ASP.NET

clock June 19, 2025 09:36 by author Peter

Type our application url (.aspx) in browser and press enter, then what will happen?


We will get the response in terms of html, but how it is possible? 
First request goes to the web server and it will check which ISAPI extension is requesting to server. In the case of .aspx, request goes  to aspnet_isapi.dll for processing our application.

Then it will check if request is coming first time or not. If request is coming for the first time, then application manager will create application domain where application runs. ASP.NET created objects like HttpContext, HttpRequest, HttpResponse.

Then application is started by creating the object of HttpApplication class.

Then HttpApplication class starts processing the request.

First global.asax page will fire, according to page life cycle events on page will be fired:

the request process is as-: 


IIS Hosting Europe - HostForLIFE :: Overview of the IIS Application Pool and Site

clock April 22, 2025 08:38 by author Peter

Websites and Application Pools are two crucial IIS components that we shall examine. Understanding these components will improve your capacity to efficiently deploy and administer web applications.

What is an IIS Site?
An IIS Site is like a container that holds your web application. It has several important properties.

  • Site Name: A unique name within IIS (e.g., "MyWebApp")
  • Physical Path: The folder on the server where your application files live
  • Bindings: Define how users access your site (IP address, port, and optionally a hostname)

Example

  • Physical Path: C:\inetpub\wwwroot\MyWebApp
  • Binding: http://localhost:8080 or myapp.local

You can have multiple sites on the same server, each with different bindings and content.

What is an Application Pool?
An Application Pool (App Pool) is a container for one or more web applications. It defines how the applications run and are isolated from others.

Here’s what it does.

  • Runs your web app in its own process
  • Allows you to use different versions of .NET
  • Provides application isolation — if one app crashes, others remain unaffected
  • Manages performance settings like idle timeout, recycling, and max processes

By default, when you create a new IIS Site, IIS also creates a new App Pool for it, but you can change that if needed.

How do IIS Sites and App Pools Work Together?
An IIS Site must be assigned to an Application Pool. That pool is responsible for executing the code in the application and handling incoming requests.

  • A site can use one app pool
  • An app pool can serve multiple sites or applications, though it’s best to isolate apps for better reliability and security


Rule of Thumb: Use one App Pool per site unless you have a good reason to share (e.g., performance tuning or tightly coupled apps).

Rules for Configuration about Application Pool and Sites

  • Valid: One App Pool → Multiple Sites
  • Invalid: One Site → Multiple App Pools

Best Practices

  • Use separate App Pools for each site: This helps with stability and security.
  • Stick to the default settings at first: They’re good enough for most apps during development
  • Give App Pools correct permissions: If your app reads/writes files, make sure the App Pool’s identity has access to those folders
  • Learn to recycle App Pools: This refreshes the app and clears memory leaks. You can do this from IIS Manager or PowerShell.
  • Use Preload for better performance: Set preloadEnabled=true so IIS warms up your app as soon as the server starts


IIS Hosting Europe - HostForLIFE :: How to Install and Configure Web RD in Server?

clock April 11, 2025 10:36 by author Peter

In this article, I will show you how to install and configure a website remote desktop on Windows Server 2019 properly and easily.


WEB RD
WEB RD in server refers to Remote Desktop Web Access (RD Web Access), a feature offered by Microsoft Windows Server that allows users to access remote desktops and applications through a web browser. This eliminates the need for users to install dedicated remote desktop software on their devices.

How does Web RD work?

Here's a breakdown of how it works.

  • RD Web Access is a role service that needs to be installed and configured on a Windows server.
  • Once configured, users can access a web portal via their web browser, typically from any device with internet access.
  • Users can launch RemoteApp programs or establish connections to remote desktops through the web portal.
  • RD Web Access can be used in conjunction with other Remote Desktop Services (RDS) components like Remote Desktop Session Host (RD Session Host) and Remote Desktop Connection Broker (RD Connection Broker) for managing remote desktop access.

Key benefits of using RD Web Access
Here are some key benefits of using RD Web Access.

  • Increased accessibility: Users can access their desktops and applications from anywhere with an internet connection and a web browser.
  • Reduced complexity: Eliminates the need for users to install and configure dedicated remote desktop software.
  • Improved security: RD Web Access can be configured with various security features to protect against unauthorized access.

Step 1. On your server’s dashboard, click “add features”.


Step 2. Click “remote desktop session installation” after clicking “next”.

Step 3. Click “quick start” after clicking “next”.


Step 4. Click “session-based desktop deployment” after clicking “next”.


Step 5. Click “next”.


Step 6. Click “restart” and click “deploy”.


Step 7. After installed on your server’s dashboard, click “remote desktop services”.


Step 8. Click “RD gateway”.


Step 9. Add your server by clicking the arrow and after clicking “next”.


Step 10. Type your computer name with the domain name.


Step 11. Click “add”.


Step 12. After installing the same installing process for “RD licensing”.


Step 13. After installation, open your web browser from the client's computer, and type your computer name with the server’s domain name after continuously typing/rdweb and hit enter then give your server’s user's name with the domain name and password.


Note. Now you can see our remote app and desktop works successfully.


Conclusion
In this article, we all clearly understand how to install and configure a website remote desktop on Windows Server 2019 in the proper method and easiest way. If there is clarification regarding this topic, feel free to contact me.


IIS Hosting Europe - HostForLIFE :: How to Install and Configure RODC in Server?

clock December 13, 2024 07:11 by author Peter

I'll walk you through the correct and simplest approach to install and setup a read-only domain controller on Windows Server 2019 in this post.

A read-only domain controller (RODC): what is it?
In Microsoft's Active Directory service, a Read-Only Domain Controller (RODC) is a unique kind of domain controller that offers a read-only replica of the primary Active Directory database. It provides features that are comparable to those of a typical domain controller yet differ significantly.

Key Structures of an RODC

  • Read-only access: Users can search for domain resources, authenticate, and receive group policies like a regular domain controller. However, they cannot modify any data directly on the RODC.
  • Security focus: Primarily for secure environments where physical access to the server might be compromised. Since it doesn't store user passwords, an attacker gaining access wouldn't have access to critical credentials.
  • Limited functionality: Unlike standard domain controllers, RODCs cannot be used for tasks like creating user accounts, resetting passwords, or modifying group policies.
  • Offline functionality: RODCs can cache login credentials for a limited set of users, allowing users to log in even when the connection to the main domain is unavailable.

Benefits of using an RODC

  • Improved security: Reduced risk of sensitive data like passwords being compromised if the RODC is physically compromised.
  • Increased availability: Allows users to access domain resources even when the connection to the main domain is unavailable (cached credentials).
  • Reduced bandwidth consumption: Requires less bandwidth compared to a full domain controller as it only replicates data from the main domain, not vice versa.

Note. We need two server operating systems server one has ADDS and DHCP with configuration, on server two without any configuration.

Step 1. On your server two set an IP address based on server one’s IP address.

Step 2. Create a user on server one. If you want to know how to create a user

Step 3. On your server, one’s dashboard clicks “tool” after clicking “active directory users and computers”.

Step 4. Right–click on “domain controllers” after clicking “pre–create read-only domain controller account”.

Step 5. Click “next”.

Step 6. Select “my current login” after clicking “next”.

Step 7. Type your server two’s computer name and click “next”.

Step 8. Click “next”.

Step 9. Again click “next”.

Step 10. Click “set” and choose your created user account after clicking “next”.

Step 11. Again click “next”.

Step 12. Click “finish”.

Step 13. On your Second Server / Server Two install adds services

Step 14. Login to your created user account and password by clicking “change” after clicking “next”.

Step 15. Click “RODC” and give your “DSRM” password and after click “next”.

Step 16. Select your main server/server one after clicking “next”.

Step 17. Click “next”.

Step 18. Again click “next”.

Step 19. Click “install”.

Note. On your main server/server one’s active directory users and computers” under domain controllers, you can see our RODC server in online.

Conclusion
In this article, we all clearly understand how to install and configure a read-only domain controller on Windows Server 2019 in the proper method and easiest way. If there is clarification regarding this topic, feel free to contact me.


IIS Hosting Europe - HostForLIFE :: Setup .NET Core on Windows Server with IIS Migration

clock November 22, 2024 07:01 by author Peter

Install the latest .NET Core SDK - not sure if .NET 8 is enough for old ASP.NET. Any way install both .NET 8 and .NET standard framework (.net 4.8.1). Install the latest .NET Core runtime(I guess .NET 8 installation takes care of it, anyway. If things dont work - install .NET runtime separately)


This software is important - I guess it is ASP.NET Core runtime.

Anyway, google --- ASP.NET Core runtime - Windows Hosting Bundle Installer -- whatever software suggestion comes in Google, pls install it.

Whenever you migrate to the latest version, Install the above software in Windows Server 2022

Of course, we need to install the latest IIS on the Windows server.

I will write a separate article about the IIS Migration

For IIS migration, list all software present in the old server. Install all this software on the new server. If you miss any software, there will be a code break/your apps will not work on the new server.

If you are using Excel Libraries on the old server, this may not be allowed on the new server. Use NPOI/EXcelDataReader opensource nugest package instead.
Below are the steps for IIS 10 Migration

First, we have to export all IIS settings from IIS 6 or IIS 8.

The settings will be exported/saved as a zip file.


You may get an error, or export settings may fail if you try to export all IIS settings.

So we have to export one set by one. Please follow the below steps.

In IIS 8/IIS 6/Old Server.

Right-click IIS => Export Server Package => Manage Components.

We have to export each item using the provider name dropdown.

Webserver and webserver60 are important.

Before exporting, delete unwanted files inside a physical directory because exporting some of the items in the dropdown may fail if the physical directory size is large.

After exporting, import each component's settings.

Right-click IIS => Import and import zip file settings in the same order they are exported.

Importing some components may fail, but move on to the next component.

Dont stop if you get errors while importing or exporting some of the components. Yes, you may not be able to export some of the settings, but dont worry. Move on to the next setting.

When you install IIS from Server Explorer, Imort Option may not be there when you right-click IIS.


IIS Hosting Europe - HostForLIFE :: Installing and Enable IIS Express on Windows 11

clock November 18, 2024 08:15 by author Peter

Installing and activating IIS Express on Windows (11/10) is described in this article. Start by downloading IIS Express from the Microsoft website's official IIS Express page. After that, install the software by opening the installer and following the prompts on the screen. Verify from the Start menu after installation.


To activate IIS Express, take the actions listed below.

Step 1. Search and open "Turn Windows features on or off" from Control Panel > Programs and Features

Step 2. From "Turn Windows features on or off" window search and on check box "install and enable the IIS express" option and click ok.

Step 3. Windows Feature update will update the required files. After Completing Click Close.

After completion go to start menu and search IIS Express manager will get enable in your system.


IIS Hosting Europe - HostForLIFE :: Using the Exit Code 0x80073CF3, the Installer Failed

clock November 8, 2024 08:51 by author Peter

I encountered the following issue when attempting to use Winget (the Windows package manager) to install "Windows Terminal Preview" on an Azure-hosted Windows 11 virtual machine.

Winget install Microsoft.WindowsTerminal.Preview.

The error message says. The installer failed with exit code: 0x80073cf3. This package has a dependency missing from your system. Just a note, windows terminal preview is a terminal window that allows the users to open command line terminals with multiple shells. In other words, you can open one shell with Windows Power Shell, another tab with Bash, and another tab with Ubuntu shell, etc. More about the Windows terminal can be learned from the references section.


Reason

When trying to install “Windows Terminal Preview” using Winget, Winget tries to look for dependencies on your system, if not found it will get the required software from the app store and try to install just like the NuGet package manager. The issue here is that Winget is trying to get the older version of dependency software Microsoft.UI.XAML which isn’t supported by Windows Terminal Preview.

Fix
The fix is to get the latest version of dependency software which is Microsfot.UI.XAML 2.8 and install it first and proceed with the Windows Terminal Preview using Winget. Below are the commands and the screen capture for reference.

winget install Microsoft.UI.xaml.2.8
winget install Microsoft.WindowsTerminal.Preview


IIS Hosting Europe - HostForLIFE :: Remove IIS Log Files

clock October 14, 2024 09:04 by author Peter

The log files that IIS generates can, over time, consume a large amount of disk space. This article will discuss a way to remove the IIS Log Files, including locate the log file directory. The content of this article is


Introduction

  • Problem
  • How to locate the IIS Log File Folder
  • Run the VB Scrip

Problem:
IIS log files continue to grow in Web Server and can, over time, consume a large amount of disk space. Logs can potentially fill up an entire hard drive. To mitigate this problem, many users turn off logging completely. Fortunately, there are alternatives to doing so, such as the following:

  • Enable folder compression
  • Move the log folder to a remote system
  • Delete old log files by script.

Here we will discuss the third option.

How to locate the IIS Log File Folder

By default, the IIS log file folder is in %SystemDrive%\inetpub\logs\LogFiles, it is usually in C:\inetpub\logs\LogFiles. However, the location can be customized by user. We have two ways to locate the IIS Log Folder

  • through IIS Manager
  • through Running a Script, such as Windows PowerShell Script

Through IIS Manager:
Open IIS Manager => Click the Chosen  Site under Sites => Double Click the Logging Icon


In the Logging page, the IIS Log File Folder is shown in the Direcitory:
such as %SystemDrive%\inetpub\logs\LogFiles by default

In certain case, it is set by user,
such as D:\LOGS\IIS\

Through Windows PowerShell Script:
Import-Module WebAdministration

# Replace 'Default Web Site' with the name of your website
$siteName = 'Default Web Site'

# Get the log file directory
$logFilePath = Get-ItemProperty "IIS:\Sites\$siteName" -Name logFile | Select-Object -ExpandProperty Directory

Write-Output "The log files for '$siteName' are located at: $logFilePath"


If we put the code in a PowerShell Script file: GotLogFolder1.ps1, we got the default folder:

In a customized case, the folder could be different:

For the IIS structure:

Run VB Script to Remove the IIS log files by Retention Policy

Microsoft provide a VB Script to implement this:
You can control disk usage of log files by running a script that automatically deletes log files that are older than a certain age. Running this script in a scheduled task will keep the problem of a disk filling up under control without constant maintenance.

The following VBScript will check the age of each log file in a folder and will delete any log file older than a specified age. To customize the script for your purposes, simply change the name and path of the folder in line 1 of the script, and change the maximum age to the desired value in days, in line 2.
sLogFolder = "c:\inetpub\logs\LogFiles"
iMaxAge = 30   'in days
Set objFSO = CreateObject("Scripting.FileSystemObject")
set colFolder = objFSO.GetFolder(sLogFolder)
For Each colSubfolder in colFolder.SubFolders
        Set objFolder = objFSO.GetFolder(colSubfolder.Path)
        Set colFiles = objFolder.Files
        For Each objFile in colFiles
                iFileAge = now-objFile.DateCreated
                if iFileAge > (iMaxAge+1)  then
                        objFSO.deletefile objFile, True
                end if
        Next
Next


How to run the VB Script?
Windows Script Host enables you to run scripts from Windows ether by WScript or CScript, you still run the scripts in the same manner. The difference is only in the output — WScript generates windowed output, while CScript sends its output to the command window in which it was started.


About HostForLIFE.eu

HostForLIFE.eu is European Windows Hosting Provider which focuses on Windows Platform only. We deliver on-demand hosting solutions including Shared hosting, Reseller Hosting, Cloud Hosting, Dedicated Servers, and IT as a Service for companies of all sizes.

We have offered the latest Windows 2016 Hosting, ASP.NET Core 2.2.1 Hosting, ASP.NET MVC 6 Hosting and SQL 2017 Hosting.


Tag cloud

Sign in