IIS 7.5 and IIS 8.0 European Hosting

BLOG about IIS 7.5 Hosting, IIS 8.0 Hosting and Its Technology - Dedicated to European Windows Hosting Customer

IIS Hosting Europe - HostForLIFE.eu :: Performance Optimization Techniques In IIS Server

clock July 2, 2021 08:05 by author Peter

Nowadays, better web application performance is a crucial job froma  business perspective. Everyone expects web applications to be user friendly, secure, better performing and with a good look and feel. So, in this article, I am going to show you a few IIS server performance optimization techniques. Once you apply them in your IIS server, I am sure that you will feel the difference as compared to the current performance of your applications.


Technique #1: HTTP Compression

When you enable this technique, the HTTP response (in both, static and dynamic content) will be compressed first and then the compressed response will be sent to the end user. With this technique, you can utilize the complete bandwidth in a better way. It results in faster data transmission between IIS server and the browser.

To enable the HTTP Compression, follow the below steps:

Step 1: Press Windows Key + R and type INETMGR

Step 2: You will find an option called Compression. Double click on that.

Compression
Step 3:  Here, you will get a different window where you can find the options with checkboxes, like the following:

    Enable dynamic content compression.
    Enable static content compression.

Technique #2: Web page Output Caching

As we know, Caching is a great performance improvement technique in the web application. When one end-user requests for one web page and receives the response, then the complete response will be cached in output cache. If the second user requests for the same page, then the cached response will be served to the second user instead of reprocessing the request.

Please refer this link to configure the Output Caching in IIS server.

Technique #3: Disabled the Client-side and Server-side debugging
In general, we enable the debugging feature in development environment, which is recommended and a good practice too. This helps us testing our code and making sure that everything is working as expected. We have to debug both the client-side and the server-side code. It helps us identifying and fixing the bugs, quickly. Whereas in production environment, it is not recommended or good practice to enable this feature. It causes a lot of performance issues. If you disable this feature in production environment, then you will get little performance boost in your application.

Please follow the below steps to disable this feature in IIS server.

Step 1: Press Windows Key + R and type INETMGR

Step 2: You will find an option called ASP. Double click on that.

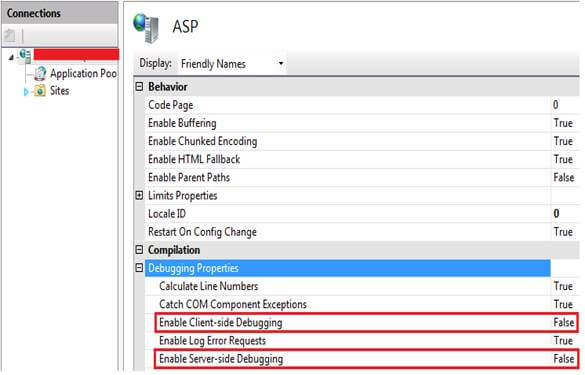
Step 3: When you double click on ASP, you will get a different window where you can find the following options:

    Enable Client-side Debugging
    Enable Server-side Debugging

Make the above items False. For reference, please see the following screenshot.

Technique #4: Disable IIS Logging
As we know, whenever the end-user performs any action in web application, the request is processed and responds back to the end-user. From receiving the request to giving response, IIS server keeps track of the following points.
From which IP address the request is received.
How much time was taken in processing the request.
Size of the response.
Cookies.
Error details etc.

let's say, you are maintaining a separate component called Logger module, to track all the information. In that case, I believe IIS server logger details are no longer needed. In such a scenario, you can disable the logger feature in IIS server, which will result in a little performance boost.

Please follow the below steps to disable the Logging in IIS server:
Step 1: Press Windows Key + R and type INETMGR
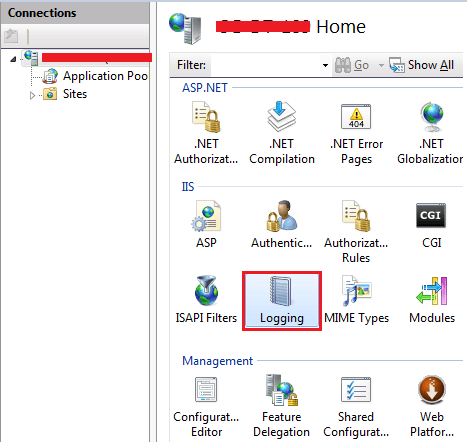
Step 2: You will find an option called Logging. Double click on that.

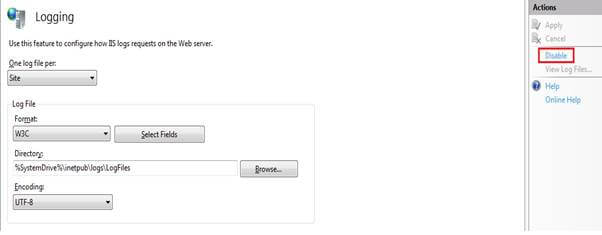
Step 3: You will see a window where you can find the Disable option. For reference, please look into the below screenshot.

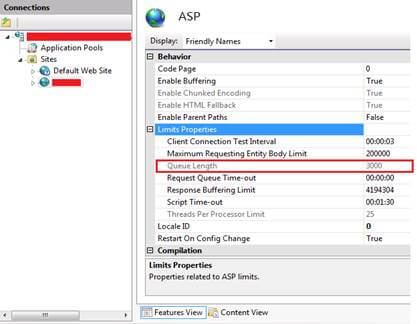
Technique #6: Increase Queue limit

In the most cases, you might receive the IIS Server response, like “Server too busy” with status code 503. The reason behind it is that when IIS Server receives too many requests, this error occurs. Even you will receive such errors when the queue capacity is very small. Increasing the queue capacity is in your hands. If you increase the queue capacity, it will boost the performance a little.

Pleas follow the below steps to increase the limit.

Step 1: Press Windows Key + R and type INETMGR
Step 2: You will find an option called ASP. Double click on that.


Step 3: On the next window, you can find Limits Properties option. If you expand it, then you will get Queue Length option where you can set the limit.

Technique #7: HTTP Expires Header configuration

This option helps you minimize the number of requests to the IIS Server. The HTTP expires header helps the client browser to cache the web pages and its elements, like CSS, images etc.

Pleas follow the below steps to set the HTTP Expires.

Step 1: Press Windows Key + R and type INETMGR
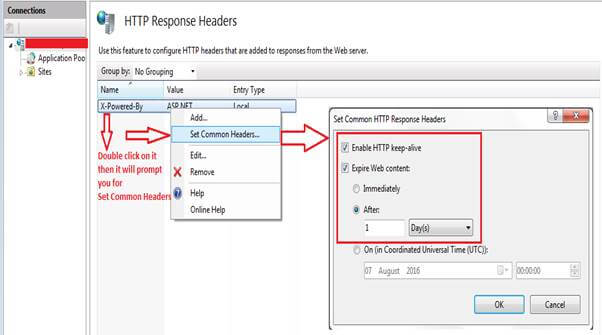
Step 2: You will find an option called HTTP Response Headers. Double click on that.

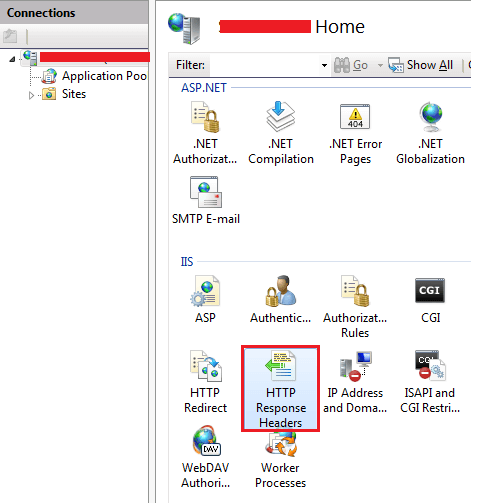
Step 3: Once you double click on the HTTP Response Headers, you will get a window where you can find X-Powered-By option. If you right click on it, it will give you Set Common Headers option. Click on that. It will give you one pop up window where you can set the HTTP expires in number of days or hours. Please find the below screenshot for reference.


IIS Hosting Europe - HostForLIFE.eu :: IIS Hosting .Net Core MVC 3.1 | In Process Hosting | w3wp.exe Worker Process

clock June 18, 2021 09:11 by author Peter

I am here to introduce you to InProcess hosting in a .Net Core MVC 3.1 web application with the w3wp worker process.

 
Also, we will learn how to configure the source code to the IIS and run the application with debugging.
 
I suppose that since you are looking for hosting, you have already installed the necessary features for that.
 
The main feature you need to install for hosting in IIS is the IIS runtime support (ASP.NET Core Module v2) Hosting Bundle.
 
I have a Visual studio 2019 community version with pre-installed features for the development of an application.
 
Let begin with downloading the ASP.NET Core Runtime Hosting bundle from Url https://dotnet.microsoft.com/download/dotnet-core/3.1
 
Step 1
 
If you haven't already installed the Hosting Bundle, please install it from the given link.


Step 2
 
After installing, let's go to the IIS manager and map our Project directory source in IIS.


Step 3
Map your Source Code path.

Step 4

I have set the Application Pool setting with NetworkServices Identity. You can also choose another as per your requirement.


Step 5
Add the Module AspNetCoreModuleV2 by following the below-given process in the screenshot.


You can also do this at the application level in your project's web.config
 
If you don't have web config right now, please follow step 6 given below and build your project.
    <system.webServer>  
       <modules>   
         <add name="AspNetCoreModuleV2" />  
       </modules>  
     </system.webServer>  


Step 6
Add the Marked Code in your Launchsettings.json

Add the below code marked in bold:
    {  
      "iisSettings": {  
        "windowsAuthentication": false,  
        "anonymousAuthentication": true,  
        "iis": {  
          "applicationUrl": "http://localhost:1111/",  
          "sslPort": 0  
        },  
        "iisExpress": {  
          "applicationUrl": "http://localhost:59631",  
          "sslPort": 44338  
        }  
      },  
      "profiles": {  
        "IIS Express": {  
          "commandName": "IISExpress",  
          "launchBrowser": true,  
          "environmentVariables": {  
            "ASPNETCORE_ENVIRONMENT": "Development",  
            "ASPNETCORE_HOSTINGSTARTUPASSEMBLIES": "Microsoft.AspNetCore.Mvc.Razor.RuntimeCompilation"  
          }  
        },  
        "TestDemo": {  
          "commandName": "Project",  
          "launchBrowser": true,  
          "environmentVariables": {  
            "ASPNETCORE_ENVIRONMENT": "Development",  
            "ASPNETCORE_HOSTINGSTARTUPASSEMBLIES": "Microsoft.AspNetCore.Mvc.Razor.RuntimeCompilation"  
          },  
          "applicationUrl": "https://localhost:5001;http://localhost:5000"  
        },  
        "Local IIS": {  
          "commandName": "IIS",  
          "launchBrowser": true,  
          "launchUrl": "http://localhost:1111/",  
          "environmentVariables": {  
            "ASPNETCORE_ENVIRONMENT": "Development"  
          }  
        }  
      }  
    }  


Step 6
Please make sure your project is running with InProcess hosting Model


    <PropertyGroup>  
       <TargetFramework>netcoreapp3.1</TargetFramework>    
       <AspNetCoreHostingModel>InProcess</AspNetCoreHostingModel>  
     </PropertyGroup>  


Step 7 
As you have recently created a profile using launchsetting.json, now you can change the Debug property to Local IIS and run your application.


Here you can see the URL. Our mapping URL http://Localhost:1111 is working now and you can debug your code.
 
If you are still facing issues with reaching breakpoints, please add webBuilder.UseIIS(); to your program.cs.
     public static IHostBuilder CreateHostBuilder(string[] args) =>  
              Host.CreateDefaultBuilder(args)  
                  .ConfigureWebHostDefaults(webBuilder =>  
                  {  
                      webBuilder.UseIIS();  
                      webBuilder.UseStartup<Startup>();  
                  });  
      }
 

That's it


IIS Hosting Europe - HostForLIFE.eu :: How to Access the Site Using Domain Name Instead of localhost in IIS?

clock June 11, 2021 08:37 by author Peter

Whenever we host a website in Internet Information Services (IIS), we previously would access the website with localhost or with that specific machine IP address in the manner of: http://localhost/TestSite/TestPage.aspx

Did you ever think of accessing your website with a domain name, such as http://www.testsite.com, instead of http://localhost/testsite or http://127.0.0.1/testsite on your local machine?

How can I tell my IIS that http://www.testsite.com is pointing to the files on my local computer and to not try to access the internet?

The answer behind all these questions is the Hosts file.

This will be in <Windows Root Folder>\System32\Drivers\etc\. In general if the Windows Operating System is installed in the C drive then it will be C:\Windows\System32\drivers\etc. You can open this file in Notepad, Notepad++ or any text editor that you have. If you open this file, it will be as follows.

local host

Note: You need administrator privileges to save your changes in this file.

Case 1

If you want to create a new website then that is possible for accessing using a domain name. Use the following procedure.

Open IIS (Click WIN+R, enter inetmgr in the dialog and click OK. Alternatively, search for IIS Manger in start window).

Expand the Server node and click on the Sites folder.

Click on Add Website in the Actions pane.

Note: If need any help for the preceding procedure then please check my blog article How to setup basic website in IIS 8.

Enter the details in the Add Website window as follows.


Click on Ok to create the website.

If you try to browse your website now, you will see an alert in Chrome that your webpage is not available. You will see the same kind of issue in other browsers also.

This is because the address you entered will search in the internet instead of your localhost. To overcome this open the Hosts file in any text editor and add the following command.

127.0.0.1 www.testsite.com

Now try to reload the page by clearing the browser cache. It will work as follows.

Case 2
If you want to access the website using the domain name you created then use the following procedure.

Open IIS (Click WIN+R, enter inetmgr in the dialog and click OK. Alternatively, search for IIS Manger in start window).

Expand the Server node and then expand Sites folder.

Click on the Website that you want to access using a domain name and then click on Bindings in the Actions pane.


Select the binding of type http and then click on Edit. This will open a new window as follows:


Enter the host name in the provided text box.

I am entering this as www.google.com because I want to access my site with a Google address.

Now make the change in the hosts file as we did in #6 in case1.

After having made this change you can access your local website with the Google address.


Note: The changes you are making in the hosts files are applicable only to that specific local machine in which the file exits.


IIS Hosting Europe - HostForLIFE.eu :: Working with IIS Metabase with DirectoryServices

clock May 21, 2021 08:00 by author Peter

While working with the IIS we all like to know the settings done on the Virtual Directory are correct or not. So we are going to see how to do that programmatically.
To check some properties of the IIS (Virtual Directory) of Web based application after  install, one can create custom application for that.

There are list of IIS Properties which we can get after post installation. The list of properties exposed by the IIS API or Web Settings Property is mentioned below
    AuthFlags
    Path
    AppFriendlyName
    EnableDirBrowsing
    AccessRead
    AccessExecute
    AccessWrite
    AccessScript
    AuthNTLM
    EnableDefaultDoc
    DefaultDoc
    AspEnableParentPaths

The above settings are configured in the Metabase of the IIS.

IIS Metabase:
IIS Metabase is a structure where IIS configuration settings are stored. The metabase configuration and schema for IIS 4.0 and IIS 5.0 were stored in a binary file, but from IIS6.0 the configuration and setting is stored in single binary file (MetaBase.bin), with plain text, Extensible Markup Language (XML) formatted files named MetaBase.xml and MBSchema.xml.  You can navigate through the IIS Metabase using MetaEdit or Metabase Explorer. The Metabase is based on a hierarchical design with inheritance. Each object in the metabase has a KeyType. The KeyType property specifies the type of metabase key.

Implementation:
.Net provides the namespace which is used to get the properties of the IIS Virtual Directory. .Net have the "System.DirectoryServices" namespace which exposes the DirectoryEntry Class.

Code:
WebSettings.cs:
public class WebSettings
{
     //Authentication Bitmask Values
     //Constant Value Description
     public const int MD_AUTH_ANONYMOUS = 0x00000001;
     //Anonymous authentication available.
     public const int MD_AUTH_BASIC = 0x00000002;
     //Basic authentication available.
     public const int MD_AUTH_NT = 0x00000004;
     //Windows authentication schemes available.
     string Auth_Type;
     public string calc(int AuthValue)
     {
          if (AuthValue == MD_AUTH_ANONYMOUS)
          {
               Auth_Type = "ANONYMOUS ACCESS ENABLED";
          }
          if (AuthValue == MD_AUTH_BASIC)
          {
               Auth_Type = "BASIC ACCESS ENABLED";
          }
          if (AuthValue == MD_AUTH_NT)
          {
               Auth_Type = "INTEGRATED WINDOWS ACCESS ENABLED";
          }
          if (AuthValue == (MD_AUTH_ANONYMOUS + MD_AUTH_NT))
          {
               Auth_Type = "INTEGRATED WINDOWS + ANONYMOUS ACCESS ENABLED";
          }
          if (AuthValue == (MD_AUTH_ANONYMOUS + MD_AUTH_BASIC))
         {
              Auth_Type="BASIC + ANONYMOUS";
         }
         if (AuthValue == (MD_AUTH_ANONYMOUS + MD_AUTH_NT))
         {
              Auth_Type = "INTEGRATED + ANONYMOUS";
         }
         if (AuthValue == (MD_AUTH_BASIC + MD_AUTH_NT))
         {
             Auth_Type = "BASIC + INTEGRATED";
         }
         if (AuthValue == (MD_AUTH_ANONYMOUS + MD_AUTH_BASIC + MD_AUTH_NT))
         {
             Auth_Type = "ANONYMOUS + BASIC + INTEGRATED";
         }
          return Auth_Type;
     }

Main.cs
string serverName;
string vDir;
serverName = System.Environment.MachineName;
vDir = "DirectoryName";
vdir = new DirectoryEntry("IIS://" + serverName + "/W3SVC/1/ROOT/" + vDir);
wbs = new WebSettings();
string[] sComp = new string[12];
sComp[0] = "AuthFlags";
sComp[1] = "Path";
sComp[2] = "AppFriendlyName";
sComp[3] ="EnableDirBrowsing";
sComp[4] ="AccessRead";
sComp[5] ="AccessExecute";
sComp[6] ="AccessWrite";
sComp[7] ="AccessScript";
sComp[8] ="AuthNTLM";
sComp[9] ="EnableDefaultDoc";
sComp[10] ="DefaultDoc";
sComp[11] ="AspEnableParentPaths";
ListViewItem[] listViewItem = new ListViewItem[12];
lstIISProperty.Items.Clear();
for (int i = 0; i < sComp.Length; i++)
{
    //lstComponents.MultiColumn = 2;
    lstIISProperty.Sorting = SortOrder.Ascending;
    if (sComp[i] != null)
    {
    listViewItem[i] = new ListViewItem(new string[]{ sComp[i], IISPropertyValue(sCompi]), fnExpected_Value(sComp[i])}, -1);
    lstIISProperty.Items.Add(listViewItem[i]);
    }
}


IIS Hosting Europe - HostForLIFE.eu :: Solution to "Unable to Launch the IIS Express Web Server"

clock May 7, 2021 12:19 by author Peter

Introduction
Today I encountered the issue "Unable to launch the IIS Express Web Server" while I was running my Visual Studio 2012. So I thought of sharing how to resolve that issue. I hope it will help someone.

Background
In my team we have 5 to 10 members. Since we wanted to do a build for our current application, I used "Get the Latest files from the server". (We are using TFS.) Then when I run my application I was getting this error.

The cause of this error is, someone has checked in the solution file with his port number (the port number he was using). When I took the latest, it was set in my solution file also. We must take the latest solution file only when it is required. So here I will share the remedy for the preceding issue.

Procedure to solve this issue

Step 1
Right-click on your solution and select Properties as shown in the following figure.


Step 2
Select “Web” from the left menu.


Step 3
Under “Use local IIS server” change the port number from http://localhost:58030/ to another one.


Step 4
Here I have changed http://localhost:58030/ to http://localhost:58031/ .
Bingo! We have done it.

Step 5
Now please run again your application. The issue will be solved.


IIS Hosting Europe - HostForLIFE.eu :: Create FTP and Web IIS Virtual Directory using C#

clock April 28, 2021 08:12 by author Peter

In this example we will create a Windows Form Project that will create new FTP and Web IIS Virtual Directories from code based on the name and path specified by the user. You can create virtual directories on the local computer by specifying the server name as "localhost" or you can create the virtual directory on a remote computer by specifying the machine name.

We make use of the DirectoryServices namespace for creating the Virtual directory.

Step 1: Create the Project and the basic User Interface.

Create a new Visual C# Windows Forms Project and add controls on the default form as shown below.

Figure 1: User interface

Figure 1: User interface 

Control Property Name Property Value
Label Text Server
TextBox Name txtServer

Text localhost
Label Text Virtual Directory Name
TextBox Name txtVDirName
Label Text Virtual Directory Path
TextBox Name txtVDir
GroupBox Text Virtual Directory Type
RadioButton Label Web
RadioButton Label FTP
Button

Label Name lblStatus

The windows form allows the user to specify the server name on which to create the virtual directory, the virtual directory name, the virtual directory path, the type of virtual directory (FTP or Web). We will now add the code to create the virtual directory when the button is clicked. The code is specified in the code listing below.

We first determine if the user has selected to create an FTP virtual directory or a Web Virtual Directory. Based on this selection, we set the values for the schema name and a part of the path for the IIS root to create the node in. We now create a DirectoryEntry object for the root of the IIS directory on the server specified by the user which points to the web or ftp root. We then add a node to the children collection of the root node and set the value for the Path property of the newly created node. If the user selected to create a web virtual directory, we set the new node as an application. We then commit the changes and close the directory entry nodes. Finally we display the status - whether successful or error, to the user. You need to make sure that the user has the privileges to create the new virtual directories before running the sample.
private void button1_Click(object sender, System.EventArgs e)
{
string strSchema= "";
string strRootSubPath = "";
if (radioButton1.Checked)
{
strSchema = "IIsWebVirtualDir";
strRootSubPath = "/W3SVC/1/Root";
}
if (radioButton2.Checked)
{
strSchema = "IIsFtpVirtualDir";
strRootSubPath = "/MSFTPSVC/1/Root";
}
if (strSchema == "")
{
strSchema = "IIsWebVirtualDir";
strRootSubPath = "/W3SVC/1/Root";
}
DirectoryEntry deRoot= new DirectoryEntry("IIS://" + txtServer.Text + strRootSubPath);
try
{
deRoot.RefreshCache();
DirectoryEntry deNewVDir = deRoot.Children.Add(txtVDirName.Text,strSchema);
deNewVDir.Properties["Path"].Insert(0,txtVDir.Text);
deNewVDir.CommitChanges();
deRoot.CommitChanges();
// Create a Application
if (strSchema == "IIsWebVirtualDir")
deNewVDir.Invoke("AppCreate",true);
// Save Changes
deNewVDir.CommitChanges();
deRoot.CommitChanges();
deNewVDir.Close();
deRoot.Close();
lblStatus.Text = "Virtual Directory " + txtVDirName.Text + "(" + txtVDir.Text + ") has been created";
}
catch (Exception ex)
{
lblStatus.Text = "Error: " + ex.Message;
}
}


Code Listing : Button Click event handler code - create a new virtual directory.
Please refer to the complete code listing available for download at the top of the article.

Figure : Creating a virtual directory from our program. This creates a FTP Virtual directory named "TestFTPDir" pointing to path "C:\Temp"


IIS Hosting Europe - HostForLIFE.eu :: Enable IIS in Windows 7

clock April 22, 2021 08:13 by author Peter

When I worked on my friend’s desktop, I just wanted to create a virtual directory. So I went to “Run” and typed “inetmgr”, then enter. Even though he had installed VS2010, but he did not installed/enabled IIS in the local machine.  
 
I guess IIS is disabled by default when you install Windows. So here I’m going to explain the steps on how to install/enable IIS in Windows 7 system.
 
Step 1: Go to "Control panel" and select "Programs and Features" or simply type “appwiz.cpl” in a run.

Step 2: On the left-hand side, click on the link “Turn Windows features on or off”.


Step 3: As a result, you got “Windows Features” popup in that check the checkboxes as shown below.


Step 4: That’s it! Windows will automatically install it! Now you can access the IIS by typing the command “inetmgr” in Run.


IIS Hosting Europe - HostForLIFE.eu :: Stop Sharing a Drive/Folder by Using Windows Interface

clock March 30, 2021 06:49 by author Peter

In this article you will learn how to stop sharing a drive/folder using a Windows interface.

Step 1
First of all open the "Computer Management" from the Start Menu of your system.

Step 2
Now your Computer Management Window will be opened that will look like this:

Step 3
On the left-hand side of Computer management you will see many options, one of them will be "Shared Folders", expand this option.

Step 4
On expanding the Shared Folders you will see that three options are available to choose from, one of them will be named "Shares", click on this option to see the folders and drives that are shared.

Step 5
Now right-click on a folder or drive you want to stop sharing and click on "Stop Sharing".

Step 6
Now a Confirmation Message Box will pop-up that will again confirm you that you really want to stop sharing, click on the "Yes" button to remove this folder from the sharing folder option.


IIS 8.5 Hosting Europe - HostForLIFE.eu :: How to Fix HTTP Error 503. The service is unavailable in IIS

clock May 20, 2020 08:27 by author Peter

Now, we are going to fix the HTTP Error 503 on IIS. The service is unavailable in IIS 8 is caused if application pool is paused or disabled as shown within the image below:

Steps to resolve HTTP Error 503. The service is unavailable are as follows:
1. First, Open your IIS and then go to Application Pool of the chosen web site. Here in this example the web site name is "test"
2. Choose the application Pool as shown within the picture below:

3. Click on the web site name within the Application Pool and so click on start as shown within the image below:

Browse the web site and the error would be resolved.


IIS 8 Hosting - HostForLIFE.eu :: How to Install SSL Certificate in IIS 8?

clock April 6, 2016 18:31 by author Anthony

In this tutorial, I will show you how to install SSL certificate in IIS 8.0. To communicate securely over the web requires the use of encryption on the messages passed back and forth.  Encryption on the web is accomplised through the use of Transport Layer Security (TLS). Http traffic layered over SSL/TLS is called Https.  It would be all too easy to venture down the rabbit hole and explain in great detail how TLS establishes a secure connection, but the crypto minutia is likely a bit out of scope for the purposes of this discussion.  However, a basic understanding of the mechanisms used by TLS to secure the communication channel will make understanding the use of SSL certificates much easier.

TLS uses public key cryptography, which requires the distribution of a public key.  This public key is transmitted as part of an SSL certificate, along with other identifying information meant to establish trust that a server is who it is supposed to be (and not a malicious eavesdroper).  While it is possible to create self-signed certificates, browsers do not trust these certificates and will give users dire warning when they are encountered (this would be like me printing my own drivers license and saying "See, I am who I say I am... really!").  For a certificate to be trusted, it must be issued by a trusted Certificate Authority (CA).  When a secure connection is made using a trusted certificate, most browsers will display an indicator that the connection is secure.  In Chrome, clicking the green lock icon will reveal information regarding the details of the connection:

And this is what a self-signed certificate will get you:

So to fully take advantage of Https you need to have a certificate from a trusted CA (Symantec [GeoTrust, VeriSign], Comodo, GlobalSign, etc).  Getting a certificate involves first creating a Certificate Signing Request (CSR).  IIS has the capability of creating a CSR, and their are other tools available, including the linux command line using OpenSSL.  This is what it looks like in IIS:

You'll transmit the CSR in one form or another to the CA you are getting your certificate from, and after they've performed whatever level of due diligence they'll send you your SSL certificate.  Once you have the certificate, you'll need to install it on the server hosting your site.  For .NET based web applications, that likely means IIS or Azure.

  • Installing SSL Certificate in IIS 8.0

In IIS Manager, under Server Certificates, there is an option for "Complete Certificate Request".  Here you'll browse to the *.cer file that contains your certificate, add a friendly name to make management easier it doesn't change anything in the certificate and add the certificate to the Personal certificate store.  This installs the certificate to the server.  To use it in your site, you have to bind it.  Navigate to the site settings in IIS, go to bindings, and add a binding for https using port 443 and the created certificate.

  • Using Https in the application

Using the URL Rewrite rule described in the Azure SSL instruction involved adding this rule to the web.config file:

<system.webServer>
  <rewrite>
    <rules>
      <rule name="Force HTTPS" enabled="false">
        <match url="(.*)" ignoreCase="false"/>
      <conditions>
        <add input="{HTTPS}" pattern="off"/>
      </conditions>
        <action type="Redirect" url="https://{HTTP_HOST}/{R:1}"
                appendQueryString="true" redirectType="Permanent"/>
      </rule>
    </rules>
  </rewrite>
  </system.webServer>

In MVC, using the [RequireHttps] attribute gives fine grained control over what portions of the site will need to use https:

[RequireHttps]
public ActionResult About()
{
    ViewBag.Message = "Your application description page.";
 
    return View();
}

HostForLIFE.eu IIS 8 Hosting

HostForLIFE.eu revolutionized hosting with Plesk Control Panel, a Web-based interface that provides customers with 24x7 access to their server and site configuration tools. Plesk completes requests in seconds. It is included free with each hosting account. Renowned for its comprehensive functionality - beyond other hosting control panels - and ease of use, Plesk Control Panel is available only to HostForLIFE's customers. They offer a highly redundant, carrier-class architecture, designed around the needs of shared hosting customers.


About HostForLIFE.eu

HostForLIFE.eu is European Windows Hosting Provider which focuses on Windows Platform only. We deliver on-demand hosting solutions including Shared hosting, Reseller Hosting, Cloud Hosting, Dedicated Servers, and IT as a Service for companies of all sizes.

We have offered the latest Windows 2016 Hosting, ASP.NET Core 2.2.1 Hosting, ASP.NET MVC 6 Hosting and SQL 2017 Hosting.


Tag cloud

Sign in