IIS 7.5 and IIS 8.0 European Hosting

BLOG about IIS 7.5 Hosting, IIS 8.0 Hosting and Its Technology - Dedicated to European Windows Hosting Customer

IIS Hosting Europe - HostForLIFE :: Remove IIS Log Files

clock October 14, 2024 09:04 by author Peter

The log files that IIS generates can, over time, consume a large amount of disk space. This article will discuss a way to remove the IIS Log Files, including locate the log file directory. The content of this article is


Introduction

  • Problem
  • How to locate the IIS Log File Folder
  • Run the VB Scrip

Problem:
IIS log files continue to grow in Web Server and can, over time, consume a large amount of disk space. Logs can potentially fill up an entire hard drive. To mitigate this problem, many users turn off logging completely. Fortunately, there are alternatives to doing so, such as the following:

  • Enable folder compression
  • Move the log folder to a remote system
  • Delete old log files by script.

Here we will discuss the third option.

How to locate the IIS Log File Folder

By default, the IIS log file folder is in %SystemDrive%\inetpub\logs\LogFiles, it is usually in C:\inetpub\logs\LogFiles. However, the location can be customized by user. We have two ways to locate the IIS Log Folder

  • through IIS Manager
  • through Running a Script, such as Windows PowerShell Script

Through IIS Manager:
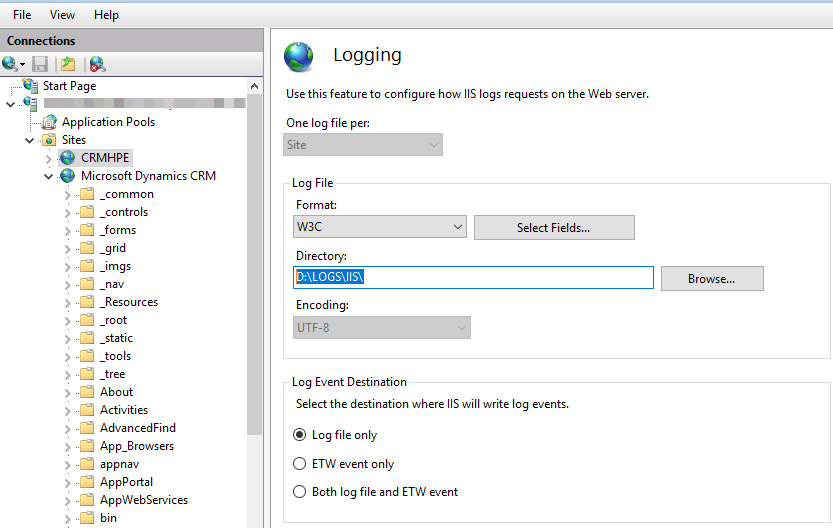
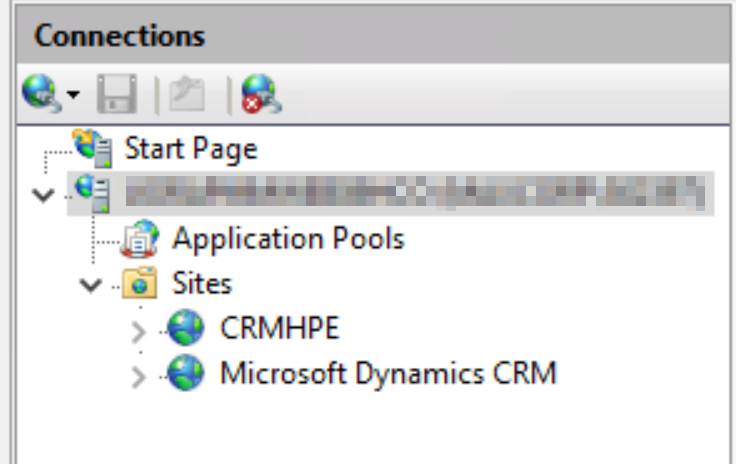
Open IIS Manager => Click the Chosen  Site under Sites => Double Click the Logging Icon


In the Logging page, the IIS Log File Folder is shown in the Direcitory:
such as %SystemDrive%\inetpub\logs\LogFiles by default

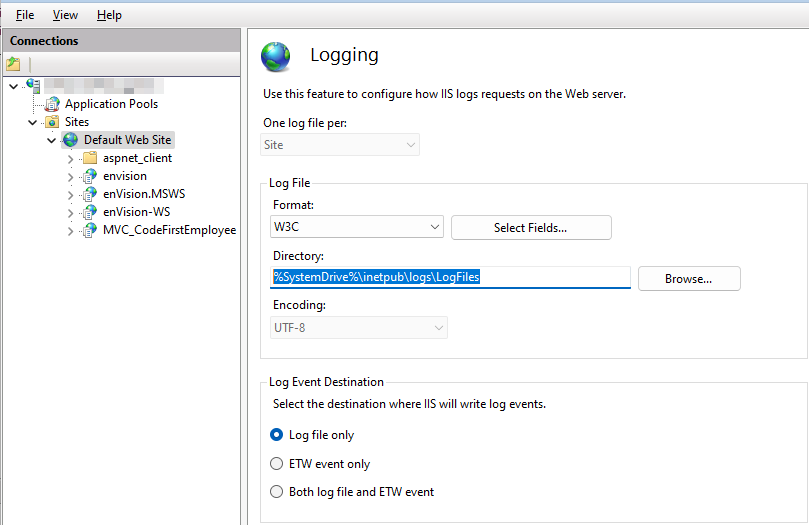
In certain case, it is set by user,
such as D:\LOGS\IIS\

Through Windows PowerShell Script:
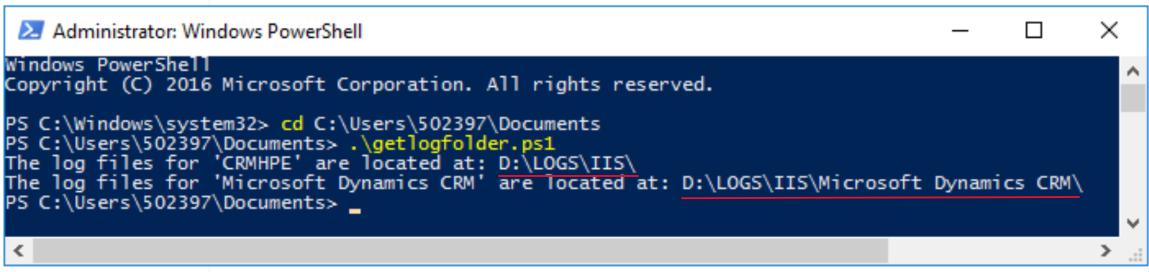
Import-Module WebAdministration

# Replace 'Default Web Site' with the name of your website
$siteName = 'Default Web Site'

# Get the log file directory
$logFilePath = Get-ItemProperty "IIS:\Sites\$siteName" -Name logFile | Select-Object -ExpandProperty Directory

Write-Output "The log files for '$siteName' are located at: $logFilePath"


If we put the code in a PowerShell Script file: GotLogFolder1.ps1, we got the default folder:

In a customized case, the folder could be different:

For the IIS structure:

Run VB Script to Remove the IIS log files by Retention Policy

Microsoft provide a VB Script to implement this:
You can control disk usage of log files by running a script that automatically deletes log files that are older than a certain age. Running this script in a scheduled task will keep the problem of a disk filling up under control without constant maintenance.

The following VBScript will check the age of each log file in a folder and will delete any log file older than a specified age. To customize the script for your purposes, simply change the name and path of the folder in line 1 of the script, and change the maximum age to the desired value in days, in line 2.
sLogFolder = "c:\inetpub\logs\LogFiles"
iMaxAge = 30   'in days
Set objFSO = CreateObject("Scripting.FileSystemObject")
set colFolder = objFSO.GetFolder(sLogFolder)
For Each colSubfolder in colFolder.SubFolders
        Set objFolder = objFSO.GetFolder(colSubfolder.Path)
        Set colFiles = objFolder.Files
        For Each objFile in colFiles
                iFileAge = now-objFile.DateCreated
                if iFileAge > (iMaxAge+1)  then
                        objFSO.deletefile objFile, True
                end if
        Next
Next


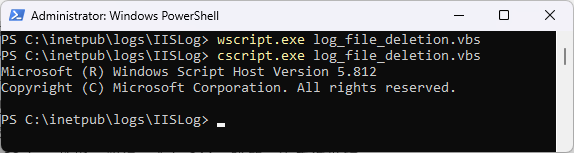
How to run the VB Script?
Windows Script Host enables you to run scripts from Windows ether by WScript or CScript, you still run the scripts in the same manner. The difference is only in the output — WScript generates windowed output, while CScript sends its output to the command window in which it was started.


IIS Hosting Europe - HostForLIFE :: How to Fix Windows Services Stopping at Startup and How to Resolve?

clock October 10, 2024 09:08 by author Peter

Imagine this: A critical Windows service that you just launched is meant to maintain the seamless operation of your organization. However, the moment you launch it, the service abruptly ends after 30 seconds, leaving you furious and scratching your head. Users are experiencing problems that are becoming worse by the minute, and the logs aren't offering definitive explanations. What isn't working well?

Stopped services
This is a scenario that many developers and IT professionals encounter when working with Windows services. The core of this problem is a specific behavior enforced by the Service Control Manager (SCM), which expects the OnStart method of your service to complete within a strict 30-second window. If your service doesn’t comply, the SCM will assume a failure and halt the service.

In this article, we’ll dive deep into the reasons why your Windows service might be stopping right after it starts and explore the mechanics behind the SCM’s behavior. Whether you’re troubleshooting an existing service or designing a new one, understanding this common factor will help you create more resilient and reliable services.

To resolve this issue, consider the following approaches.

  • Optimize Initialization Code: Review and refactor the code in the OnStart method to ensure it executes as quickly as possible. If certain operations are time-consuming, consider moving them to a separate thread or background worker. Make sure executing the Onstart method does not take more than 30 seconds.
  • Increase the Timeout: This approach is not recommended as a first step. It’s possible to extend the startup timeout by modifying the service’s properties in the registry. However, this should be done with caution, as it may lead to other performance issues.

Follow the below steps to increase service time out.

  • Press Win + R, type regedit, and press Enter. This opens the Windows Registry Editor.
  • In the Registry Editor, navigate to HKEY_LOCAL_MACHINE\SYSTEM\CurrentControlSet\Control.
  • Right-click on the Control key, select New, then DWORD (32-bit) Value.

Regedit

  • Name this new value “ServicesPipeTimeout”.
  • Double-click the “ServicesPipeTimeout” value you just created.

ServicesPipeTimeout

  • In the “Value data” field, enter the desired timeout value in milliseconds. In this case, we will be setting a timeout of 60 seconds, so we will input “60000” as value data and ensure that the base is set to Decimal.
  • For the changes to take effect, restart your system.

Important note

  • Modifying the registry can have unintended side effects if not done correctly. Always back up the registry before making any changes.
  • The “ServicesPipeTimeout” value affects all services on the system, not just the specific service you're troubleshooting.
  • While increasing the timeout can prevent premature service stoppages, it can also delay the detection of legitimate service startup failures.

Conclusion
While increasing the timeout via the registry is an option, it’s often more recommended and also effective to optimize your OnStart method or use asynchronous tasks.
By doing so, you can prevent premature service stoppages and ensure your service runs smoothly and efficiently.


About HostForLIFE.eu

HostForLIFE.eu is European Windows Hosting Provider which focuses on Windows Platform only. We deliver on-demand hosting solutions including Shared hosting, Reseller Hosting, Cloud Hosting, Dedicated Servers, and IT as a Service for companies of all sizes.

We have offered the latest Windows 2016 Hosting, ASP.NET Core 2.2.1 Hosting, ASP.NET MVC 6 Hosting and SQL 2017 Hosting.


Tag cloud

Sign in