IIS 7.5 and IIS 8.0 European Hosting

BLOG about IIS 7.5 Hosting, IIS 8.0 Hosting and Its Technology - Dedicated to European Windows Hosting Customer

IIS 8.0 Hosting Italy - HostForLIFE.eu :: How to Fix "Unable to Launch the IIS Express Web Server" Error ?

clock March 10, 2015 08:25 by author Peter

Today, I experienced the issue "Unable to launch the IIS Express Web Server" while I was running my Visual Studio 2012. So I considered imparting how to determine that issue.

Since we needed to do a "Get the Latest files from the server". (We are using TFS.) Then when I run my application I was getting this problems. The reason for this error is, somebody has checked in the solution file with his port number (the port number he was using).

When I took the most recent, it was situated in my answer record too. We must take the latest solution file only when it is required. So here I will impart the solution for the first issue.

1. Right-click on your solution and select Properties as indicated in the following picture:

2. Choose “Web” from the left menu.

3. Under the “Use local IIS server” change the port number from http://localhost:58030/ to another one.   

4. In this example, I’ve changed http://localhost:58030/ to http://localhost:58031/

5. Now run again your Apps. The issue will be solved. I Hope it works for you!

HostForLIFE.eu IIS 8.0 Hosting
HostForLIFE.eu is European Windows Hosting Provider which focuses on Windows Platform only. We deliver on-demand hosting solutions including Shared hosting, Reseller Hosting, Cloud Hosting, Dedicated Servers, and IT as a Service for companies of all sizes. We have customers from around the globe, spread across every continent. We serve the hosting needs of the business and professional, government and nonprofit, entertainment and personal use market segments.


IIS 7.5 Hosting UK - HostForLIFE.eu :: Retrieve IIS Application Pool Password

clock February 11, 2015 13:20 by author Peter

In this short article, I am going to explain you about Retrieve IIS Application Pool Password. I had to induce the password for application pool account in SharePoint so as to require the control on an existing environment. Here are the tools helped me to get app pool password:

1. IIS Metabase explorer - a part of IIS Resource kit - ensure "Secure Data" is checked.

2. SharePoint Manager - excellent tool for exploring the server objects. simply navigate to the target application pool, get the password from properties pane.

3. using APPCMD command tool to get App Pool Password:
Appcmd could be a command tool for managing IIS 7 and higher than. you'll be able to notice it under: C:\Windows\System32\inetsrv.

To retrieve the IIS Application Pool's password enter this command:
appcmd list apppool “<Your Application Pool Name>” /text:*

HostForLIFE.eu IIS 8.0 Hosting
HostForLIFE.eu is European Windows Hosting Provider which focuses on Windows Platform only. We deliver on-demand hosting solutions including Shared hosting, Reseller Hosting, Cloud Hosting, Dedicated Servers, and IT as a Service for companies of all sizes. We have customers from around the globe, spread across every continent. We serve the hosting needs of the business and professional, government and nonprofit, entertainment and personal use market segments.


IIS 8.0 Hosting Italy - HostForLIFE.eu :: How to Configure IIS to Run Silverlight Services

clock February 10, 2015 15:38 by author Peter

In this post, I will tell you about How to Configure IIS to Run Silverlight Services. When you have been installed the Silverlight, we still need to install/enable IIS using the following steps.

Either we can open it from "Run" - "appwiz.cpl" - "Turn Windows features on or off - by enabling Internet Information Services & Microsoft .NET Framework 3.5.1" or we can do it from the Control Panel.

Selecting Turn Windows Features on or off

Enabling IIS and .NET Framework

When you preceding has been done you need to add MIME types in IIS.

First step, open the IIS with this command: 

"Run" - "inetmgr"For the first time, it will ask you to connect. When you connect & choose the instance on the right hand side under "Features View" there is IIS. Below the IIS there is "MIME Types"; click on that looks like the picture below.

In MIME Types check whether we have an extension for .SVC since we are using services in our Silverlight project. If we do not have the extension then add a new extension on right hand side at the top there is an add under Action. I already added it in my IIS, That’s why the File Name Extension is showing as un-editable.

Now, must do the same for xaml, xap and xbap extensions.

And now we are going to configure IIS from the command prompt. Since we already installed Framework and Silverlight. It is installed at the following location: c:\Windows\Microsoft.NET\Framework\v4.0.30319\
Next step, Open the CMD with Administrative privileges. And go to the above path.

In my case we’ll need both V3.0 & V4.0.30319, now first we will go to version V4.0.30319 and run the following command:
aspnet_regiis /i

The command above will install the ASP.NET and enables the service for IIS. Now we will go to version V3.0 at the following path: c:\Windows\Microsoft.NET\Framework\v3.0\Windows Communication Foundation.

Now, type and run the following command:
ServiceModelReg.exe /i

It’ll install a few things that we require to repare our IIS to publish our SilverlightServices and run. Now our IIS is ready to use Silverlight enable services.

HostForLIFE.eu IIS 8.0 Hosting
HostForLIFE.eu is European Windows Hosting Provider which focuses on Windows Platform only. We deliver on-demand hosting solutions including Shared hosting, Reseller Hosting, Cloud Hosting, Dedicated Servers, and IT as a Service for companies of all sizes. We have customers from around the globe, spread across every continent. We serve the hosting needs of the business and professional, government and nonprofit, entertainment and personal use market segments.


IIS 8.0 Hosting Netherlands - HostForLIFE.eu :: How to use Shared Configuration in IIS ?

clock February 3, 2015 08:36 by author Peter

In this short article, I will tell you about Shared Configuration in IIS. Before we start, first thing that you should do is backup the following configuration files for your sites on both servers, administration.config and applicationHost.config.The default location for that files are in C:\Windows\System32\inetsrv\config.  If you got an error you can use the files to restore the configuration back to its original state. 

1. Now, from server1 in IIS Management chopse the server name and on the right Window pane under Management click the “Shared Configuration” icon like the picture below:

2. Next, on the Actions pane select “Export Configuration” as shown on the picture below:

Then Select the location to store the files and provide an Encryption key password (keep track of it for use on server2)

3. Copy the files to a folder location on server2 (administration.config and applicationHost.config)
4. Now, Open the Shared Configuration icon in IIS Manager for server2
5. Tick on the box to “Enable shared configuration”
6. Now, Enter the path to the exported configuration files on server2

7. Next step Click Apply and input the Encryption key password.  You’ll receive the message below.

8. Close and open up IIS Manager, choose the server name, click the Management Service icon and choose Restart under the Actions menu (you may additionally choose to run iisreset at the command line)

Now make sure the sites are in place. you'll disable “Shared Configuration” if everything is setup properly. when you go to disable “Shared Configuration” you will be prompted to choose “Yes” if yo wish to copy the new configuration back to the default folder location or select “No” if you do not want to import the new configuration however instead revert back to your original configuration. Select “Yes” to overwrite your original file configuration with the new configuration.  Check the Event Viewer to assist troubleshoot any problems you run into with the sites.

HostForLIFE.eu IIS 8.0 Hosting
HostForLIFE.eu is European Windows Hosting Provider which focuses on Windows Platform only. We deliver on-demand hosting solutions including Shared hosting, Reseller Hosting, Cloud Hosting, Dedicated Servers, and IT as a Service for companies of all sizes. We have customers from around the globe, spread across every continent. We serve the hosting needs of the business and professional, government and nonprofit, entertainment and personal use market segments.


IIS 7.5 Hosting UK - HostForLIFE.eu :: How to Enable HTTPS on IIS ?

clock January 27, 2015 07:35 by author Peter

First, you may have to be compelled to purchase a 2048-bit SSL certificate(s) and configure IIS. you'll got to purchase a multi-domain or wildcard certificate based mostly upon your wants. There are free certificates obtainable for bloggers and non-commercial organizations.

Create certificate request file
First we want to create a certificate request file. Once making the certificate request, we'll copy/paste the contents of the certificate request file into the SSL provider web site. Once their verification we'll be ready to download the resulting SSL certificate files.

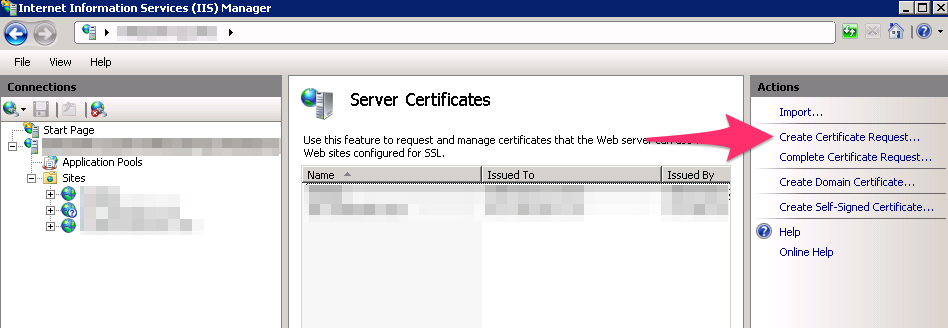
Create Certificate Request
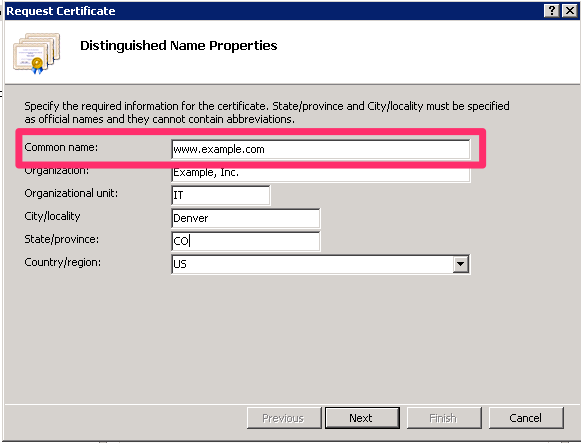
On the primary screen of the wizard you may have to be compelled to give the details for your organization. The important part is to specify the Common name as your fully qualified domain name (FQDN) — together with appropriate subdomain. Here i'm simply using “www.example.com”.

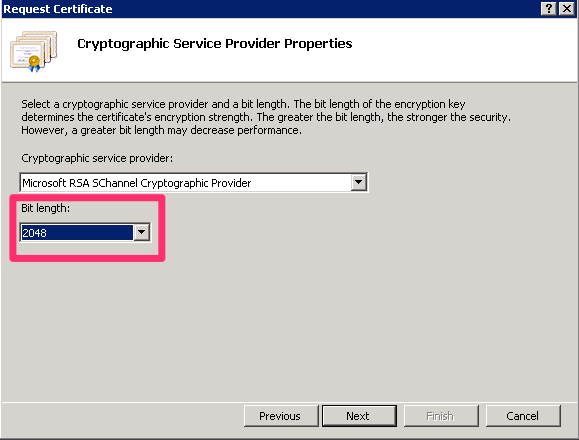
Next, make certain to specify the bit length of your certificate to 2048. supported todays standards, this is often the length to decide on. Any shorter isn't secure enough, and any further isn't necessary and can produce unnecessary cpu cycles on your server.

The next step is to specify the file name for the certificate request file. I store all of my SSL certificates and associated files in folder on the C drive: C:\ssl. Then, merely click the finish button.

We will currently open up the resulting .txt file and copy and paste the contents into the SSL provider’s web site. however and wherever you do this can rely on the SSL provider you selected.

Install certificate in IIS
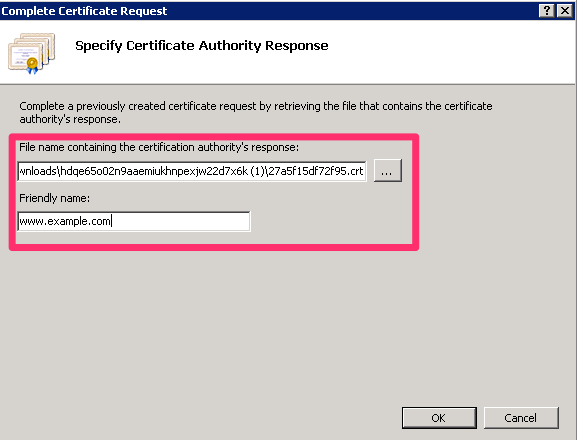
Once you have got completed the certificate signing request, your SSL supplier can notify you once the SSL certificate is prepared and accessible for you to transfer. After downloading the SSL certificate file (csr), complete the certificate request in IIS.

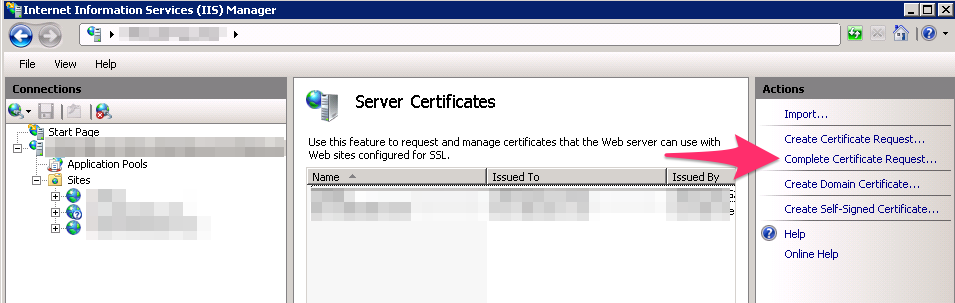
To complete the certificate request, choose the SSL certificate file (crt) and enter the Friendly name. The friendly name is for you to understand that SSL certificate is that in IIS. For best practices, I continuously name these to match the absolutely qualified domain name.

Add HTTPS Binding
The last step is to bind our web site in IIS to the HTTPS port (443). Note that the common name (FQDN) for the certificate should match the host name for the location that you just are configuring.  To get started right click on the site in IIS and choose Edit Bindings.

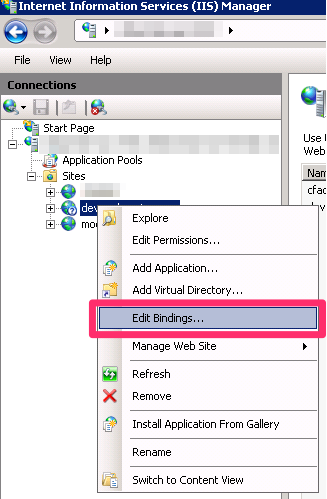
Then click the Add… button to add a replacement binding. we'll choose https because the kind, the suitable IP address on the server to bind the web site to, then choose the SSL certificate file and click on OK. you're now serving the web site using HTTPS. move and open your browser and enter the full domain with the https:// protocol specification to look at the location a new HTTPS.

HostForLIFE.eu IIS 7.5 Hosting
HostForLIFE.eu is European Windows Hosting Provider which focuses on Windows Platform only. We deliver on-demand hosting solutions including Shared hosting, Reseller Hosting, Cloud Hosting, Dedicated Servers, and IT as a Service for companies of all sizes. We have customers from around the globe, spread across every continent. We serve the hosting needs of the business and professional, government and nonprofit, entertainment and personal use market segments.


IIS 7.5 Hosting UK - HostForLIFE.eu :: How to Fix NetworkService Account Not GZIPing IIS Responses ?

clock January 14, 2015 06:43 by author Peter

After following several posts and tutorials on properly fixing IIS dynamic compression for JSON responses, i used to be still reaching a dead finish. For no matter reason, my responses were still uncompressed. Apparently, using the NetworkService account doesn’t perpetually play nicely with static or dynamic content compression.

The NetworkService account doesn’t have permission to the IIS Temporary Compressed Files folder, preventing it from writing and reading out compressed streams. The best thanks to get around this can be by adding the NetworkService account to the IIS_IUSRS group (which already has permissions to the IIS temporary folder).

1. First step, Open the local Users and groups management console.

2. Next, Select Groups from the sidebar.

3. Now, open the IIS_IUSRS property window.

4. Click Add, then enter Network Service as the user. Make sure to have your nearby workstation as the area, then Check Names to make certain you entered everything effectively. Click OK.

5. Next, Click OK on the IIS_IUSRS property window.

6. Close the Local Users and Groups management console
7. Restart IIS

Dynamic compression should be working now!


IIS 7.5 Hosting UK - HostForLIFE.eu :: How to Upload Large File on IIS ?

clock December 16, 2014 08:32 by author Peter

By default, IIS can not upload large file size to the web server. For IIS 6 and IIS 7, the default maximum file size for upload is 4 MB and 28.6 MB respectively. IIS 7 will throw a 404 error (HTTP Error 404.13 - CONTENT_LENGTH_TOO_LARGE) if user upload file larger than 30MB. In order to allow for larger file size uploads, a few server changes are required.  You have three steps to increase the file upload limit:

1. Modify the maxAllowedContentLength setting in the web.config
You could increase the max file size by modify the maxAllowedContentLength setting in the web.config file:
<system.webServer>
  <security>
    <requestFiltering>
      <requestLimits maxAllowedContentLength="2147483648" />
    </requestFiltering>
  </security>
</system.webServer>


With that maxAllowedContentLength, users can upload files that are 2 GB in size. This setting will work right away without restart IIS services.

2. Edit the request filtering feature settings and therefore the request limits using IIS manager

  • Open IIS Manager.
  • Choose the web site that you simply wish to configure.
  • Check that you're in features view per the button at the lowest of the manager.
  • Choose Requests Filtering and open it by double-clicking the icon. The Request Filtering pane displays.
  • From the Actions pane on the right hand side of the screen click Edit Feature Settings... link. The Edit Request Filtering Settings window displays.
  • In the Request Limits section, enter the appropriate maximum allowed content length (Bytes) then click the OK button.
  • Next, Restart IIS.

3. Manually edit the ApplicationHost.config file

  • Click start. In the start Search box, type notepad. Right-click notepad, and so click Run as administrator.
  • On the File menu, click Open. within the File name box, type %windir%\system32\inetsrv\config\applicationhost.config, and so open.
  • Within the ApplicationHost.config file, find the  node.
  • Take away the maxAllowedContentLength property. Or, add a value that matches the scale of the Content-Length header that the client sends as a part of the request. By default, the worth of the maxAllowedContentLength property is 30000000.
    For instance, modify the subsequent configuration information within the  section.

    <requestLimits maxAllowedContentLength ="<length>" />

  • Finally, Save the ApplicationHost.config file.


About HostForLIFE.eu

HostForLIFE.eu is European Windows Hosting Provider which focuses on Windows Platform only. We deliver on-demand hosting solutions including Shared hosting, Reseller Hosting, Cloud Hosting, Dedicated Servers, and IT as a Service for companies of all sizes.

We have offered the latest Windows 2016 Hosting, ASP.NET Core 2.2.1 Hosting, ASP.NET MVC 6 Hosting and SQL 2017 Hosting.


Tag cloud

Sign in