IIS 7.5 and IIS 8.0 European Hosting

BLOG about IIS 7.5 Hosting, IIS 8.0 Hosting and Its Technology - Dedicated to European Windows Hosting Customer

European IIS 10 Hosting - HostForLIFE.eu :: How To Manage IIS Server Online?

clock December 14, 2018 08:41 by author Peter

Hey folks, now it’s possible to manage your IIS (Internet Information Services) Server right from the Browser. I am going to share the steps , which I was required to perform before it started running. It was simple though. Right now, the Service is in “Preview” mode, hope to see this launched very soon!

“To start, head over to https://manage.iis.net and download IIS Administration Setup.

As soon the download starts, it shows you another screen waiting for the Service to be installed and run and let you proceed further.


The installation failed twice. It asked me to install “Microsoft Visual C++ 2015 Redistributable (x64)” first and then asked to install “Microsoft .NET Core 1.0.1 Windows Server Hosting”. I had no other trouble during the installation. My machine config at the time is Windows 10 Enterprise (x64) / i5 / 12 GB. I did an IIS reset and the waiting Window started receiving signals. The first screen prompted me with a default port (PORT# 55539) on the localhost address and asked me to supply an “Access Token”.

The link, given below in the input box lets you generate or refresh the access token. In the background, it installed “Microsoft IIS Administation Service” exposing a Web Service on port 55539. I’ve yet to figure out, if the port is configurable or not.

Generate an access token and supply to IIS Management form and you are done. It also allows you to set how soon the access token should be expired.

IIS Administration Setup needs to be installed on the machine running IIS Server. To manage any IIS Server online, you just need the Access Token.

The steps are given below.

  1. Install IIS Administration Setup and its dependencies on IIS Server machine. (It will install and start “Microsoft IIS Admistration” Service).
  2. Generate Access Token on the machine.
  3. Use the token any where in the world to access IIS Server, which belongs to the token. Make sure the port 55539 is allowed from the network, which you’re trying to access the IIS Server over the Web.

You can refresh the key anytime, which you want to (or an access token has been compromised).

Server and Website Administration is very smooth with the Web console. All the options from IIS Manager are available online and are very user friendly. You can do pretty much everything from the Web console, which comes available with IIS Manager on Windows.

Exploring websites

Create a Website.

Managing IIS Server


I’ll leave the rest of the exploration for you. Hope, you enjoyed it. Thanks for reading.


European IIS 10 Hosting - HostForLIFE.eu :: Dedicated Servers As The Secured Solutions

clock November 14, 2018 10:42 by author Peter

When it comes to the option of dedicated servers, you may find it costly in comparison to other web hosting options. But ultimately, the choice is worth making because plenty of commercial benefits are integrated into this web hosting plan. Let’s see how it is a better option than others web hosting plans.

Better uptime
In dedicated hosting arrangements, the service provider reserves the SLA,  including the solution of hardware failure. The service provider maintains a support team for 24x7. With expert skill sets and ITIL complaint methods you can be sure about a high uptime.

Cost efficiency
This is a cost efficient option. According to the plan, a dedicated hosting service provider is responsible for upgradates and maintenance of hardware for maintaining connectivity, and for offering a friendly physical environment. Under this plan, you as a user have no obligation to pay for the total server room or for employing a service administrator. Under this plan you have to pay for the services you will be using.

Reliable bandwidth
Under this web hosting plan you will get to enjoy higher internet speed. There is no chance to lose the speed as there is no risk of sharing the connection. This will help in faster communication, upload management, and uninterrupted business presence.

Complete control on applications
If you select dedicated web hosting, you will enjoy a complete monopoly of decisions about using site management tools and allied other applications to boost your hosting environment. However, about the tools, you need to get prior approval from your hosting service provider that they will be able to give you backend support to maintain them.

Better security arrangement
Dedicated hosting service offers uninterrupted access to physical server. The security arrangement includes supervision cameras, Biometric Access Control System, round-the-clock patrolling, etc. for improved security. Advanced service providers often provide additional supports like DDos guard, web application firewall, VAPT, and security event management.

These reasons can clearly  justify why Dedicated Server is a better option. It is clearly understood that although expensive, this category of web hosting service offers excellent ROI (Return over investment).


European IIS Hosting - HostForLIFE.eu :: IIS - A Worker Process Has Requested A Recycle Issue

clock August 8, 2018 09:43 by author Peter
My website recently experienced an issue where one of the servers was throwing some random error. On investigating, I found the below message in the information of event viewer of that server.

IIS, by default, sets application pool to recycle after an interval of 29 hours ( 1740 minutes ). This can cause issues when using in-memory sessions.
 
To resolve this issue, either remove the automatic recycle or change it to a specific time such as 12 AM, depending on your requirement.
  • Open IIS.
  • Go to Application Pool and select the required application pool. Then, click on Recycling on the right sidebar.

  • Select your required setting and save.
 -------------------------------------------------------------------------------------------------------------------------------------------------------
Important point to note is that Website sessions should be designed to not be dependent on IIS restarts or IIS app pool recycles.
--------------------------------------------------------------------------------------------------------------------------------------------------------
More Information - https://technet.microsoft.com/en-us/library/cc735298(v=ws.10).aspx


European IIS Hosting - HostForLIFE.eu :: Setting Up an HTTPS Service in IIS

clock July 11, 2018 11:52 by author Peter

HTTPS is a secure communications channel that is used to exchange information between a client computer and a server. It uses Secure Sockets Layer (SSL). This article describes how to configure the SSL/HTTPS service in Internet Information Services (IIS) and compares this process to the similar process in Apache.

Configuring Your Web Server for SSL
To enable SSL in IIS, you must first obtain a certificate that is used to encrypt and decrypt the information that is transferred over the network. IIS includes its own certificate request tool that you can use to send a certificate request to a certification authority. This tool simplifies the process of obtaining a certificate. If you use Apache, you must obtain the certificate manually.

In both IIS and Apache, you receive a certificate file from the certification authority, which you must configure on the computer. Apache reads the certificate from its source file by using the SSLCACertificateFile directive. However, in IIS, you can configure and manage certificates by using the Directory Security tab of the Web site or folder properties.

You can migrate certificates from Apache to IIS; however, Microsoft recommends that you re-create or obtain a new certificate for IIS.

Configure Folder or Web Site to Use SSL/HTTPS
This procedure assumes that your site has already has a certificate assigned to it.

  1. Log on to the Web server computer as an administrator.
  2. Click Start, point to Settings, and then click Control Panel.
  3. Double-click Administrative Tools, and then double click Internet Services Manager.
  4. Select the Web site from the list of different served sites in the left pane.
  5. Right-click the Web site, folder, or file for which you want to configure SSL communication, and then click Properties.
  6. Click the Directory Security tab.
  7. Click Edit.
  8. Click Require secure-channel (SSL) if you want the Web site, folder, or file to require SSL communications.
  9. Click Require 128-bit encryption to configure 128-bit (instead of 40-bit) encryption support.
  10. To allow users to connect without supplying their own certificate, click Ignore client certificates. Alternatively, to allow a user to supply their own certificate, use Accept client certificates.
  11. To configure client mapping, click Enable client certificate mapping, and then click Edit to map client certificates to users. If you configure this functionality, you can map client certificates to individual users in Active Directory. You can use this functionality to automatically identify a user according to the certificate they supplied when they access the Web site. You can map users to certificates on a one-to-one basis (one certificate identifies one user) or you can map many certificates to one user (a list of certificates is matched against a specific user according to specific rules. The first valid match becomes the mapping).
  12. Click OK.


European IIS Hosting - HostForLIFE.eu :: How to Check Trace is Enabled on IIS Server

clock December 9, 2016 07:33 by author Scott

Trace \ Track is a vulnerability that is usually identified on an IIS server when we run PCI compliance and find this vulnerability. A hacker can run a Trace attack on IIS Website and get information about the Backend server and other important information.

In latest versions on IIS (IIS 6.0, 7.5) Trace is disabled by default but still it is good idea to make sure that Trace is disabled on IIS.

Testing if Trace \ Track is Enabled on a IIS website or not

Follow these steps :

1. Go to command Prompt of your Machine.
2. Type telnet <URL of the website> 80 (this will open a telnet session of that website on port 80)
3. Type following commands on the telnet session screen in exact same order: 

    TRACE / HTTP/1.0
    Host: <hostname_you_are_testing>
    TestA: Hello
    TestB: World


4. Press enter twice. 

If Trace is enabled on your server, you should see following results:

    HTTP/1.1 200 OK
    Server: Microsoft-IIS/7.5
    Date: Tue, 05 Dec 2016 08:17:15 GMT
    Content-Type: message/http
    Content-Length: 76 


And If you receive following results on the telnet screen, then Trace is enabled :

     HTTP/1.1 501 Not Implemented
    Content-Type: text/html
    Server: Microsoft-IIS/7.5
    X-Powered-By: ASP.NET
    Date: Tue, 06 Dec 2016 09:32:58 GMT
    Content-Length: 1508


    Connection: close

Disabling Trace or Track on IIS

The easiest way to mitigate the risk of Trace \ Track on iis is  : installing URLScan from Microsoft, 
The urlscan.ini file is included as part of URLScan . This sets by default a configuration setting "UseAllowVerbs=1".  In this [AllowVerbs] section of the ini file, only http methods that are allowed are GET, HEAD, and POST so simply by installing URLScan on an IIS server , we can assume that it  protected from TRACE or TRACK.  


European IIS Hosting - HostForLIFE.eu :: How to Fix "Could not establish trust relationship for the SSL/TLS secure channel" Error

clock December 6, 2016 10:45 by author Scott

One of our clients receive this error message when deploying his ASP.NET application.

“System.Net.WebException: The underlying connection was closed: Could not establish trust relationship for the SSL/TLS secure channel.”. Here is how we solved that issue.

There are 3 related and important issues:

1. the remote site uses a Server Name Indication (SNI) certificate, installed on a different domain name
2. the web application was published to a IIS 6.0 (Windows Server 2003) web server
3. a System.Security.Authentication.AuthenticationException: The remote certificate is invalid according to the validation procedure. This error message is caused because the process is not able to validate the certificate supplied by the server during an HTTPS (SSL) request

IIS 6.0 + Server Name Indication (SNI) certificates = System.Net.WebException #

A Server Name Indication (SNI) certificate basically means that you can install oneSSL/TLS certificate on a web server, to use on multiple domain names. The TLS part takes the negotiation, and that enables the server to select the correct virtual domain early and present the browser with the certificate containing the correct name. Therefore with clients and servers that support SNI, a single IP address can be used to serve a group of domain names for which it is impractical to get a common certificate.

Windows Server 2003 (IIS 6.0), Windows Server 2008 (IIS 7.0) and Windows Server 2008 R2 (IIS 7.5) do not support SNI-certificates.

How to Solve this Error Message

You might wonder what the solution to this error message was. Well, simple: Move the website to an IIS 8.0+ (Windows Server 2012) web server. This version supports Server Name Indication certificates. Microsoft calls this SSL Scalability in IIS 8.0. Because of SNI, or SSL-scalability, support in Windows Server 2012, the ASP.NET System.Net.WebException went away.

It’s simple, right? :)


European IIS 8 Hosting - UK :: How to Optimize Your IIS 7.5/8 Performance

clock March 3, 2015 06:58 by author Scott

Most of you must be very familiar with IIS, moreover if you use Windows Server and deploy your ASP.NET application. In this tutorial, we will only give short tips about how to improve your IIS 7.5/8 performance. With good performance, IIS will serve better and faster web pages to your users.

Please Disable ASP Debugging

When you run your server in the production environment, you may not need to run ASP debugging mode. Stopping debugging mode will save you a great amount of processing power. To disable debugging, click on your server name in IIS and then right click on it to enable feature view. One the right pane, click on ‘compilation’ and then click on ‘debugging properties’. Next, set the following values as given below:

Server side debugging: false

Client side debugging: false

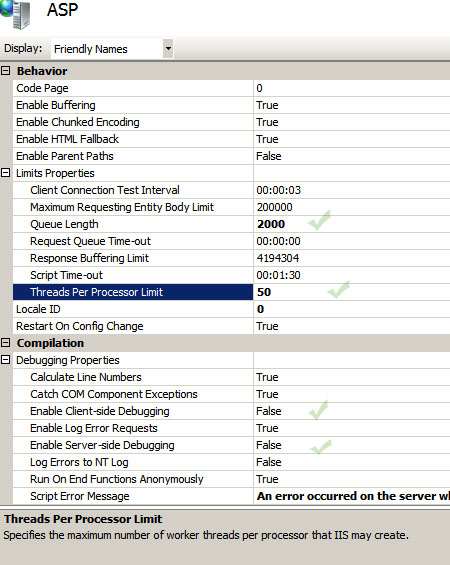
Limit ASP Threads per Processor

This limits the number of ASP requests handled by IIS simultaneously. Normally, the default value is 25. The maximum allowed number is 100. You can increase it to 50 and monitor the performance level of your IIS. To change this value click on your server and then double click on ASP under IIS in the feature view mode. Next, click on “limit properties” and set the value, as you consider suitable to match your processing needs.

Enable HTTP Compression

This is something that our clients ask to configure and it is really effective to make your site run faster. This feature helps to transfer data faster between IIS and client browsers and saves your bandwidth. You can compress HTTP in both website level and server level. To enable server level http compression, right click on sever name in IIS and then double click on compression under IIS on the right pane. You can enable both static and dynamic http compression.

Setup Logging Option

With default settings, IIS logs almost everything under the hood.  You either can disable logging option or can select a number of essential events to log in your server. To set logging option, click on “Sites” in IIS server, and then select the parameters that you want to keep as a log in your server. Remember to enable the “feature view” by right clicking on the server name in IIS. In the feature view pane, click on ‘log’ and set the logging feature; to disable logging completely click on the disable option on the right pane. Remember that you can set logging option both in server level and website level.

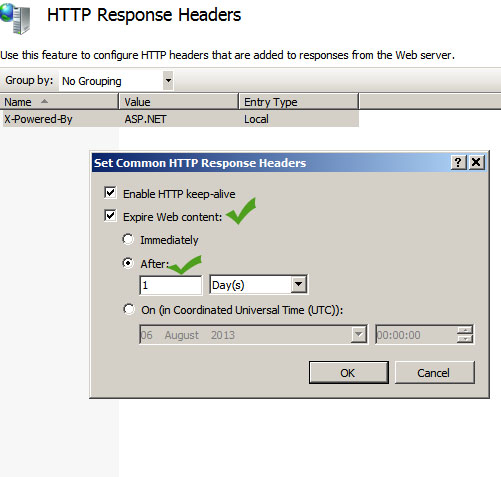
Setup HTTP Response Header

This feature helps to minimize the number of http requests send to IIS by website visitors. HTTP expires header will help the client browser to cache webpages and its elements such as images, CSS etc.  To set http expires you need to click on HTTP response headers in the IIS, and then click on “set common headers”. Next select ‘expire web contents” and select the number of days or hours—this is total time your contents will be cached in the client’s browser.

Enable Output Caching

When you enable output caching, IIS will keep a copy of requested webpages. If a new user requests the very same webpage located in the cache, IIS will send the copy from its cache without reprocessing the contents. Output caching can significantly improve your server response time for dynamic contents.

Modify ASP queue length property

This value represent how often IIS will send “server too busy” message (HTTP error 503) to the users when ASP is receiving high number of requests. If the queue length time is too high, IIS will send “busy message” to users with longer delay, which make the users feel that the server may be out of service.  Too low queue length will cause the server send “server busy message” quite often, consuming resources of the server. If you are unsure about this setting, you can follow Microsoft’s recommendation for one-to-one ratio, which means if you have four processors in your server with ASP thread processor value set to the default 25, you can set the queue length to 25*4=100.

You can change the queue length by going at “limit properties”—the same way you change the ASP thread processor value.

Control the connection limits

This option can give you to control the connection in three ways: controlling connection timeout, controlling maximum bandwidth per website, controlling concurrent connections.

This connection limit option will allow you to set the maximum bandwidth per second and the maximum concurrent connection per second.  The maximum allowed bandwidth make a site use only a certain amount of bandwidth per second—thus improving the performance of other sites in a shared web-hosting environment.

Controlling the number of concurrent connection is another way to improve IIS performance and to improve the security of IIS as well. This option will allow only the specified number of clients to connect to the website at a given moment. So, if any malicious program tries to send numerous connection requests will be rejected by the IIS, and thus prevent your server becoming overloaded with requests during a DDoS attack.

After changing the performance settings, check the performance level of your server by gradually increasing load to a desired level. You can also consider using Google page speed tool to check whether page-loading time has been improved.

Hope above tutorial bring benefits for you. Thanks for reading.


About HostForLIFE.eu

HostForLIFE.eu is European Windows Hosting Provider which focuses on Windows Platform only. We deliver on-demand hosting solutions including Shared hosting, Reseller Hosting, Cloud Hosting, Dedicated Servers, and IT as a Service for companies of all sizes.

We have offered the latest Windows 2016 Hosting, ASP.NET Core 2.2.1 Hosting, ASP.NET MVC 6 Hosting and SQL 2017 Hosting.


Tag cloud

Sign in