IIS 7.5 and IIS 8.0 European Hosting

BLOG about IIS 7.5 Hosting, IIS 8.0 Hosting and Its Technology - Dedicated to European Windows Hosting Customer

European IIS 10 Hosting - HostForLIFE.eu :: How to Change Application Pool Identities in IIS 7/8 With PowerShell

clock October 25, 2019 11:06 by author Peter

This question was asked so many times, and in this occasion I am going to share with you how to change application pool identities in IIS 8 using PowerShell, there are several ways to do so, and one of my favorite ways to get and change information about an application pool is through the IIS Provider that’s loaded when importing the WebAdministartion module.

You can get basic information about the pool using the Get-Item cmdlet.
PS> Get-Item -Path IIS:\AppPools\MyTest | format-List *

In that picture you can see that a list of application pool settings and information is displayed, but you will also see that some seem hidden from you. ProcessModel contains the identity information in a property named IdentityType The one we want for the application pool identity is ProcessModel. You can retrieve the information from ProcessModel by using the Get-ItemProperty cmdlet.

PS> Get-ItemProperty -Path IIS:\AppPools\MyTest -Name ProcessModel

ProcessModel contains the property IdentityType that holds the application pool identity. Now, if you are one of those hip PowerShell folks you know that you can get this information without reading a long list on the screen with the following:

PS> Get-ItemProperty -Path IIS:\AppPools\MyTest -Name ProcessModel | Select-object IdentityType

But this is IIS and things work better if you change how you operate just a little bit. So, instead of using Select-Object to grab the IdentityType, I’m going to accomplish that in a slightly different approach.  Notice the –Name parameter below:

PS> Get-ItemProperty -Path IIS:\AppPools\MyTest -Name ProcessModel.IdentityType

It’s a bit unusual, but this will make it much easier to change the IdentityType with the Set-ItemProperty cmdlet. Before I show you how to change the application pool identity, the values for the identity are Int32 (numbers). here are the identities and their corresponding numbers.

LocalSystem = 0
LocalService = 1
NetworkService = 2
SpecificUser = 3
ApplicationPoolIdentity = 4

So, to change the application pool identity using the Set-ItemProperty to something like “NetWorkService” would look like this:

PS> Set-ItemProperty -Path IIS:\AppPools\MyTest -Name ProcessModel.IdentityType -value 2

Most of the time when an admin needs to change the application pool identity it’s because they want application pool isolation. This means changing the identity to a specific account and password.  Here is an example of how to do that:

PS> Set-ItemProperty -Path IIS:\AppPools\MyTest -Name processmodel.identityType -Value 3
PS> Set-ItemProperty -Path IIS:\AppPools\MyTest -Name processmodel.username -Value Administrator
PS> Set-ItemProperty -Path IIS:\AppPools\MyTest -Name processmodel.password -Value P@ssw0rd


European IIS 10 Hosting - HostForLIFE.eu :: How to Fixing Common Errors While Hosting Web API In IIS?

clock May 24, 2019 11:48 by author Peter

While publishing Web API using Visual Studio, you may run into some errors. This article helps to provide the solution to the possible errors that will occur. When you publish the Web API from Visual Studio, the following error may possibly come up.

Output class library not set error while hosting web API
OutputPath property is not set for project 'Company.Directory.Web.csproj'. Please check to make sure that you have specified a valid combination of Configuration and Platform for this project. Configuration=Release Platform='AnyCPU'. You may be seeing this message because you are trying to build a project without a solution file, and have specified a non-default Configuration or Platform that doesn't exist for this project.

Solution

When you try to publish for the first time, one of the reasons for the above error to pop up is due to the incorrect settings in .csproj.user file of the solution.

Open the .csproj.user file in the solution and change the settings in the file.

Add the following code in the file.
    <PropertyGroup Condition=" '$(Configuration)|$(Platform)' == 'Debug|AnyCPU' "> 
        <DebugSymbols>true</DebugSymbols> 
        <DebugType>full</DebugType> 
        <Optimize>false</Optimize> 
        <OutputPath>bin\</OutputPath> 
        <DefineConstants>DEBUG;TRACE</DefineConstants> 
        <ErrorReport>prompt</ErrorReport> 
        <WarningLevel>4</WarningLevel> 
    </PropertyGroup> 
    <PropertyGroup Condition=" '$(Configuration)|$(Platform)' == 'Release|AnyCPU' "> 
        <DebugType>pdbonly</DebugType> 
        <Optimize>true</Optimize> 
        <OutputPath>bin\</OutputPath> 
        <DefineConstants>TRACE</DefineConstants> 
        <ErrorReport>prompt</ErrorReport> 
        <WarningLevel>4</WarningLevel> 
    </PropertyGroup> 
    <PropertyGroup Condition="'$(Configuration)|$(Platform)' == 'Dev|AnyCPU'"> 
        <DebugSymbols>true</DebugSymbols> 
        <OutputPath>bin\</OutputPath> 
        <DefineConstants>DEBUG;TRACE</DefineConstants> 
        <DebugType>full</DebugType> 
        <PlatformTarget>AnyCPU</PlatformTarget> 
        <ErrorReport>prompt</ErrorReport> 
        <CodeAnalysisIgnoreBuiltInRuleSets>false</CodeAnalysisIgnoreBuiltInRuleSets> 
        <CodeAnalysisIgnoreBuiltInRules>false</CodeAnalysisIgnoreBuiltInRules> 
        <DeployIisAppPath>Port 80/directory/dev</DeployIisAppPath> 
    </PropertyGroup> 

Solution to 500.19 internal server error while hosting Web API


Solution

The above error will pop up when you do not have the permission to access the folder/web.config file.

  •     In Windows Explorer, locate the web.config file that is associated with the Web site.
  •     Right-click the web.config file
  •     Click Properties.
  •     Click the Security tab, and then click Edit.
  •     Click Add.
  •     In the Enter the object names to select box, IUSR, click Check Names, and then click OK.
  •     Click to select the Read check box, and then click OK.
  •     In the Web.config Properties dialog box, click OK.


Solution to 500.21 internal server error while hosting Web API


Solution

One of the reasons for the error 500.21 Internal Server Error to pop up, is when ASP.NET is not installed completely in your system.
    Run the command prompt as administrator.
    Type the line in the command prompt below any one.

    %windir%\Microsoft.NET\Framework\v4.0.30319\aspnet_regiis.exe -i
    or
    %windir%\Microsoft.NET\Framework64\v4.0.30319\aspnet_regiis.exe -I


Solution to login for application pool access error is denied while hosting Web API


Solution

Create the application pool in IIS by selecting the .NET version which your project supports. When creating the site in the default application in IIS for Web API, select the application pool which you have created. The above error will pop up if the application pool which you have created has a built in account selected.

For reference - go to: "Advanced Setting->Process->Identity” of the application pool which you have created. Change the application pool identity to custom account and click on set button to provide the account credentials. Once you have set the setting, refresh/reset IIS to resolve the above error.

Access Denied Error while hosting Web API

Solution
The above error will pop up if the solution directory (folder) doesn’t have required permissions.
To resolve the issue follow the steps given in “500.19 : internal server error”.


European IIS 10 Hosting - HostForLIFE.eu :: Briefly Unavailable For Scheduled Maintenance. Check Back In A Minute

clock October 12, 2018 11:22 by author Peter

In this post, we will see how we can get rid of the error “Briefly unavailable for scheduled maintenance. Check back in a minute,” in WordPress. If you are working with WordPress, or your blog or website is made in WordPress, you may face this kind of issue whenever you are updating any plugins or updating the WordPress core. But sometimes, what happens is that even after the update process is finished, your site remains in maintenance mode. Here, I am going to share with you a quick fix, so that you can fix this issue. I hope you will like this.

Background
I always prefer to update my WordPress core and the plugins whenever there is an update. So, I faced the following issue so many times. “Briefly unavailable for scheduled maintenance. Check back in a minute.” 

So, I thought of sharing a quick fix with you for the same.


Here are the steps to remove the error," Briefly unavailable for scheduled maintenance. Check back in a minute".

Step 1: Go to your File Explorer


Step 2: Go to your ftp folder
You can either go to your ftp folder via file explorer or by using an ftp client, like FileZilla.


Step 3: Find the .maintenance file and delete
Check for the .maintenance file in the root folder and delete it.


Now, if you refresh your WordPress site, it will be running fine. Hope it helps.

Conclusion

Did I miss anything that you may think is needed? Did you find this post useful? I hope you liked this article. Please share your valuable suggestions and feedback with me.

Your turn. What do you think?

A blog isn’t a blog without comments. So, comment on it but try to stay on topic. If you have a question unrelated to this post, you’re better off posting it on C# Corner, Code Project, Stack Overflow, Asp.Net Forum instead of commenting here. Tweet or email me a link to your question there and I’ll definitely try to help if I can.


European IIS 10 Hosting - HostForLIFE.eu :: Server And Service Health Check And IP Capture For Bulk Servers

clock October 4, 2018 12:11 by author Peter

This Script will help in checking the below basic functionalities of the Bulk Servers. It will do so during Migration, Patch and Monthly Restart activities
This Script is added with the below functionalities,

  • IP Capture -- >Collects the DNSHostName,Description,DHCPEnabled,IPAddress,IpSubnet,DefaultIPGateway,MACAddress,DNSServerSearchOrder for all Enabled and IP Discovered NICs
  • Services Status -- >It checks all the Services Automatic set and not Stopped services and provides the output.
  • Server Status –- >Checks the Servers reachability and provides the output on screen
  • Server Shutdown/Reboot -- >Checks the server status and perform Bulk Shutdown / Restart at once with Event Description Keyed.

Output Samples

European IIS 10 Hosting


European IIS 10 Hosting - HostForLIFE.eu :: Load Balancing

clock September 26, 2018 11:52 by author Peter

What is Load Balancing ?
Distributing network traffic across multiple servers effectively is called Load Balancing.To meet high volumes, it generally requires adding more servers. Load Balancer routes the client requests to the servers in an optimized way and takes care that no server is overworked. If a new server is added to the group, It will start sending requests to this new server.


Load-Balancing Algorithms
Why did algorithms come into the picture ? Actually Load Balancer selects the server based on two factors,

  • periodically pinging server to check its availability.
  • defined algorithms - based on which load-balancer selects the server.

Algo 1 Least Connection (Default algorithm)
The least connection is the default algorithm to select server. Server which has the least number of active transactions is picked by Load Balancer to handle request. Load Balancer maintains records of transactions for each server. Now discuss this in detail: Let's say all the servers have the same capacity and still some of the servers are overloaded as there may be the situation that the client stayed in those servers for longer duration and connected to other severs for shorter duration. Active connections on the server where client stayed longer will pile up and hence based on the least connection algorithm Load Balancer will route the request in the server with least active connections,

Weighted Least Connections
Now let's consider the above Least Connection algorithm with different server capacities (CPU/RAM etc.). You would definitely want to allocate more requests to the higher capacity server than the lower capacity servers. Weighted Least Connection is the solution.

Let's say there are 2 servers, server 1 and server 2 and server 2 has high configuration.With this algorithm Load balancer will allocate more requests to server 2 to utilize it better. Like Least Connection this also allocates request to the server withthe least number of active connections but the higher configuration server will handle more requests based on the right proportion defined during the Load Balancer setup. Weight proportion is calculated by the server capacity. Server 1 : Capacity X, Server 2 : Capacity : 10X the weight for each server would be 1:10 .


Round Robin
Round Robin is a vastly used and simple algorithm. Load Balancer distributes requests in the cyclic order irrespective of server inefficiencies. There might be the scenario if you don't want to overload any of the servers for some reason, you may use this algorithm to give extra weight to other servers.


Both the Servers are ready to take request, suppose request comes and load-balancer routes to Server 1 then if a second  request comes it will be routed to Server 2. The third and fourth will be routed to Server 1 and 2 respectively in a cyclic order. Even if one of the server has stronger configuration i.e. RAM, CPU etc. As per Round Robin algorithm Load-Balancer will follow the cyclic order.

Algo 4 Weighted Round Robin
Like Round Robin this is also cyclic but the higher configuration server will handle more requests.Rest it is same as Weighted Least connection algorithm i.e. weight would be defined during Load Balancer setup and high weight server will handle more requests.

i.e. if weight proportion to server 1 and server to is 1:10. first 10 requests will go to server and 11th request will go to server 1 and next 10 request will go to server 2 and so on.

Algo 5 IP Hash
This algorithm generates a hash key using client and server IP addresses which means this key would be assigned to client for subsequent requests which assure that the client is routed to the same server that it was using earlier.This algorithm can be used to achieve Session Persistence or Sticky Session.

Session Persistence
In the multiple server environment a user might experience losing cart items during navigation. Persistence session or sticky session is the culprit. As you know Http is a stateless protocol which means in subsequent requests it doesn't maintain any information about the user so to identify server uses client's ip or cookie to track users session. Sticky session is to make sure all the requests goes to the same server which has its user's session tracking information.

Layer 4 & Layer 7 Load Balancing
In Layer 4 Load Balancing , Load balancer decides the server on which it will redirect the requests on the basis of the IP addresses of the origin and destination servers (Network Layer : Layer 3) and the TCP port number of the applications (Transport Layer : Layer 4).

On the other hand Layer 7 Load Balancing decides routing on the basis of OSI Layers 5, 6, and 7 which together makes Http.


European IIS 10 Hosting - HostForLIFE.eu :: How To Fix "Unrecognized attribute targetFramework" Error?

clock September 12, 2018 08:50 by author Peter

We may get the following error after publishing a website on IIS.

Parser Error Message
"Unrecognized attribute 'targetFramework'. Note that attribute names are case-sensitive."

To fix it, we need to follow the below troubleshooting steps.

  1. Check on which .NET version the application is developed. Let's assume, it's .NET 4.0.
  2. Open IIS Manager and find the Application Pool, on which your website is hosted.
  3. Go to that Application Pool and check the .NET version and change it to 4.0 accordingly by clicking on Basic\Advanced Settings.
    If .NET 4.0 is not listed, go ahead and install it.
  4. If it still won't show up, go to command prompt and fire the below command to find a list of ASP.NET versions installed:
    C:\Windows\Microsoft.NET\Framework\v4.0.30319>aspnet_regiis.exe -lv

    In the output, if .NET 4.0 is not listed, register it by firing the below command:
    C:\Windows\Microsoft.NET\Framework\v4.0.30319>aspnet_regiis.exe -I.
  5. It should show up as .NET 4.0 in the .NET Framework Version dropdown for the application pool.


European IIS 10 Hosting - HostForLIFE.eu :: Configuring Nano Server For Remote Connections

clock July 25, 2018 11:18 by author Peter

Here, we are going to connect with the Docker engine remotely using PowerShell. For this, we can either use our local machine or a VM. Before we proceed further, make sure that your Nano Server is up and running.

Step 1 Downloading the Docker Daemon and extracting them
Create a variable that references the zip file which is in the official docker website. This zip file will have the Docker engine data that is required to create the client and server. Open the PowerShell with administrator privileges and run the below given command.

This will assign the link to that variable named,

$package = "https://download.docker.com/components/engine/windows-server/cs-1.12/docker.zip"

The next step is to invoke a web request to get the link that has been referenced in the variable called. Then, the file will be stored in a temporary storage by getting downloaded from the Docker site. For this, we have to run the following command.
Invoke-WebRequest $package ` -OutFile "$env:TEMP\docker.zip" ` -UseBasicParsing

Now, we shall expand the downloaded zip file to the programming files of our machine. For this, run -
Expand-Archive -Path "$env:TEMP\docker.zip" `
-DestinationPath $env:ProgramFiles


The final step is to create an environment variable that will add the Docker directory to the path daemon. Run the command
[Environment]::SetEnvironmentVariable("Path", $env:Path + ";$($env:ProgramFiles)\Docker", [EnvironmentVariableTarget]::Machine)

Nano Server
Now, we have finished installing the Docker (client) and Dcokerd (engine) in "Program Files" folder. Check for these inside the Docker folder.

Step 2 Creating Environment variable to connect Docker easily
Here, Docker is client and Dockerd is engine. Now, we are going to configure an environment variable that will store the DNS name of our Nano Server and connect with it. For this, run the below command.
[Environment]::SetEnvironmentVariable("DOCKER_HOST","nanoserver007.southindia.cloudapp.azure.com",[EnvironmentVariableTarget]::Machine)

Note - Replace the DNS name with your Nano Server DNS or IP.

Now, open the new PowerShell console and run the command "docker version" . This will show you the client (Docker) and engine (Dockerd). This means we have created a connection in between these two services which we have actually downloaded from the Docker website.


European IIS 10 Hosting - HostForLIFE.eu :: Publish Website On IIS Using AppCmd

clock July 18, 2018 11:36 by author Peter

In this article, we will learn the most useful and powerful command line tool, AppCmd, for publishing or hosting a website on IIS. Using the AppCmd tool, we can host static as well as a dynamic website (ASP.NET Webform, MVC, Dot Net Core etc) easily.

Description
I assume you are aware of (or have knowledge of) how to Host or Publish Website in IIS using inetmgr. This will help you understand AppCmd.exe.
AppCmd.exe is the command line tool for managing IIS 7 and above. It provides an easy way to manage a website without Graphical User Interface.

Some of the things you can do with AppCmd,

  • Create and configure sites, apps, application pools, and virtual directories
  • Start and stop sites, and recycle application pools
  • Search, manipulate, export, and import IIS and ASP.NET configuration


How to Use AppCmd.exe
The AppCmd.exe command line is built on top of a set of top-level server management objects, such as Site and Application. These objects expose methods that can be used to perform various actions on those objects, and object instances expose properties that can be inspected and manipulated.

AppCmd.exe is located in the %systemroot%\system32\inetsrv\ directory. Because it is not a path of the PATH automatically, you need to use the full path to the executable when executing commands like in %systemroot%\system32\inetsrv\AppCmd.exe list sites. Alternatively, you can manually add the inetsrv directory to the path on your machine so that you can access AppCmd.exe directly from any location.

Note
Run Command Prompt as Administrator to using AppCmd.
In this article, we learn basic command to host websites.

List all available commands and actions in AppCmd
AppCmd
AppCmd /?

From the above screenshot, it is clear that Command Prompt is run as administrator and run AppCmd which return list of supported Command.
List all hosted or published websites in IIS.
    AppCmd List Site

In the above screenshot, I have run List Site command which returns all published site with bindings and state of site e.g. Started or Stop.

Create the website using AppCMD
    APPCMD add site /name:WebByAppCMD /bindings:"http/*:94:" /physicalPath:"C:\Users\Mepani\Desktop\2018 Article\Kendo Grid" -virtualDirectoryDefaults.userName:USERNAME -virtualDirectoryDefaults.password:PASSWORD

For any website hosting we require information as above like Site Name, Bindings (Protocal, hostname), Physical Path, Credential for access or permission to folder path.
Sometimes, if you don't provide access/permission to a physical path then you might be getting Access denied error.
View Newly Hosted or published website
    appcmd.exe list site "WEbByAppCMD"

Start and stop hosted or publish a website
    appcmd.exe start site "WEbByAppCMD"
    appcmd.exe stop site "WEbByAppCMD"


Delete or remove published or hosted website from IIS
    appcmd.exe delete site "WEbByAppCMD"

App CMD Create website
In the above screenshot, we have covered all the above site commands except delete. Possible issue or challenges might be faced during command line website hosting niclude,

  • Site name already created
  • Port is already in use
  • Bad Request -Invalid hostname

Hope you enjoyed this and learned a new way to host or publish a website using AppCmd.


European IIS 10 Hosting - HostForLIFE.eu :: How to Block SQL Injection On IIS 7 And Later Versions?

clock January 23, 2017 10:06 by author Peter

The discussion is specific to IIS 7 and later versions. Let's start with version IIS 7.0. It has a built-in feature that is able to filter HTTP requests. If a request is found to have contents which are unacceptable to process the request, then it will block such request there, before proceeding to process a request by a web application. This feature is useful as a mitigation technique, for such SQL Injection vulnerabilities.

Prerequisite

At first, verify the IIS version that you are using currently. If you are using earlier than IIS 7.0, then update with the latest version before applying the following configuration.

Configuring the Request Filter

To create a global filtering rule for SQL Injection, we should follow the below steps:

Step 1
Open the run window by pressing keyboard key Windows key + R and copy and paste the following code
%systemroot%\system32\inetsrv\config\applicationhost.config
 
It will open the applicationhost.config file.

Step 2

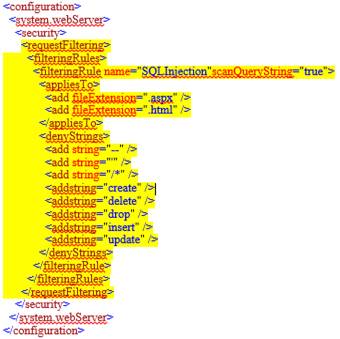
In the applicationhost.config file, identify <requestFiltering> section. Under this section, configure for the reserve keywords or reserved special characters, like DELETE, CREATE, UPDATE, INSERT, --,',/* etc. in <denyStrings> section.
Configure the file extensions for which IIS server needs to be validated. The sample code is shown below:

Step 3

Now, to save the file, go to the File menu and choose Save option.

How  does the above configuration behave in the IIS server?


With the above configuration settings, first of all, IIS will look at each incoming request for pages with .html, .aspx, or .asp extensions, to search for specific strings in the request's Query String. If the IIS server finds the specified strings, then IIS will block the request and return a 404: Not Found page to the client.
 
If you want to add a new file extension or change the existing file extensions in applicationhost.config file, you can add/remove the required file extensions in file Extension tags which lies in the <appliesTo> section. Whatever strings you are placing in the <denyStrings> section, the IIS looks for those strings. If it finds those, then it will block the request and return 404 error page to the client. You can add a new string, remove the existing string,  or change the existing string, in the <denyStrings> section.

In fact, in IIS server, you may have hosted many web applications which are running in parallel.
 
Let's say, for one of the web applications, you don't want to deny any string for the incoming request. How will you handle such  a scenario?
 
It is very simple. Create a rule in your application's config file, for which, you want to allow all such strings. If you create a rule in the application's config file, it will override the applicationhost.config file's rule. For instance, if you want to allow the string "end" for only a few applications,  and for the rest of the applications, you want to deny such a string, then follow the below steps:

Step 1: Remove the <add string="end" /> entry from applicationhost.config file.

Step 2: Add the below code into the application's config file where you want to restrict the string "end":

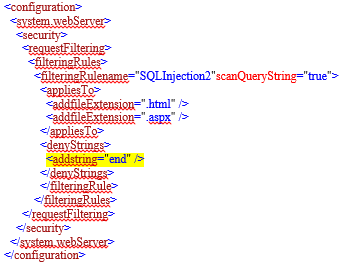
Make a note --  the name for the filteringRule tag must and should be unique and it should not conflict with a name which is in the applicationhost.config file or/and the same name with any other web.config files in the path. And, it is also possible to limit the scope of filtering rules using location tags.

Procedure to check logs for SQL Injection attempts

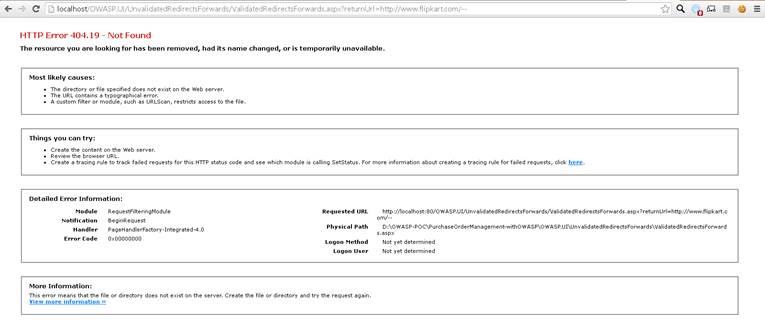
You can check the SQL injection attempt logs in IIS W3SVC logs section. filteringRule rejects such SQL injection attempts and responds with a 404 status and with a substatus 19. You have to check these logs periodically to make sure that your rule is blocking such SQL Injections for the legitimate requests.

After the configuration changes made in the applicationhost file, if you give the followingURL request in your browser, the following output will show:

http://localhost/OWASP.UI/UnvalidatedRedirectsForwards/ValidatedRedirectsForwards.aspx?returnUrl=http://www.flipkart.com/--

Output

HostForLIFE.eu IIS 10 Hosting
HostForLIFE.eu is European Windows Hosting Provider which focuses on Windows Platform only. We deliver on-demand hosting solutions including Shared hosting, Reseller Hosting, Cloud Hosting, Dedicated Servers, and IT as a Service for companies of all sizes.


About HostForLIFE.eu

HostForLIFE.eu is European Windows Hosting Provider which focuses on Windows Platform only. We deliver on-demand hosting solutions including Shared hosting, Reseller Hosting, Cloud Hosting, Dedicated Servers, and IT as a Service for companies of all sizes.

We have offered the latest Windows 2016 Hosting, ASP.NET Core 2.2.1 Hosting, ASP.NET MVC 6 Hosting and SQL 2017 Hosting.


Tag cloud

Sign in