IIS 7.5 and IIS 8.0 European Hosting

BLOG about IIS 7.5 Hosting, IIS 8.0 Hosting and Its Technology - Dedicated to European Windows Hosting Customer

IIS 8 Hosting - HostForLIFE.eu :: How to Config ASP.NET and IIS Request Length?

clock April 8, 2016 20:30 by author Anthony

In this post, i will show you how to configuring ASP.NET and IIS request length for post data. One of the most infuriating things about IIS configuration in general is how the Request length is configured in IIS and ASP.NET. There are several places that control how much content you can send to the server and over the years this setting has changed in a number of ways. The places where it's configured is not super obvious and they can be fluid because some of these features are optionally installed IIS features.

So here are the two main places where the request length is set in IIS and ASP.NET:

  • IIS Request Filtering
  • HttpRuntime maxRequestLength

Let's start with the IIS level setting, which is also a relatively new setting. It's based around the Request Filtering module in IIS which is an optional IIS component, but that is a required component if you have ASP.NET installed on your server (at least in the latest versions). If you have ASP.NET enabled in IIS the Request Filtering module is also enabled and the following settings apply.

If you don't use ASP.NET you can still install Request Filtering, but it's an optional component. So if you only use ISAPI or CGI scripts and no ASP.NET content Request Filtering may not be enabled in which case the following settings cannot be set and aren't required. Since most people do run ASP.NET at least for some sites, for all intents and purposes we can assume that the Request Filtering module is installed on IIS.

So to configure the posted content size you can use the following web.config based configuration settings:

<?xml version="1.0" encoding="UTF-8"?>
<configuration>
    <system.webServer>
     <security>
      <requestFiltering>
        <requestLimits maxAllowedContentLength="500000000"  />
      </requestFiltering>
    </security> 
   </system.webServer>
</configuration>

The maxAllowedContentLength determines the size of the POST buffer allowed in bytes. Above I've set the value to 500megs.

Or you can do the same thing in the IIS Management console using Request Filtering option in the IIS options:

As is usually the case you can apply the filtering at all levels of the IIS hierarchy – Machine, Site and Virtual/Application. Using web.config as shown above sets the settings at the Application level.

Because these are IIS settings, the value controls the IIS upload settings so they are applied against any and all requests that are fired against IIS, including ASP.NET, ASP, ISAPI extensions, CGI/FASTCGI executables, IISNodeJs requests and so on.

ASP.NET traditionally has had its own httpRuntime element in the <system.web> section that control ASP.NET runtime settings one of which is the maxRequestLength. This setting controls the ASP.NET pipeline's acceptance of file uploads and it needs to be configured in addition to the Request Filtering settings described above.

<?xml version="1.0" encoding="UTF-8"?>
<configuration>
  <system.web>
    <httpRuntime maxRequestLength="500000000" executionTimeout="120" />
  </system.web>
</configuration>

You can also use the IIS Management Console and the Configuration Manager option, to view all of the options on the httpRuntime element:

What's interesting is that the settings you see here widely mirror the settings in the Request Filtering section, and they are not inherited. It's your responsibility to make sure the settings are set correctly in both places. I recommend that you take a minute and go through the values you care about and set them correctly in both places.

The above describes ASP.NET settings. If you're using another framework, like WCF you may end up with yet another different set of settings on the WCF bindings and Endpoints. Just be aware of the framework you're using and that it too might have specific filters to restrict request size.


HostForLIFE.eu IIS 8 Hosting

HostForLIFE.eu revolutionized hosting with Plesk Control Panel, a Web-based interface that provides customers with 24x7 access to their server and site configuration tools. Plesk completes requests in seconds. It is included free with each hosting account. Renowned for its comprehensive functionality - beyond other hosting control panels - and ease of use, Plesk Control Panel is available only to HostForLIFE's customers. They offer a highly redundant, carrier-class architecture, designed around the needs of shared hosting customers.


European IIS 8 Hosting - UK :: Tips to Secure Your IIS Installation

clock November 18, 2015 20:55 by author Scott

You have just finished installing IIS on your Windows OS. You’re probably thinking that you can delve into the web development world and forget all about the underlying web server. After all, IIS is a Microsoft product so it should install with the right default configuration settings, right? That is far from true with IIS.

In this article, I will provide 8 tips that you can use to secure your IIS installation.

Move the Inetpub folder to a different drive

The Inetpub folder is the default location for your web content, IIS logs and so on. By default IIS 7 and upwards install the Inetpub folder in the system drive. It’s good practice to move the Inetpub folder to a different partition so that the web content is separate from the operating system. This folder can be moved after IIS installation is completed.

Install the appropriate IIS modules

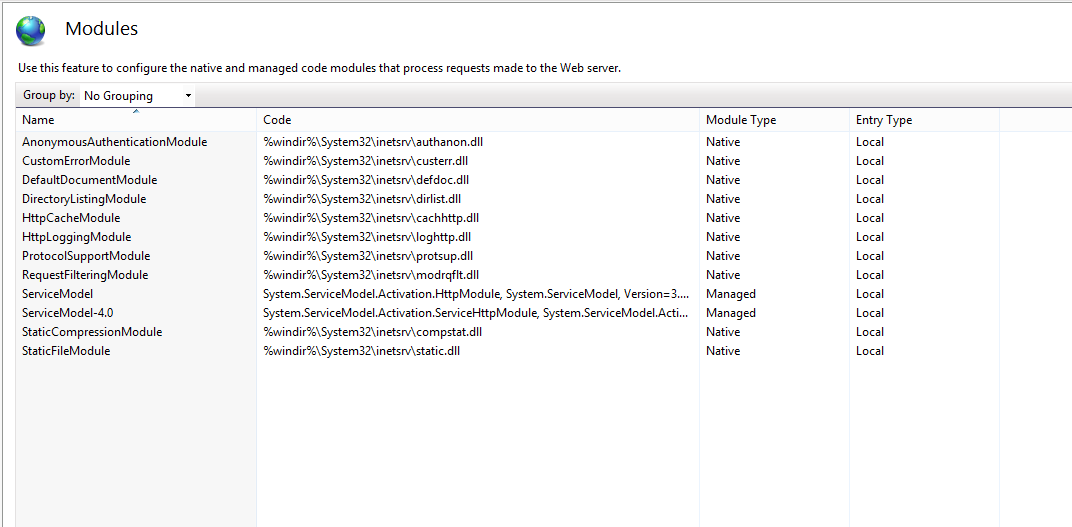
IIS includes more than 30 modules  – you should only install the ones which are needed by your web applications. Disable any modules that are not required, to minimize the capacity of potential attacks. Periodically review the modules that are installed and enabled and remove any that are no longer required. You can use IIS Manager to list all the modules that are enabled.

  • Open IIS Manager
  • Select the name of the machine to view the modules for the whole machine, or change to the specific web site to view the modules enabled for the selected site
  • Double click on ‘Modules’
  • To disable a module, click on the module from the list and select ‘Remove’ from the Actions pane
  • Confirm the removal by pressing Yes

Disable the OPTIONS method

The OPTIONS method provides a list of methods that are supported by the web server. Although this might seem beneficial, it also provides useful information to an attacker. This will provide information to an attacker at the reconnaissance stage of this attack. Therefore it’s recommended to disable the OPTIONS method completely. This can be done by denying the OPTIONS verb from the HTTP Verb request filtering rules in IIS.

  • Open IIS Manager
  • Select the name of the machine to configure this globally (or change to the specific web site for which you need to configure this)
  • Double click on ‘Request Filtering’
  • Change to the HTTP Verbs tab
  • From the Actions pane, select ‘Deny Verb’
  • Insert ‘OPTIONS’ in the Verb, and press OK to save changes
Enable Dynamic IP Restrictions

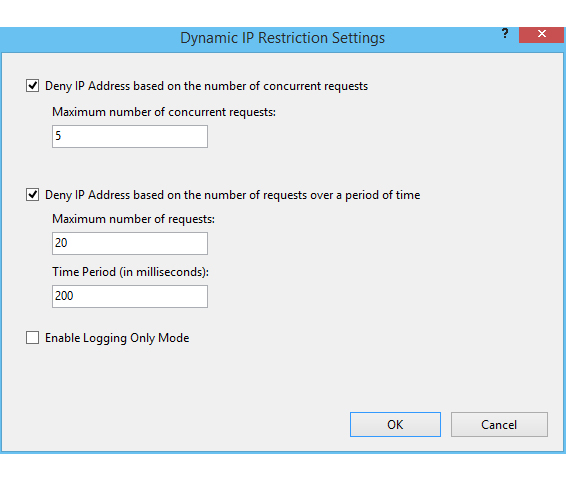
The Dynamic IP Restrictions module helps blocks access to IP addresses that exceed a specified number of requests and thus helps prevent Denial of Service (DoS) attacks. This module will inspect the IP address of each request sent to the web server and will filter these requests in order to temporarily deny IP addresses that follow a particular attack pattern. The Dynamic IP Restrictions module can be configured to block IP addresses after a number of concurrent requests or by blocking IP addresses that perform a number of requests over a period of time. Depending on your IIS version you will need to enable either the ‘IP Security’ feature or the “IP and Domain Restrictions”  as explained in this Microsoft article.
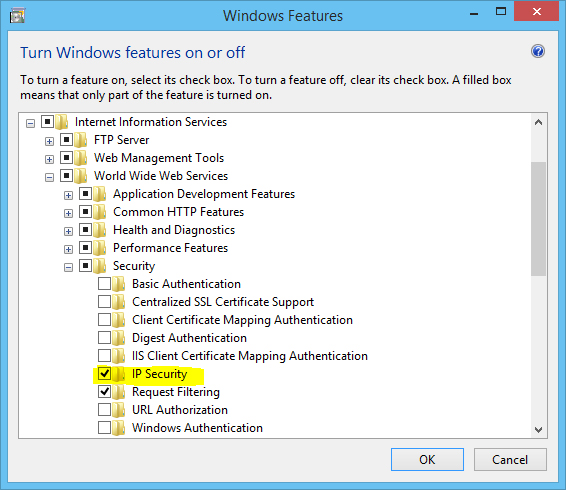
This will include the ‘IP Address and Domain Restrictions module in the IIS Manager, from where dynamic IP restrictions can be set.

  • Open IIS Manager
  • Select the name of the machine to configure this globally (or change to the specific web site for which you need to configure this)
  • Double click on ‘IP Address and Domain Restrictions’
  • From the Actions pane, select ‘Edit Dynamic Restriction Settings’
  • Modify and set the dynamic IP restriction settings as needed and press OK to save changes
Enable and Configure Request Filtering Rules

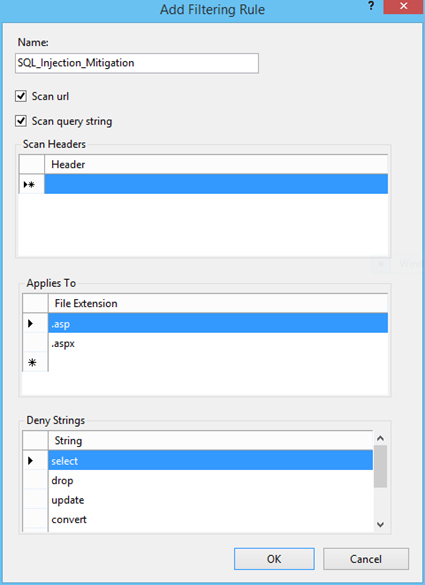
It is also a good idea to restrict the types of HTTP requests that are processed by IIS. Setting up exclusions and rules can prevent potentially harmful requests from passing through to the server, since IIS can block these requests on the basis of the request filtering rules defined. For example, a rule can be set to filter traffic for SQL Injection attempts. Whilst SQL Injection vulnerabilities should be fixed at source, filtering for SQL Injection attacks is a useful mitigation. This can be set from the Rules tab found in the Request Filtering page in IIS Manager.

  • Open IIS Manager
  • Select the name of the machine to configure this globally (or change to the specific web site for which you need to configure this)
  • Double click on ‘Request Filtering’
  • Change to the Rules tab
  • From the Actions pane, select ‘Add Filtering Rule’Set the required rules, and press OK to save changes

The rule set in the below screenshot would instruct IIS to check for the provided strings in requests for .asp and .aspx pages. IIS will then block the request if any of these strings are found.
You can also filter requests that contain things like high-bit characters or double escape characters. This and other similar filtering options are explained at http://technet.microsoft.com/en-us/library/hh831621.aspx

Enable logging

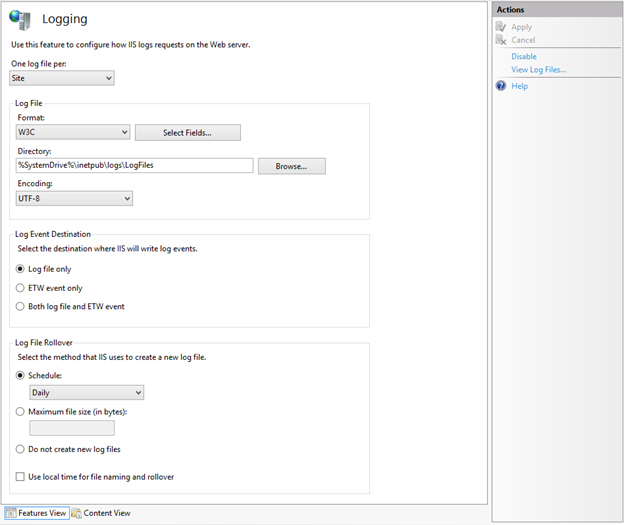
Configuring IIS logging will cause IIS to log various information from HTTP requests received by the server. This will come in handy and can give a better understanding of issues that might have occurred on your website when things go wrong. It’s the place where you will start the troubleshooting process in such situations.

The server’s logs can also be continuously or periodically monitored in order to review the server’s performance and provide optimizations if needed. This can be automated using various server monitoring tools. Make sure to keep a backup of the logs. Microsoft also provide Log Parser, which is a tool that can be used to query and retrieve specific data from IIS logs. Additionally, log consolidation tools prove useful for consolidating and archiving data from logs in a more meaningful way.

IIS logging can be enabled and configured from IIS Manager > select the machine name or the specific site you want to configure > Logging. Since these log files might grow quite large, it would be a good idea to start a new file periodically.
Use the Security Configuration Wizard (SCW) and the Security Compliance Manager (SCM)

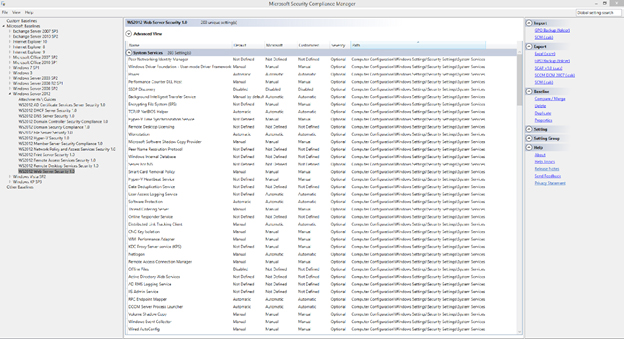
Both of these Microsoft tools can be used to test your IIS security. The Security Configuration Wizard (SCW) runs different checks and provides advice and recommendations on how to boost your server’s security. The Security Compliance Manager (SCM) tool performs security tests on your server and compares server configurations to predefined templates as per industry best practices and security guide recommendations.
Updates

Finally, ensure that you keep up to date with the latest updates and security patches. It is interesting how often this basic security requirement is missed. The majority of hacks affecting the web server occur on unpatched servers. This just demonstrates how important it is to always keep your IIS web server up to date.


European IIS Hosting - Amsterdam :: How to Host WCF Service in IIS 8 (Windows Server 2012)

clock April 25, 2013 06:56 by author Scott

This blog cover brief information how to host your WCF service in IIS8 (Windows Server 2012).

Here is the solution.

Server Roles

1. First make sure you have enabled IIS function and .net 3.5 in Features.
For the IIS features, please remember to enable ASP.NET3.5 and ASP.NET 4.5

2. Second, check the IIS Hostable WebCore
3. Finally, I think the most important is this:

Check Application Sever->Web Server (IIS) Support

I have also check the HTTP Activation in Windows Process Activation Service Support, but I do not know if it is required.

For the freatures,

1. Check all items in .NET 3.5
2. Check WCF Service in .NET 4.5

That’s it.

Last but not least, I have register the WCF Service from

C:\Windows\Microsoft.NET\Framework\v3.0\Windows Communication Foundation\ServiceModelReg.exe –i

Run the above in command line.


European IIS Hosting - Amsterdam :: IIS 7 Url Rewrite Rules for SEO and Security

clock December 14, 2012 09:02 by author Scott

With IIS 7 url rewriting and redirecting has never been easier thanks to Microsoft’s Url Rewrite module. The rewriting is done by rules which are specified in the web.config under <system.webserver> element. Using IIS Manager you can use the Url Rewrite gui to create and maintain your rules.

You can also just put the rules directly into the web.config without using the gui. For example:

<system.webserver>
 <rewrite>
 <rules>
 <rule name="xyz">...blah...</rule>
 </rules>
 <rewrite>
</system.webserver>

IIS 7 Url Rewrite WWW

One of the most common needs for SEO is to force your site to use www for all page requests so that search engines will go to www.mydomain.com instead of domain.com. This is very easy to do with IIS 7′s Url Rewrite. Here is the rule:

<rewrite>
<rules>
<rule name=”Redirect to www” patternSyntax=”Wildcard” stopProcessing=”true”>  
<match url=”*” />
<conditions>
<add input=”{HTTP_HOST}” pattern=”abc.com” />
  </conditions>
 <action type=”Redirect” url=”http://www.abc.com/{R:0}” />
</rule>
</rules>
<rewrite>

This works really well and it is a completely seamless experience for your web site visitors.  Here is how the rule looks in the IIS Manager gui.

IIS 7 Url Rewrite HTTP to HTTPS

Probably the 2nd most common use of Url Rewrite is for sites that have SSL certificates installed and need to seamlessly redirect page requests using the certificate for either the entire site or a particular folder. Here is the Url Rewrite rule for redirecting requests on the entire site. You simply detect if the request is not secure and then redirect to the secure channel:

<rewrite>
 <rules>  <rule name="HTTP Redirect to HTTPS" enabled="true" stopProcessing="true">  <match url="(.*)" ignoreCase="false" />  <conditions>  <add input="{HTTPS}" pattern="off" />  </conditions>  <action type="Redirect" url="https://{HTTP_HOST}/{R:1}" appendQueryString="true" redirectType="Permanent" />  </rule>  </rules>  </rewrite>

IIS 7 Url Rewrite HTTP to HTTPS on Subfolder

The example above is great but running your entire site in HTTPS will have a performance impact so you don’t need to do it unless there is a specific business requirement for it. So then we need a rule to redirect requests to HTTPS for just one folder. In this example we’ll use a folder called “/secure”. In this instance we use the same rule as above however now we only want page requests for the “secure” folder. This is done by modifying the “match url” element.

<rewrite>
 <rules>
  <rule name="HTTPS on subfolder" enabled="true">
         <match url="(^secure/.*)" ignoreCase="false" />
         <conditions>
             <add input="{HTTPS}" pattern="off" />
         </conditions>
         <action type="Redirect" url="https://{HTTP_HOST}/{R:1}" appendQueryString="true" redirectType="Permanent" />
     </rule>
 <rules>
 <rewrite>


We’ve covered 3 of the most common uses of IIS 7 Url Rewrite but if you notice the rules above are really for redirecting and not url rewriting.


About HostForLIFE.eu

HostForLIFE.eu is European Windows Hosting Provider which focuses on Windows Platform only. We deliver on-demand hosting solutions including Shared hosting, Reseller Hosting, Cloud Hosting, Dedicated Servers, and IT as a Service for companies of all sizes.

We have offered the latest Windows 2016 Hosting, ASP.NET Core 2.2.1 Hosting, ASP.NET MVC 6 Hosting and SQL 2017 Hosting.


Tag cloud

Sign in