Redesigning a website or creating a new version of an existing web page is a common task for web developers and webmasters. If you have an established web site with good search engine traffic it’s critical to be able to redirect that search traffic from the old pages to the new pages even if the name of the page or the page location changes. Even if that content is great and plenty of people have linked to your page/s, all your hard work won’t matter if search engines like Google are unaware of the new location or people are trying to link to the old, non-existent, page location.
The way to properly communicate these changes to search engines is to use a 301 Redirect which tells search engines the new permanent location of the content.
Using 301 redirects used to be a manual process where you had to place code in the old page using Javascript in the page body or add a special metatag like this:
<meta http-equiv=”refresh” content=”0;url=http://www.domain.com/newpage.html”>
As you can imagine, this can be a tedious and time consuming task if you have several of pages to update. One additional downside to the old manual redirects option is performance. The old page still has to be accessed in order for the redirection to take effect.
URL Rewrite Module with IIS7
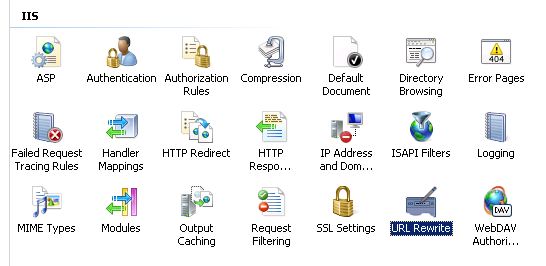
Now there’s an easier solution, and one that offers better performance. Starting with IIS 7 one can implement different kinds of url rewriting and redirecting with ease by using the URL Rewrite Module. The various rules can be configured using the IIS 7 Manager GUI or by directly editing the web.config. To open the URL Rewrite Module simply double click the URL Rewrite icon on your site properties as shown below.

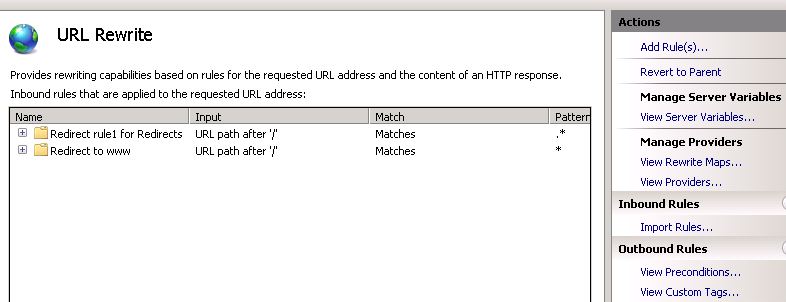
From there you will be able to maintain your existing rules or add new ones as seen in this picture.

This is a pretty easy way to create server-side rules for rewriting and redirecting, but what happens when you have 30 or 40 legacy URLs that need to be redirected to new pages? Do you have to enter each one manually? Of course not. The solution to that is to use a URL Rewrite Map.
URL Rewrite MAP
By using a URL Rewrite Map it has never been easier to create and maintain multiple 301 redirects for different pages on your web site. The rewrite rules are stored in the <system.webServer> section of your web.config so you can quickly make changes as needed.
Here is all the code you need to accomplish this:
<system.webServer>
<rewrite>
<rewriteMaps>
<rewriteMap name=”Redirects”>
<add key=”/test.aspx” value=”/test2.aspx” />
<add key=”/aboutus.aspx” value=”/about” />
</rewriteMap>
</rewriteMaps>
<rules>
<rule name=”Redirect rule1 for Redirects”>
<match url=”.*” />
<conditions>
<add input=”{Redirects:{REQUEST_URI}}” pattern=”(.+)” />
</conditions>
<action type=”Redirect” url=”{C:1}” appendQueryString=”false” />
</rule>
</rules>
</rewrite>
</system.webServer>
In the example above I’m performing a 301 redirect on the test.aspx file to test2.aspx file. There’s also a 301 redirect for the aboutus.aspx file to folder called /about, however, in this case it’s important to note that the /about folder will also need a default page or else a 404 error will result.
As you add more URLs to your Rewrite Map you’ll notice that your web.config can become a bit cluttered. The solution to this will be to store the redirect rules in an external file. Let’s call this file myrewritemaps.config. This file will now contain this code block:
<rewriteMaps>
<rewriteMap name=”Redirects”>
<add key=”/test.aspx” value=”/test2.aspx” />
<add key=”/aboutus.aspx” value=”/about” />
</rewriteMap>
</rewriteMaps>
In your web.config you add the following line of code under the <rewrite> section referencing the external config file:
<rewriteMaps configSource=”myrewritemaps.config” />
Your web.config will now look nice and clean like this:
<system.webServer>
<rewrite>
<rewriteMaps configSource=”myrewritemaps.config” />
<rules>
<rule name=”Redirect rule1 for Redirects”>
<match url=”.*” />
<conditions>
<add input=”{Redirects:{REQUEST_URI}}” pattern=”(.+)” />
</conditions>
<action type=”Redirect” url=”{C:1}” appendQueryString=”false” />
</rule>
</rules>
</rewrite>
</system.webServer>
Here is a 3rd party site which offers a free test to ensure your 301 redirect rules are working:
http://www.ragepank.com/redirect-check/
There is no real limit on how many URLs can be configured for redirecting with the URL Rewrite Map. You should perform regular search engine analysis to see when the new URLs have been picked up. Once the old URL is no longer indexed and traffic has dropped off you could remove it from your map.