IIS 7.5 and IIS 8.0 European Hosting

BLOG about IIS 7.5 Hosting, IIS 8.0 Hosting and Its Technology - Dedicated to European Windows Hosting Customer

IIS 8.0 Hosting Germany - HostForLIFE.eu :: How To Access A Folder With No Default Document

clock October 31, 2015 01:02 by author Rebecca

In this post, I will tell you how to access a folder with no document in IIS. It's easy, just follow these steps:

Step 1

Create a folder called Original--IIS-Files

Step 2

Move all the files into folder Original-IIS-Files

Step 3

Navigate to your web server. By default, the Web Server will render the following message when the folder has no default documents.

And you're done! Simple, right?

HostForLIFE.eu IIS 8.0 Hosting
HostForLIFE.eu is European Windows Hosting Provider which focuses on Windows Platform only. We deliver on-demand hosting solutions including Shared hosting, Reseller Hosting, Cloud Hosting, Dedicated Servers, and IT as a Service for companies of all sizes. We have customers from around the globe, spread across every continent. We serve the hosting needs of the business and professional, government and nonprofit, entertainment and personal use market segments.


IIS 8.0 Hosting France - HostForLIFE.eu :: How to Configure DNS Record for Sub Domain

clock October 16, 2015 11:34 by author Rebecca

In this article, I will tell you how to configure DNS record for sub domain.

Step 1

Open your domain control panel then go to DNS manager.

Step 2

Add following A records for domain.com and www.domain.com which point to IIS server IP address:

domain.com  IN A XXX.XXX.XXX.XXX
www.domain.com  IN A XXX.XXX.XXX.XXX
service.domain.com IN A XXX.XXX.XXX.XXX

First two rows will ensure that whenever user browse domain.com or www.domain.com at that time it will be routed to IIS server and rest will be take care by IIS then it will serve public site. The third row in above is important for next step.

Step 3

Now add following wildcard CNAME record:

*.domain.com  IN CNAME service.domain.com

In above wildcard entry ensure that any sub domain request for domain.com will be routed to server which is pointed by service.domain.com.

In IIS setup, you have to edit website binding to include domain.com and www.domain.com as host header, by this way you can tell IIS that any request from domain.com and www.domain.com will be handled by this particular website. So, whenever user browse domain.com or www.domain.com it is serving public website without any problem.

While in case of sub domain it is showing error that “The connection was reset” this is because IIS does not found host header entry for requested domain in any websites. So, you need to add host header entry in service.domain.com website created in IIS setup because service.domain.com is actual website which is going to serve hosted service application when it is browse from sub domain. Use the following code to add host header entry programmatically in IIS:

private string GetWebSiteId(string serverName, string websiteName)

{

    string result = "-1";


    DirectoryEntry w3svc = new DirectoryEntry(string.Format("IIS://{0}/w3svc", serverName));


    foreach (DirectoryEntry site in w3svc.Children)

    {

        if (site.Properties["ServerComment"] != null)

        {

            if (site.Properties["ServerComment"].Value != null)

            {

                if (string.Compare(site.Properties["ServerComment"].Value.ToString(),

                                        websiteName, true) == 0)

                {

                    result = site.Name;

                    break;

                }

            }

        }

    }


    return result;

}


private void AddHostHeader(string hostHeader, string websiteID)

{

    DirectoryEntry site = new DirectoryEntry("IIS://localhost/w3svc/" + websiteID);

    PropertyValueCollection serverBindings = site.Properties["ServerBindings"];


    serverBindings.Add(hostHeader);


    Object[] newList = new Object[serverBindings.Count];

    serverBindings.CopyTo(newList, 0);


    site.Properties["ServerBindings"].Value = newList;

    site.CommitChanges();

}  


AddHostHeader("127.0.0.1:80:user1.domain.com", GetWebSiteId("localhost", "service.domain.com"));

HostForLIFE.eu IIS 8.0 Hosting
HostForLIFE.eu is European Windows Hosting Provider which focuses on Windows Platform only. We deliver on-demand hosting solutions including Shared hosting, Reseller Hosting, Cloud Hosting, Dedicated Servers, and IT as a Service for companies of all sizes. We have customers from around the globe, spread across every continent. We serve the hosting needs of the business and professional, government and nonprofit, entertainment and personal use market segments.


IIS 8.0 Hosting Ukraine - HostForLIFE.eu :: How to Configure ASP.NET Application on IIS

clock October 13, 2015 12:46 by author Rebecca

In this article, I'm going to explain how to set Windows Authentication to configure ASP.NET application in IIS. To make Windows authorize application you need to make changes in web.config as well as IIS manager.

Configuring Windows Authentication

<system.web>
   <authentication mode="Windows"/>
</system.web>

  1.     Start Internet Information Services (IIS).
  2.     Right-click your application’s virtual directory, and then click Properties.
  3.     Click the Directory Security tab.
  4.     Under Anonymous access and authentication control, click Edit.
  5.     Make sure the Anonymous access check box is not selected and that Integrated Windows authentication is the only selected check box.

If you will put Anonymous check box checked then it will not take windows login Id for the user. e.g. string windowsLogin = Page.User.Identity.Name;

Now, your application will work on windows authentication.

Here is the example code:

protected void Page_Load(object sender, EventArgs e)
{
   try
     {
       //Start:
        if (Session["EmployeeCode"] == null)
          {
             string windowsLogin = Page.User.Identity.Name;
             //Check user is valid or not from data base
            //I am putting simple condition by hard code value
            if (windowsLogin=='ValidUser')
                 {
                   Session["EmployeeCode"] = userId;
                 }
             else
                {
                  Session.Abandon();
                  Response.Redirect("InvalidUser.aspx", false);
                }
         //End
     }
    catch (Exception ex)
    {
       //Handel exception here
       Throw;
     }
}

It's done! You will get user from windows credential and check with existing user with database. If user is valid go ahead other wise navigate the user to Invalid page.

HostForLIFE.eu IIS 8.0 Hosting
HostForLIFE.eu is European Windows Hosting Provider which focuses on Windows Platform only. We deliver on-demand hosting solutions including Shared hosting, Reseller Hosting, Cloud Hosting, Dedicated Servers, and IT as a Service for companies of all sizes. We have customers from around the globe, spread across every continent. We serve the hosting needs of the business and professional, government and nonprofit, entertainment and personal use market segments.


IIS 8.0 Hosting - HostForLIFE.eu :: How to Setting Up IIS On Your Windows 10 OS ?

clock September 23, 2015 21:28 by author Peter

In this article, let me show you how to setting up IIS on your Windows 10 OS. I am using Windows 10 Enterprise edition.

First, open the browser and just type the url http://localhost/ shown on the below picture:

When you pressing Enter, it will throw page not found error.
Now I am going to search for IIS manager. Not found!
Then, open Control Panel -> Click Programs.
Under Programs and Features, click Turn Windows features on or off.

The popup will appear as you can see on the following picture:

Just check the Internet Information Services and its related features.
Under Internet Information Services check the following folders:

  • FTP Server
  • Web Management Tools
  • World wide web services
  • Application development features
  • Common HTTP Feature
  • Health and Diagnostics
  • Perfomance Feature
  • Security

Then click OK to complete the installation of new features.
Click Restart now to apply changes to complete the IIS feature installation.

After restart, you will see the IIS webserver option on the All Programs menu. Now, open the browser then write on address bar http://localhost.

Internet Information Services (IIS) successfully configured!

HostForLIFE.eu IIS 8.0 Hosting
HostForLIFE.eu is European Windows Hosting Provider which focuses on Windows Platform only. We deliver on-demand hosting solutions including Shared hosting, Reseller Hosting, Cloud Hosting, Dedicated Servers, and IT as a Service for companies of all sizes. We have customers from around the globe, spread across every continent. We serve the hosting needs of the business and professional, government and nonprofit, entertainment and personal use market segments.


IIS 8.0 Hosting Spain - HostForLIFE.eu :: How to Use ASP.NET to Configure Costum Error Page in IIS

clock September 23, 2015 11:55 by author Rebecca

In this post, we're gonna explain how to use ASP.NET to configure custom error pages in IIS (Internet Information Server).  If we configure .NET Error Pages at the site level, ASP.NET stores the settings in the site’s web.config file. Since these settings are stored in the web.config file they are portable and can be easily moved to another server with the site’s content.

Step 1

Open Internet Information Services (IIS) Manager.  Select your website. Note: This could also be set at the server level and applied to all sites on the server. DoubleClick on the “.NET Error Pages” icon.

The .NET Error Pages features view will be displayed.

Step 2

Click the “Edit Feature Settings” link to enable this feature. The “Edit Error Page Settings” dialog box will appear.

In order to change the default mode, we must also specify a “Default Page”. This page will be used for all status codes that are  not otherwise defined. In this example, we are using a generic custom error page to trap all other errors. Once you enter the absolute URL for the default error page click OK.  It may be a good idea to use a static HTML page here just in case ASP.NET is not functioning properly.
By default server errors are shown when logged on locally to the IIS server and custom errors will only be used from remote sessions. You will want to change this to “On” if you are logged on locally to the IIS server. Otherwise, it will display detailed server errors, and not our custom error pages.

Step 3

Next we will explicitly define the 404 Error code. To get the browser to throw a 404 error, we pointed it to a file on the test site that does not exist. As you can see in the following image the friendly HTTP 404 error page was shown in IE9. A friendly HTTP 404 Error in IE9:

Step 4

On the .NET Error Pages Actions menu click the Add link.

Step 5

The “Add Custom Error Page” dialog will appear. This is where you define individual error pages per status code. For this example, you will add a custom page for the HTTP 404 Error.

Now that you have turned on the feature and added a custom page for the 404 status code, you can verify it is working. To verify visit a page that does not exist. In this example, you will use http://mysite.com/deletedfile.aspx. You can see in the following image that the custom error page was shown.

Step 6

As mentioned above this can also be managed from the site’s web.config file. Consider the following configuration section from our site’s web.config file.

<configuration>
  <system.web>
    <customErrors defaultRedirect=”http://mysite.com/errors/Error.aspx” mode=”RemoteOnly”>
       <error redirect=”http://mysite.com/errors/404.aspx” statusCode=”404″ />
    </customErrors>
  </system.web>
</configuration>

Everything you set in the GUI can easily be set directly in the web.config. This will also allow you to setup .NET Error Pages, if you are on a shared hosting Plan.

HostForLIFE.eu IIS 8.0 Hosting

HostForLIFE.eu is European Windows Hosting Provider which focuses on Windows Platform only. We deliver on-demand hosting solutions including Shared hosting, Reseller Hosting, Cloud Hosting, Dedicated Servers, and IT as a Service for companies of all sizes. We have customers from around the globe, spread across every continent. We serve the hosting needs of the business and professional, government and nonprofit, entertainment and personal use market segments.


IIS 8.0 Hosting Italy - HostForLIFE.eu :: How to Reset/Restore IIS Settings to its Default in Windows?

clock September 17, 2015 11:54 by author Peter

IIS usually works well in Windows. but sometimes, we have a tendency to customize it to serve a required setting for a specific web project. If we install Xampp in Windows, default Xampp configuration forces IIS to decline its normal beaver or any custom configuration could be the cause.

So let’s see however we are able to reset IIS to its default settings. i'm working with Windows 8 and IIS 8.

Reset IIS

Go to 'Control Panel\Programs’.
Click 'Turn Windows feature on or off'.

Now, uncheck these two check boxes.
Click OK
And then, reboot/restart machine.

Again Go to 'Control Panel\Programs'.
Click 'Turn Windows feature on or off'.
Check these two check boxes.
Click ok.
Reboot/Restart machine.

Go to 'C:\Windows\System32\Drivers\etc'.
Open the 'hosts' file with Notepad.

Remove the Custom IP configurations, if any.
Save the edited hosts file ‘Ctrl+s’.

If Windows doesn’t let you save the 'hosts' file, copy the hosts file to another location.
Do edit and save.

Replace the 'hosts' file at 'C:\Windows\System32\Drivers\etc' with your edited 'hosts' file and we are ready to go.
"turn windows features on" An error has occurred. Not all of the features were successful.

HostForLIFE.eu IIS 8.0 Hosting
HostForLIFE.eu is European Windows Hosting Provider which focuses on Windows Platform only. We deliver on-demand hosting solutions including Shared hosting, Reseller Hosting, Cloud Hosting, Dedicated Servers, and IT as a Service for companies of all sizes. We have customers from around the globe, spread across every continent. We serve the hosting needs of the business and professional, government and nonprofit, entertainment and personal use market segments.


IIS 8.0 Hosting Spain - HostForLIFE.eu :: Configuring Self-Signed Certificate

clock September 9, 2015 09:25 by author Rebecca

In this post, we're going to be very basic and straight forward few clicks on how to create an dconfigure self-signed certificate in IIS 7 or later.

Steps here mentioned are based on IIS 8, but it would be almost same on IIS 7 as well.

Step 1

To get started open IIS and select Server Certificates feature.

It will display list of all installed Server Certificate on web server.

Step 2

To create new self-signed certificate, click on Create Self-Signed Certificate in action pane.

It will open dialog box where you can specify friendly name for server certificate and certificate store for newly created SSL certificate.

Just specify name of the certificate, certificate store and click on OK. So, you are half way done, you have created Self-Signed Certificate with IIS, but still half way to go. After creating certificate, you need to bind it with websites then only we will be able to browse local IIS website with HTTPS.

Step 3

To bind websites with this certificate, select website in IIS and right click on it and select Edit Bindings.

It will open Site Bindings dialog where we can see binding information for selected websites. By default you will find one HTTP binding listed here.

Step 4

Click on Add button to Add new binding for selected website.

Step 5

Here, select binding type HTTPS and select newly created SSL certificate from drop down and click on OK. And congrats, you have added HTTPS binding to website which uses self-signed certificate in local IIS. To verify open and browse https://localhost.

Hope this quick post would be helpful!

HostForLIFE.eu IIS 8.0 Hosting
HostForLIFE.eu is European Windows Hosting Provider which focuses on Windows Platform only. We deliver on-demand hosting solutions including Shared hosting, Reseller Hosting, Cloud Hosting, Dedicated Servers, and IT as a Service for companies of all sizes. We have customers from around the globe, spread across every continent. We serve the hosting needs of the business and professional, government and nonprofit, entertainment and personal use market segments.


IIS 8.0 Hosting Portugal - HostForLIFE.eu :: How to Use IIS URL Rewrite Module to Set Preferred Domain

clock September 2, 2015 06:22 by author Rebecca

In this post, we will learn how you can use IIS URL Rewrite extensions to redirect domain.com to www.domain.com. IIS URL Rewrite extensions enables web administrator to enforce powerful rules to transform complex URLs into simple and consistent Web addresses. As well it also helps to produce user and search engine friendly URLs.

As you all know that by default, you can access website with or without WWW. For e.g. browsing hostforlife.eu and www.hsotforlife.eu will open same website. This means there are two different web addresses are available for one website and hence website’s SEO ranking will be distributed between these two addresses. To overcome these SEO ranking distribution, we can force all web traffic to redirect either domain.com or www.domain.com. Google web masters tool also allow web master to set preferred domain for indexing website URLs. So conclusion is that redirecting all web traffic to only one primary domain or canonical domain can improve SEO ranking. Just follow these steps with IIS.

Step 1

Connect to website through IIS manager and click on URL Rewrite icon.

Step 2

In Actions pane click on Add Rules.

Step 3

In Add Rules dialog box click you can find several predefined rule template. Click on canonical domain name template under search engine optimization section.

Step 4

It will open dialog box to select primary domain for website. Choose appropriate options.

Step 5

Press ok. You have done it. Now all your web traffic will be redirected to primary domain you have selected. And you can see added rewrite rule in list pane. But just using predefined rule template is not enough for web administrator. We should also dig into rule settings done by this rule template. For examine settings of created rule select rule in list pane and double click on it or click on Edit Rules link in Action Pane.

Step 6

It will open edit inbound rule window. Scroll down to bottom of window. There you will find Action sections. In action sections, there is one drop down named Action Type. Default value of Action Type is redirect. Expand Action Type drop down to see different actions available for this rule.

Step 7

And below action type drop down there is another drop down Redirect Type. Default value of this is Permanent (301). Expand drop down to see list of available other redirect type.

Setting redirection type Permanent (301) will cause to send HTTP 301 status code and then after it will redirect to primary domain. So search engine can index appropriate URLs.

HostForLIFE.eu IIS 8.0 Hosting
HostForLIFE.eu is European Windows Hosting Provider which focuses on Windows Platform only. We deliver on-demand hosting solutions including Shared hosting, Reseller Hosting, Cloud Hosting, Dedicated Servers, and IT as a Service for companies of all sizes. We have customers from around the globe, spread across every continent. We serve the hosting needs of the business and professional, government and nonprofit, entertainment and personal use market segments.


IIS 8.0 Hosting UK - HostForLIFE.eu :: How to Set Canonization of the URL in IIS using URL Rewrite Module

clock August 4, 2015 08:08 by author Rebecca

When we publish a website on the internet, typically we record more internet domains (.com, .net, etc.) in order to encourage the maximum possibility that users reach our pages. Having a site that responds to different URL, however, it is not indicated by a point of view of SEO, as it involves a fractionation of the total hit among the various possible addresses, and a best practice is to make sure that all these addresses redirigano to a standard domain name. This process, which is called a URL Canonicalization, can be easily implemented in IIS 7 and above.

First, the initial situation will be similar to that in the figure, that is when we have a Site with binding in a number of hosts that will include various domains, even in the versions with and without "www.". If desired, we can add additional ones through the Bindings option.

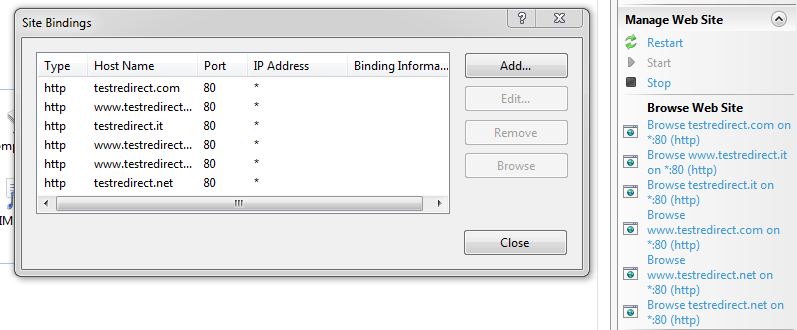
With such a configuration, IIS responds to calls in each of these domains, but obviously keeping unchanged the address displayed by the browser. To solve this problem, we can use a form called IIS URL Redirect Module, which can automatically download and install via the Web Platform Installer.

The configuration can be done either by using IIS Manager web.config. In the first case, just double click on URL Rewrite, as shown, to open a mask through which to create our rewriting rules.

From www.testredirect.com to testredirect.com

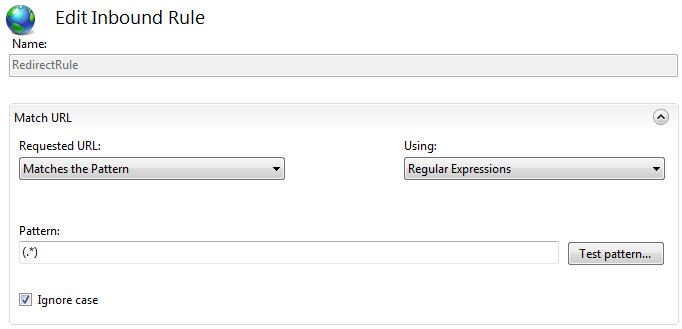
Once you add a new Blank rule, we must first specify which URLs are to be taken into account by the module applying the rule. This type of setup is indicated by regular expression and, in our case, we will use the pattern (. *) To handle all possible URL.

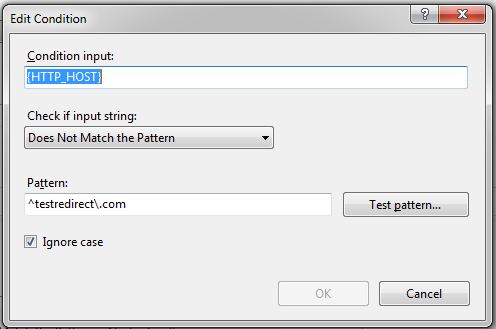
The second step is to indicate, within the group Conditions, the condition for which the rule will have to act. Therefore, we add a new condition to apply to the host component of the URL and check that does not match the canonical (in our example "testredirect.com"), indicating quset'ultimo through a regex ^ testredirect\.com$.

The last step is to specify the action to be taken (section Action), which in particular will be a type Permanent Redirect to the address shown.

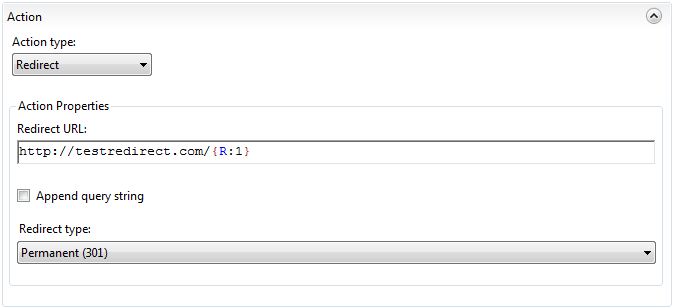
The suffix {R: 1} and the Append flag query string make sure that any file names or query string parameters are appended to the new address so generated.

This configuration can also be set from the web.config section system.webServer:

<system.webServer>
    <modules runAllManagedModulesForAllRequests="true" />
      <rewrite>
          <rules>
              <rule name="RedirectRule" stopProcessing="true">
                  <match url="(.*)" />
                  <conditions>
                      <add input="{HTTP_HOST}" pattern="^testredirect\.com"
                            negate="true" />
                  </conditions>
                  <action type="Redirect" url="http://testredirect.com/{R:1}"
                          appendQueryString="false" />
              </rule>
          </rules>
      </rewrite>
</system.webServer>

From testredirect.com to www.testredirect.com

To redirect reverse, simply change the regular expression and the redirect url in the web.config as in the example below:

<system.webServer>
    <modules runAllManagedModulesForAllRequests="true" />
      <rewrite>
          <rules>
              <rule name="RedirectRule" stopProcessing="true">
                  <match url="(.*)" />
                  <conditions>
                      <add input="{HTTP_HOST}" pattern="^www\.testredirect\.com"
                            negate="true" />
                  </conditions>
                  <action type="Redirect" url="http://www.testredirect.com/{R:1}"
                          appendQueryString="false" />
              </rule>
          </rules>
      </rewrite>
</system.webServer>

Since our rule applies to all the different hosts by canon law, the redirect will be performed automatically for all other domain names (eg. Www.testredirect.net) that we recorded between the bindings of IIS Site.

HostForLIFE.eu IIS 8.0 Hosting
HostForLIFE.eu is European Windows Hosting Provider which focuses on Windows Platform only. We deliver on-demand hosting solutions including Shared hosting, Reseller Hosting, Cloud Hosting, Dedicated Servers, and IT as a Service for companies of all sizes. We have customers from around the globe, spread across every continent. We serve the hosting needs of the business and professional, government and nonprofit, entertainment and personal use market segments.


IIS 8.0 Hosting Romania - HostForLIFE.eu :: How to Prevent Remote Linking Image using URL Rewrite Module

clock July 1, 2015 05:51 by author Rebecca

When a website is particularly popular, it is possible that its contents, for example images, videos and so on in your site, are shown on another website beacuse most of people took those files and linked it to their site. Perhaps without any authorization and permission, you didn't realize about it. In the end, the result is the files will appear on sites that do not belong to us. Maybe this condition is annoying, it will enlarge your expense (bandwidth) of your site. But don't worry, you can have some return in terms of visibility or impressions of the ads especially images and videos that you have in your pages.

Fortunately, using URL Rewrite Module for IIS 7 or above is pretty straightforward to create a rule to handle this problem. All you have to do, once installed, you have to include this section in the web.config:

<system.webServer>
  <modules runAllManagedModulesForAllRequests="true" />
  <rewrite>
    <rules>
      <rule name="Avoid remote linking" enabled="true" stopProcessing="true">
        <match url="(.*)" />
        <conditions>
          <add input="{REQUEST_FILENAME}" matchType="IsFile" />
          <add input="{REQUEST_FILENAME}" pattern="\.(png|jpg)" />
          <add input="{REQUEST_FILENAME}" pattern="blocked\.png" negate="true" />
          <add input="{HTTP_REFERER}" pattern="^http://www\.testredirect\.com/.*$" negate="true" />
        </conditions>
        <action type="Rewrite" url="/blocked.png" appendQueryString="false" />
      </rule>
    </rules>
  </rewrite>
</system.webServer>

As you can see, You can apply the node condition to all requests for files whose extensions are png or jpg (of course you can customize this setting at will). The last condition, in particular, allows you to see through the value of the variable HTTP_REFERER server, if the request was originated by a page that belongs to us or not. If not, the action is designated to perform a rewrite the URL to be processed, by sending the contents of a special image that you have provided (in your case, blocked.png) in a place that originally requested.

HostForLIFE.eu IIS 8.0 Hosting
HostForLIFE.eu is European Windows Hosting Provider which focuses on Windows Platform only. We deliver on-demand hosting solutions including Shared hosting, Reseller Hosting, Cloud Hosting, Dedicated Servers, and IT as a Service for companies of all sizes. We have customers from around the globe, spread across every continent. We serve the hosting needs of the business and professional, government and nonprofit, entertainment and personal use market segments.


About HostForLIFE.eu

HostForLIFE.eu is European Windows Hosting Provider which focuses on Windows Platform only. We deliver on-demand hosting solutions including Shared hosting, Reseller Hosting, Cloud Hosting, Dedicated Servers, and IT as a Service for companies of all sizes.

We have offered the latest Windows 2016 Hosting, ASP.NET Core 2.2.1 Hosting, ASP.NET MVC 6 Hosting and SQL 2017 Hosting.


Tag cloud

Sign in